


As an engineer who’s spent countless hours with as many smart home devices as I can get my hands on, I developed a fascination with how robot vacuum cleaners work and transform home cleaning. My own robotic vacuum cleaner has saved me many hours of cleaning time and given me some insights into robotics.
Below, I’ll break down exactly how these intelligent machines work, from navigation systems and brush mechanics to smart features and maintenance requirements. If you’re wondering how robotic vacuums work and how to get the most bang for your buck, keep reading.
How a Robotic Vacuum Cleaner Works
Let me walk you through the ingenious systems that make these automated cleaning devices function in today’s homes.
Core Components and Basic Operation
A typical robot vacuum operates through several integrated components working as a cohesive cleaning system. Inside the shell sits a motor, battery, processor, collection bin, and various sensors.
Most robot vacuums have two motorized wheels for movement and steering and a third wheel for balance. The cleaning mechanism typically includes a main brush roll, side brushes, and a suction motor. Once you turn it on, the vacuum pulls out of its dock, sweeps across your floors to pick up debris, and returns when it is finished (or has a low battery).
Motor and Suction Systems
What really matters in these machines is the quality of the motor. Good ones deliver between 1,500-2,500 Pa of suction power — just right for daily cleaning without killing the battery. I’ve found higher-end units often use separate motors: one for movement and another just for suction. This design prevents the sluggish performance you’ll notice in budget models when they hit thick carpet.
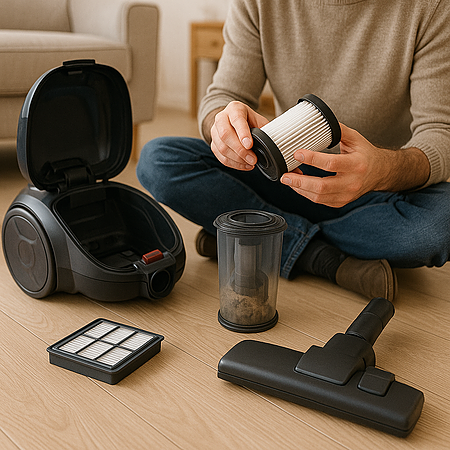
Brush Systems
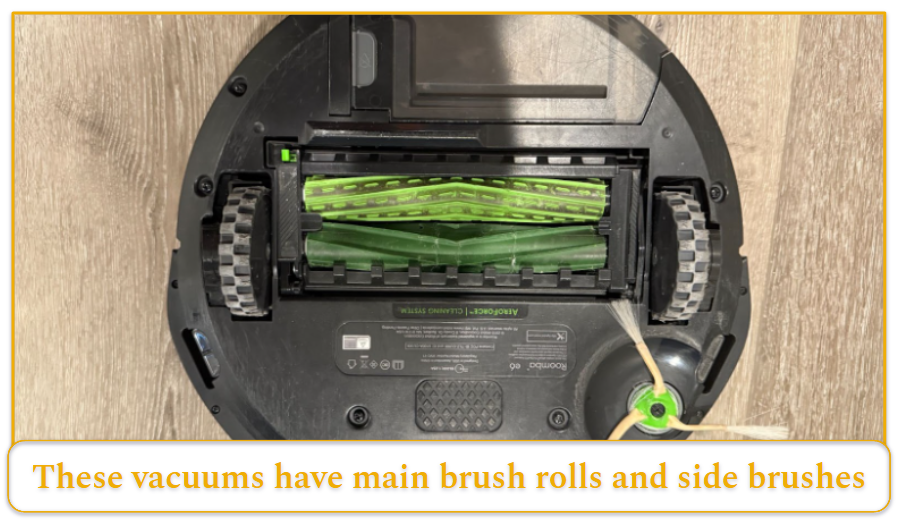
The brush setup creates a night and day difference in cleaning results. Most vacuums combine:
- Main brush roll: My experience shows rubber-bristle combinations resist hair tangling best
- Side brushes: These extend the cleaning reach by sweeping edge debris toward the center suction path
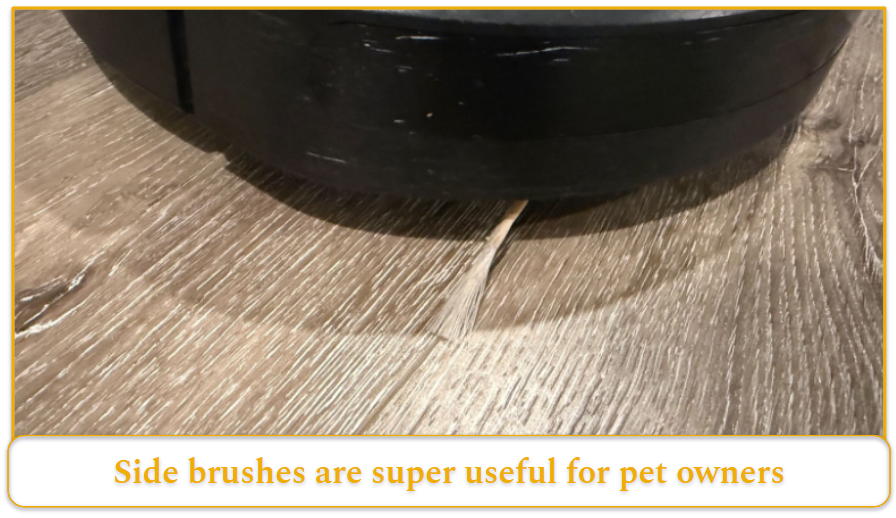
For pet owners or anyone with long hair in the house, look for brushes you can pop out without tools. My newest model has this feature – I’ve cut my maintenance time in half compared to my old vacuum.
Navigation Technologies
How your robot finds its way around determines whether your floors get truly clean. I’ve worked with three main types:
Bounce Navigation
The basic systems use bumper sensors that only detect obstacles through physical contact. They clean in seemingly random zigzags, changing course after bumping into things. They’re fine for studio apartments with minimal furniture, but get lost in complex rooms. My first-ever robot vacuum used this system and routinely missed entire sections of my living room.
Visual Navigation
Camera-equipped models capture visual information to spot obstacles and remember locations. They clean more methodically than bounce systems and recognize furniture landmarks. These work well in average homes with good lighting, but struggle in darkness or with reflective surfaces. Fair warning, though – if privacy matters to you, skip these models. They literally take pictures inside your home.
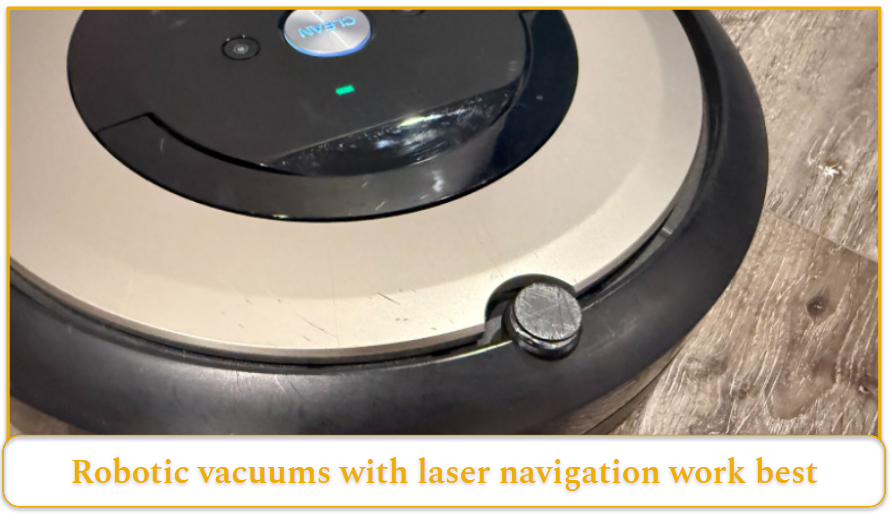
Laser Navigation
LIDAR-based systems shoot laser beams to measure distance to objects, building precise maps even in complete darkness. After testing all three types, I’m convinced these clean the most effectively. My current LIDAR model maps my entire house in a precise grid pattern, rarely missing spots. For multi-story homes, you’ll want this technology since it can store multiple floor layouts – something I’ve come to appreciate in my two-story house.
Mopping Functionality
Some fancy vacuums double as mops. These include a water tank, pump system, and attachable microfiber pad. The pad gets a controlled amount of moisture as the robot moves. Just don’t expect deep cleaning – they can’t press down hard enough. I learned this lesson when my combo unit couldn’t handle dried coffee spills. For homes with hardwood or tile, pick a model with electronic water control instead of gravity systems – they won’t leak and damage your floors.
Docking Station Technology
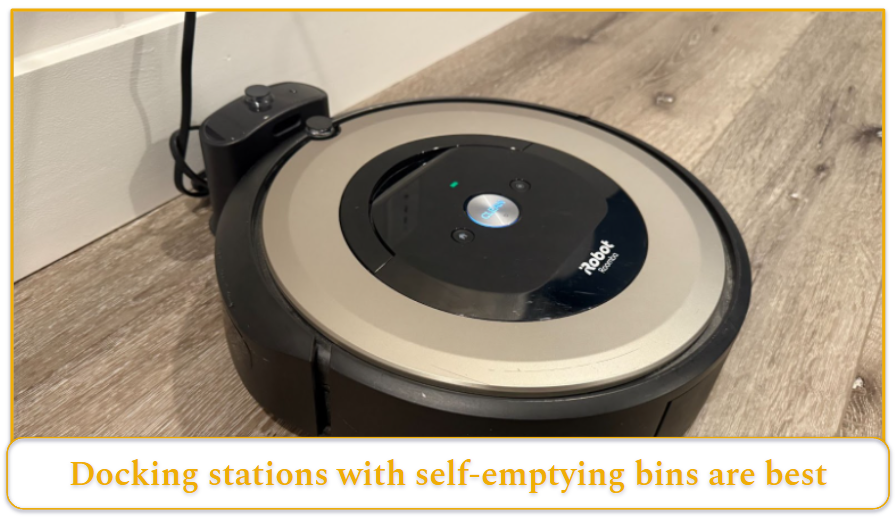
The home base does more than charge. Basic stations just recharge batteries, but self-emptying bases include secondary vacuum motors that suck debris from the robot into a larger bag. After trying both types, I’ll never go back to models without self-emptying bins – they’re worth every penny, especially with pets. The newest models I’ve tested even clean brush rolls and wash mop pads automatically, solving the biggest maintenance headache.
Flooring Compatibility
Robot vacuum cleaners work well with most flooring materials, including hardwood, laminate, tile, and most carpets. My testing shows that models with rubber brush rolls clean hard floors more thoroughly than bristle-only designs, as they create better floor contact and resist hair tangling.
On the other hand, carpets present a greater challenge, with performance varying dramatically by pile height. Low-pile carpets and area rugs work well with most robots, though suction power becomes much more important here.
Medium to high-pile carpets demand robots with specialized features – deeper-treaded wheels to prevent getting stuck, stronger motors (3,000+ Pa suction), and auto-carpet detection that increases power when carpet is detected.
If you have multiple floor types in your home (particularly high-pile carpets), I recommend robot vacuums with auto-height adjustment and surface detection, which seamlessly transition between surfaces without manual intervention.
Pet-Specific Considerations
Pet owners face unique challenges that standard robot vacuums often struggle to handle effectively. I have a black lab that seems to shed all year long. I’ve found that pet hair quickly overwhelms basic brushrolls, leading to tangles, jams, and reduced suction.
For households with furry companions, look specifically for models with anti-tangle brushrolls (typically featuring silicone fins or self-cleaning designs) and higher-capacity dust bins, preferably with self-emptying capabilities to minimize your exposure to allergens when emptying.
Beyond hair management, advanced models include specialized filters that capture pet dander and allergens rather than recirculating them back into your home. The difference is noticeable; my newest vacuum with HEPA filtration has significantly reduced both the visible dust and the allergic reactions of house guests.
If your pets occasionally have accidents, avoid camera-based navigation systems that might mistake dark pet waste for shadows — LIDAR systems paired with specific pet waste avoidance technology offer the best protection against the dreaded “pooptastrophe” that early robot vacuum owners discovered the hard way.
Noise Levels
The operational sound of robot vacuums varies dramatically between models and directly impacts when and where you can use them. Budget models I’ve tested typically operate at 65-70 decibels (about as loud as a normal conversation), while premium units with better sound insulation run quieter at 50-60 decibels.
Many newer models feature night modes that reduce suction power for quieter operation, trading some cleaning efficiency for the ability to run during sleeping hours. My current robot vacuum operates at just 55 decibels on standard mode, making it quiet enough to run during video calls without disruption. This is a marked improvement over my previous model that had me constantly apologizing to colleagues for the background noise.
Robotic Vacuum Smart Features
Today’s robot vacuums pack Wi-Fi connectivity and app controls that transform them from simple cleaners into genuine home assistants. Here’s what makes the difference in daily use:
1. Scheduled Cleaning
Program specific days and times for automatic cleaning runs. This feature has saved me countless hours – I’ve set mine to run while I’m at work. Some vacuums now let you create different schedules for each room, so high-traffic areas like my kitchen get daily cleaning while guest rooms only need weekly attention.
2. Remote Control
App connectivity puts your vacuum’s controls right on your phone. Beyond basic commands, better models show real-time location, cleaning reports, and power settings to balance suction with battery life. This feature saved my sanity last month when I got a text that friends were dropping by unexpectedly – I fired up the vacuum from my office, and my floors were spotless by the time I got home.
3. Obstacle Avoidance & Custom Mapping
New AI-powered sensors help vacuums identify and avoid common household objects:
- Pet waste detection (thank goodness – my neighbor’s robot once smeared dog poop throughout their entire first floor)
- Cords and cables (no more unplugging your TV)
- Liquid spills
- Stray shoes and clothing
Maps now recognize furniture placement and temporary obstacles, and let you create no-go zones through the app. I’ve tested five different models with object recognition, and even the best ones still miss about 10% of obstacles – much better than the original versions, but not perfect.
4. Virtual Assistant Integration
Voice control through Alexa, Google Assistant, or Siri makes operation hands-free. Just say “clean the kitchen” instead of opening an app. Some brands have their own voice systems with detailed feedback and can handle complex commands. My current model responds to “clean under the dining table then go charge” – perfect when I’ve dropped food during dinner.
5. Room-Specific Cleaning
Target only the areas that need attention with custom cleaning patterns. This lets you:
- Clean up a spill without running a whole-house cycle
- Give extra passes to your entryway after rainy days
- Use softer cleaning for antique rugs
- Skip your home office during important video calls
I use this feature almost daily – yesterday my kid spilled cereal in the kitchen, and I sent the vacuum just to that spot while we got ready for school.
6. Smart Battery Management
The newest power systems track energy usage and adjust cleaning patterns based on remaining battery. When running low, smarter models head back to charge just enough, then pick up exactly where they left off. My previous vacuum would die mid-cleaning, forcing me to start over – a problem completely eliminated with my current model.
Cost Considerations and ROI
The robot vacuum market spans from basic $150 entry models to feature-packed $1,200+ premium units, with a sweet spot for reliable performance around $400-600. After owning a few different price-tier models, I’ve found the mid-range vacuums offer the best value, typically including mapping capabilities, decent suction power (2000+ Pa), and app control without the premium price tag.
Factoring in maintenance costs matters too – replacement filters ($20-40 annually), brush rolls ($20-30 every 6-12 months), and side brushes ($10-15 every 3-4 months) add roughly $100 yearly to ownership costs.
The real return comes in time savings: my robot vacuum saves me about 4 hours of manual vacuuming weekly – translating to over 200 hours annually that I can spend on projects I actually enjoy rather than pushing a vacuum around.
How to Set Up a Robotic Vacuum Cleaner
Getting your robot vacuum set up right the first time makes a huge difference in how well it works long-term. Here’s what I’ve learned from setting up a few different models:
- Pick the perfect dock location — Back it against a wall with 3 feet of open space on both sides and 5 feet in front. This gives your robot runway space to find its home. Keep it away from stairs and sunny windows – both confuse the sensors. I mounted a small shelf specifically for my dock in my hallway.
- Clear the runway before first use — Grab anything small from the floor, clip loose cords, and move flimsy rugs that might jam the brushes. I skipped this step once and spent 20 minutes untangling my phone charger from the vacuum’s brush roller.
- Give it a full first charge — Let it charge 4-6 hours before the maiden voyage, even if the indicator shows full sooner. This properly primes the battery. The manual won’t tell you this, but it can add months to battery life.
- Set up the app connection — Each brand works differently, but usually involves scanning a QR code or pressing button combinations. Test the connection before moving on – my second robot had connectivity issues that needed troubleshooting before it would map correctly.
- Watch the first mapping run — Start the initial cleaning when you’ll be around for a while. The first run focuses more on mapping than deep cleaning. Stay nearby to rescue it from tight spots, but don’t pick it up unless it’s truly stuck – this erases its mapping progress. I hover like a nervous parent during first runs.
- Fine-tune the map — After the first run, check the app and make adjustments: name your rooms, block off problem areas, and set cleaning preferences. I label rooms by function rather than traditional names – “dog area” makes more sense than “back hallway” for my needs.
- Create your maintenance schedule — Set reminders for brush cleaning, filter changes, and bin emptying. I get monthly filter alerts and weekly brush check reminders since my long-haired dogs fill brushes quickly.
- Run room-specific tests — Target clean individual rooms to help your robot learn trouble spots. Fix physical obstacles where possible instead of creating software barriers. I rearranged my dining chairs to create cleaner paths after watching my vacuum struggle.
The first week with your robot vacuum is basically training camp. My current vacuum got noticeably better at navigating my home after about five cleaning cycles.
Robotic Vacuum Cleaner Maintenance
Taking care of your robot vacuum extends its life and keeps your floors cleaner. After having my robot vacuum stop multiple times mid-cleaning due to poor maintenance, I’ve developed this care routine:
- Brushes, filters, and side sweepers wear out fastest. I keep extras on hand and replace them before they fail completely.
- Most people overlook cleaning the cliff sensors – when dust builds up on these, your vacuum might refuse to cross thresholds or stop working on dark floors altogether. Found this out the hard way when my robot suddenly “saw” cliffs everywhere on my black kitchen tiles.
Here’s what works for me:
- Right after cleaning: Empty the dust bin and pull hair from the brush roll. Quick wipe of sensors with a dry cloth. It takes about 45 seconds.
- Every weekend: Pop out and clean the main brush. Tap dust from the filter. Wipe charging contacts. Check wheels for hair – this prevents most movement problems.
- Once a month: Swap filters if using non-washable types. Clean wheel assemblies and blow out cliff sensors with compressed air. Take apart the dust bin for a deep clean. Check for clogs in the suction path.
- Every three months: Replace worn brushes. Clean the fan compartment – this part gets nasty! Check battery connections and give the bottom a thorough wipedown.
For models with mops, never store them with wet pads or water in the tank. I made this mistake once and found mold growth after a vacation. Check the rubber gaskets around water tanks regularly – these crack over time and cause leaks.
Common Problems and Troubleshooting
Even the most advanced robot vacuums eventually encounter operational issues. Based on repairing dozens of units, I’ve identified these recurring problems and their fixes:
- Navigation errors — When your vacuum suddenly can’t find its way home, first clean all sensors with a microfiber cloth. If the problem persists, delete saved maps and remap your home. Dark-colored floors sometimes read as stairs to worn cliff sensors; applying small pieces of white tape over the sensors often fixes this.
- Reduced suction — Check for clogs in the brush assembly and suction channel before assuming motor failure. Remove the bottom plate and brush assembly completely, then use compressed air to clear blockages in the internal duct leading to the dust bin.
- Battery degradation — When run time suddenly drops, perform a battery reset by fully draining then charging for 12 hours uninterrupted. If performance doesn’t improve, most batteries can be replaced for $40-70 — far cheaper than a new vacuum.
- Erratic movement or spinning — This usually indicates a stuck wheel or sensor confusion. Flip the vacuum over and manually rotate each wheel, listening for grinding sounds. Clean wheel housings thoroughly and lubricate bearings with a single drop of sewing machine oil.
- Wi-Fi connection issues — Position your router centrally in your home, as connection stability affects mapping accuracy. For persistent connection problems, reset your vacuum’s network settings completely rather than repeatedly trying to reconnect to a problematic network.