Skip a few cleanings, and your ice picks up that weird freezer taste. Worse, bacteria and mold start colonizing the wet surfaces inside. Most ice maker “failures” I heard about during my years working with refrigeration OEMs came down to neglected maintenance. Mineral scale on evaporator plates and slime in water reservoirs accounted for the bulk of the warranty claims I saw.
The whole process takes about half an hour. I’ve split this guide into two parts: one for countertop machines and one for the ice maker built into your fridge. They need different approaches.
Supplies You’ll Need
- White vinegar or a commercial ice maker cleaner (nickel-safe formula)
- Warm water
- Soft cloths or microfiber towels
- Soft-bristle brush or old toothbrush
- Mild dish soap
- Small bucket or basin
- Dry towels
- Replacement water filter (if due)
Commercial cleaners work faster on heavy mineral deposits. Vinegar handles routine maintenance fine. If you live in a hard water area, a commercial descaler every few months helps. I’ve used both over the years, and the commercial stuff is worth the extra few dollars if you have well water or high mineral content.
How To Clean a Freestanding or Countertop Ice Maker
Countertop units don’t connect to a water line. You fill the reservoir manually, which means cleaning is entirely on you.
Step 1: Unplug and Empty
![[MK]: How to Clean an Ice Maker](https://www.market.com/wp-content/uploads/2026/01/-mk-how-to-clean-an-ice-maker-1.png)
Pull the cord from the outlet before you start. Remove all the ice from the bin and empty the reservoir. Most machines have a drain plug somewhere on the side or bottom. Use it if yours does. It’s much easier than wrestling a wet, sloshing machine across the kitchen.
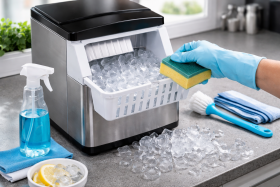
Step 2: Wash Removable Parts
![[MK]: How to Clean an Ice Maker](https://www.market.com/wp-content/uploads/2026/01/-mk-how-to-clean-an-ice-maker-2.png)
Start by removing the ice basket. Your unit probably has a drip tray as well. Some models also let you remove the reservoir entirely. Warm water and dish soap are all you need for washing. Use a soft cloth only.
I’ve seen what happens when people attack these parts with steel wool or green scrub pads. Scratched plastic develops grooves, and those grooves give bacteria a place to hide.
Step 3: Clean the Reservoir
![[MK]: How to Clean an Ice Maker](https://www.market.com/wp-content/uploads/2026/01/-mk-how-to-clean-an-ice-maker-3.png)
Mix one part white vinegar with ten parts warm water and pour it up to the fill line. Let it sit for 15 to 20 minutes. Then use a soft brush to scrub the walls, focusing on corners and seams.
Back when I worked with OEMs, we’d open units that looked spotless at first glance. Run a finger along those tucked-away edges, though, and you’d find slime every time.
Step 4: Run a Cleaning Cycle
![[MK]: How to Clean an Ice Maker](https://www.market.com/wp-content/uploads/2026/01/-mk-how-to-clean-an-ice-maker-4.png)
Most countertop units don’t have a dedicated clean mode, so you’ll create your own. Plug the machine back in with the vinegar solution still inside and run one ice-making cycle. Discard that ice.
This step flushes the solution through internal water lines and across the evaporator plate, which is where ice actually forms. Skip it, and your ice will still taste off. Any buildup on that plate freezes directly into the cubes.
Step 5: Rinse
![[MK]: How to Clean an Ice Maker](https://www.market.com/wp-content/uploads/2026/01/-mk-how-to-clean-an-ice-maker-5.png) Dump the vinegar solution and refill the reservoir with plain water. Run two or three additional cycles, discarding the ice each time. You want all vinegar residue gone before you start using the ice again.
Dump the vinegar solution and refill the reservoir with plain water. Run two or three additional cycles, discarding the ice each time. You want all vinegar residue gone before you start using the ice again.
Step 6: Wipe and Dry
![[MK]: How to Clean an Ice Maker](https://www.market.com/wp-content/uploads/2026/01/-mk-how-to-clean-an-ice-maker-6.png)
Unplug the unit again. Wipe the exterior, lid, and controls with a damp cloth, then go back over everything with a dry towel. Don’t leave moisture behind.
A closed-up machine with lingering dampness becomes a mold incubator, especially in humid kitchens. My neighbor learned that the hard way. He cleaned his unit, closed it up, and left it in his garage for a week. When he opened it again, green fuzzy spots had formed around the reservoir rim.
Step 7: Reassemble
![[MK]: How to Clean an Ice Maker](https://www.market.com/wp-content/uploads/2026/01/-mk-how-to-clean-an-ice-maker-7.png)
Put all the parts back in place, plug the machine in, and add fresh water. The whole job takes about 30 minutes, most of which is just waiting while the machine cycles.
How To Clean a Refrigerator Ice Machine
Fridge ice makers connect directly to your water supply. There’s no reservoir you can dump. Since the evaporator sits inside your freezer, the cleaning method changes.
Step 1: Turn Off the Ice Maker
Find the power switch. Some units have a physical toggle right on the ice maker. Others bury it in the refrigerator’s digital settings menu. Turn it off before you start.
Step 2: Remove the Ice Bin
Slide or lift the ice storage bin out of the freezer. Some models require you to pull up and out at an angle. Others slide straight forward. Dump the ice or save it in a cooler. Scrub the bin with soapy water, rinse it, and set it on a towel to dry while you work on the rest.
Step 3: Clean the Ice Maker Assembly
With the bin removed, you’ll see the full ice maker assembly. Look for frost buildup, discoloration, or crusty residue. Dampen a cloth with the same one-to-ten vinegar solution and wipe down all accessible surfaces. Keep liquid away from wiring, sensors, and the motor.
There’s usually a plastic arm that sweeps across the ice mold to eject finished cubes. That part collects grime over time, so wipe it carefully. Some refrigerator models allow you to remove the ice mold for deeper cleaning. Check your manual to see if yours does.
Step 4: Check the Water Supply Line
The water inlet valve and supply line live behind the fridge. Pull the unit out and take a look at least once a year. Sediment from your water supply can gunk up the valve screen and restrict water flow.
If your cubes have gotten smaller or the machine takes forever between batches, a clogged screen might be the issue. I’ve fixed plenty of “broken” ice makers just by cleaning that little screen.
Step 5: Replace the Water Filter
Dirty filters restrict water flow and force the ice maker to work harder. After the filter media is saturated, it stops trapping contaminants and lets them pass straight through. Manufacturers typically say replace it every six months. I’d shorten that to three or four months if your water is hard or you burn through a lot of ice.
Where’s the filter? It depends on the fridge. Common spots include the base grille, inside the refrigerator compartment, or near the rear water connection. After you install a fresh filter, run a couple of gallons through the dispenser. You’ll see some black specks at first. That’s just loose carbon and it’s harmless, but most people prefer not to see it in their glass.
Step 6: Clean the Surrounding Area
Wipe down the freezer walls and shelves in the area around the ice maker. Clear away any frost creeping toward the unit. If frost keeps coming back, you may have a door seal issue or a temperature control problem. This is a separate issue, but it’s worth looking into.
Step 7: Turn It Back On
Replace the ice bin and turn the ice maker back on. It needs a few hours to resume normal production. Throw away the first batch or two since those cubes may carry cleaning residue or loosened particles.
Why It’s Important To Clean an Ice Maker
Ice makers stay wet, and any place water sits becomes prime real estate for mold, yeast, and bacteria. I saw plenty of neglected units during my OEM days. Just a few months without cleaning produced biofilm that would make you question every restaurant ice cube you’ve ever had.
Mineral scale causes mechanical problems as well. Calcium and lime deposits coat evaporator plates and tubing, insulating surfaces where heat transfer needs to happen. The compressor works harder, energy use rises, and parts wear out faster. If scale builds up enough, it can choke off water flow and shut the machine down entirely.
Routine cleaning pays off. The machine lasts longer, ice tastes the way it should, and small issues get spotted before they turn into repair bills.
Cleaning Takeaways
You probably already have everything you need to clean your ice maker already sitting under your sink. Set aside time every couple of months and clean it. Your ice will taste better, and the machine will stay reliable.
From my years working with refrigeration OEMs, I can tell you that most ice maker repairs stem from neglect rather than defective parts. Scale buildup, reservoir slime, and clogged filters are the most common failure points. They’re all preventable with basic maintenance. The 30 minutes you spend cleaning now saves you the headache of a machine that quits or produces funky-tasting cubes.