


Kettle looking crusty? Limescale is usually the culprit. I’ve spent years as an engineer and use my electric kettle daily, so I’ve tested nearly every cleaning method out there. Most take under 15 minutes.
Stop buying expensive descaling products – simple household items work better. Check your manual first since some warranties prohibit certain cleaning agents.
Cleaning supplies you need:
- White vinegar or citric acid
- Baking soda
- Soft sponge or cloth
- Old toothbrush
- Microfiber cloth
- Dish soap
- Lemon (optional)
How To Clean Your Kettle: Complete Guide
Most kettle issues trace back to mineral deposits and buildup on the heating element. Years of engineering work taught me one thing – five minutes of prevention beats an hour of scrubbing. These methods handle everything from light maintenance to stubborn buildup.
See the common cleaning tasks below.
Removing Limescale Buildup
Hard water leaves minerals that crystallize on heating elements, creating that white, flaky mess. To clean:
- Mix equal parts water and white vinegar
- Fill the kettle halfway and boil
- Let it sit for 15–20 minutes
- Dump and rinse thoroughly
- Repeat if white flakes remain
Deep Cleaning the Heating Element
Concealed heating elements hide gunk underneath. Once you’ve done the vinegar treatment:
- Mix baking soda with water into a paste
- Use an old toothbrush and scrub gently around the element base
- Rinse several times because any residue ruins the taste
I learned the hard way – leftover baking soda makes tea taste bitter.
Descaling With Vinegar
Full-strength vinegar tackles heavy buildup.
- Fill the kettle with pure white vinegar and boil
- Let cool completely; it usually takes 1-2 hours (the acid needs time to break down thick deposits)
- Rinse well afterward
- Boil plain water three times to eliminate the vinegar smell
I recommend opening your windows as the smell tends to linger.
Descaling With Citric Acid
I prefer citric acid over vinegar for two reasons: speed and smell. Cleanup is easier with fewer rinse cycles needed. I made the switch after my wife complained about the vinegar smell taking over the kitchen. I recommend buying food-grade citric acid powder online since it costs less than coffee.
- Mix 1–2 tablespoons per liter of water
- Boil the mixture
- Let it sit for 20 minutes
- Rinse thoroughly
Cleaning the Exterior (Stainless Steel)
Fingerprints and water spots are the bane of stainless steel.
- Wipe with a damp microfiber cloth and dish soap
- Dry immediately to prevent streaks
- For stubborn spots, use a baking soda paste (always scrub with the grain)
Since my kettle lives on the counter, I clean the exterior weekly.
Cleaning the Filter and Spout
Filters catch sediment until they get clogged.
- Pull the filter out
- Soak it in vinegar for 30 minutes
- Scrub gently with a toothbrush (the spout takes patience)
- Grab a bottle brush or pipe cleaner to reach inside
Hard water cities need monthly filter cleaning. Mine clogs about every three weeks.
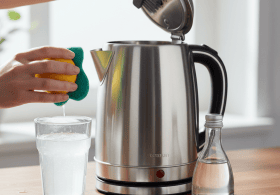
Removing Hard Water Stains
Brown or orange stains mean there’s iron in your water. For these:
- Squeeze lemon juice into the kettle
- Add water and boil
- Let cool
- Scrub with a sponge
The stains are harmless, just ugly.
Getting Rid of Odors
Brand-new kettles often smell like plastic or manufacturing chemicals. To eliminate them:
- Pour in water with two tablespoons of baking soda
- Boil and pour out
- Repeat until the smell disappears
This took three cycles for my current kettle. If your kettle has persistent odors after descaling means there’s still vinegar residue. You can easily fix this by just rinsing the kettle a few more times.
Cleaning Rust Spots
Rust forms where chrome plating chips or at screw points. For light rust, you can usually save the kettle:
- Scrub gently with baking soda paste
- Rinse thoroughly
For deep rust, replacement is safer since rust flakes in water aren’t healthy. My previous kettle developed rust after I dropped it and cracked the interior coating.
Cleaning the Detachable Base and Contacts
Dust and drips on the base can lead to poor electrical contact and slower boiling. Keep it running smoothly by:
- Unplug the kettle before cleaning
- Wipe it with a damp cloth (never submerge electrical components)
- Clean the metal contacts with rubbing alcohol on a cotton swab
Corroded contacts cause heating failures. I clean mine monthly after noticing slower boil times.
Dealing With Stubborn Mineral Deposits
If your kettle’s buildup won’t budge with normal descaling, a stronger approach will do the trick:
- Pour in vinegar and add three tablespoons of salt
- Boil the mixture
- Let it sit overnight
- Scrub with a bottle brush
Repeat if needed. Week-long buildup comes off easier than month-old neglect.
Cleaning Glass Kettles
Glass shows every water spot and mineral stain.
- For the interior, regular descaling prevents visible buildup
- For the exterior, window cleaners work perfectly
The transparency makes people think glass stays cleaner in general. Wrong. Glass needs more frequent cleaning to look decent.
Cleaning Plastic Kettles
Plastic kettles stain from tea and coffee.
- Use baking soda paste for most discoloration
- For tougher stains, soak in diluted bleach (1 tablespoon per liter) for 30 minutes
- Rinse thoroughly afterward
Personally, I stay away from plastic kettles. They hold onto smells. After a while, they get this taste that never goes away.
Removing Discoloration
Blue-green stains come from copper in old pipes. Brown stains mean tannins from tea.
- For copper deposits, use vinegar
- For tannin stains, drop two denture-cleaning tablets in warm water. Let it fizz for an hour and rinse
Kettle Maintenance & Care
Regular maintenance prevents heavy cleaning sessions. My electric kettle is five years old and still works like new. Monthly care takes minutes and saves hours of scrubbing later.
- Descale regularly. Hard water areas need monthly descaling. Elsewhere, every three months is fine. Not sure which you have? White residue appearing within a week means hard water. Soft water areas see buildup after months.
- Empty after each use. After each use, dump any leftover water. Letting it sit speeds up the formation of mineral deposits.
- Avoid overfilling. Never fill past the max line. Overfilling causes boil-overs. Water seeps into the base. I’ve seen this ruin the electrical components.
- Dry after filling. A quick wipe prevents water stains, especially on stainless steel.
- Use fresh water each time. Reboiling concentrates dissolved minerals. Filtered water helps extend the time between deep cleans.
- Store with the lid open. Trapped moisture grows mildew. My first kettle developed a musty smell from being in closed storage – lesson learned.
- Replace when necessary. Interior rust, cracking plastic, or electrical faults all mean it’s time for a new kettle. When calcification on the heating element won’t come clean anymore, replacement is overdue. This typically happens after 7–10 years without consistent care.