


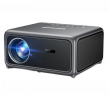


Espresso machines aren’t just for caffeine addicts. They’re for aficionados who appreciate crema, heat control, and rich, balanced shots, and can help home baristas or newcomers create café-worthy coffee in their own kitchens.
If you’re a beginner trying to pick a machine for your home use, you need to know about pressure systems, heating, and build quality. This guide will walk you through espresso machine specifications and help you find a machine that suits your skill level, kitchen, and coffee taste.
How to Choose an Espresso Machine (Quick Answer)
Choose an espresso machine based on skill level, brew style, and features you’ll actually use. Beginners benefit from automatic or capsule machines, while enthusiasts may prefer manual or semi-automatic with pressure control and a good steam wand. Look for consistent pump pressure (9 bar), easy maintenance, and a size that fits your counter space.
What to Look For When Buying an Espresso Machine?
To choose the right espresso machine, start by understanding the components that most directly impact performance and quality.
Pressure System
Stick with machines that deliver steady 9-bar pressure. Some advertise 15+ bars, but don’t be fooled. Steam-driven machines (common under $150) often lack proper extraction power. Ignore high max pressure claims; steady 9-bar extraction matters most.
Temperature Stability
Temperature stability is one of the most important factors in producing consistent, high-quality espresso.
During extraction, water should stay within a narrow range of about 90–96°C (194–205°F) to properly dissolve coffee’s soluble compounds. Even small temperature fluctuations can cause espresso to taste bitter, sour, or flat.
Machines that hold a steady temperature during and between shots are far more likely to produce repeatable, café-level results, especially when pulling multiple espressos in a row.
PID Controllers (Must-Have Feature)
A PID (Proportional–Integral–Derivative) controller continuously monitors and adjusts the heating element to maintain precise temperatures.
- Typically keeps brew temps within ±1–2°C
- Produces more balanced, repeatable shots
- Strongly recommended for machines $500–$700 and up
- Now common in many mid-range espresso machines
Pre-Heating & Thermal Design
Pre-heating systems help prevent heat loss before extraction begins. Look for features such as:
- Pre-heat coils
- Saturated group heads (common in prosumer and commercial machines)
These designs warm the entire brew path, improving stability—especially for the first shot of the day.
Brewing Multiple Shots
If you plan to pull several shots back-to-back, prioritize machines with group head temperature management, whether through saturation, pre-heating, or PID-linked systems. This ensures consistent results from the first shot to the last.
Milk Frothing Capability
Your frothing needs should guide your machine choice, especially if you love milk-based drinks like lattes and cappuccinos. A good frothing system can make the difference between café-quality texture and a flat or overly airy result.
There are two main types of frothing systems: manual steam wands and automatic milk frothers. The right one depends on how hands-on you want to be and how important microfoam texture is to you.
Manual steam wands offer the most control, allowing for rich, textured microfoam and latte art. These are found on both home and professional machines and require some technique—but they produce the most authentic results when used correctly.
Look for:
- Rotational range: A swivel or articulating wand makes it easier to position your pitcher correctly.
- Tip design: Single-hole tips are easier for beginners; multi-hole tips steam faster and are preferred for larger milk volumes or advanced frothing.
- Steam power and recovery time: More powerful boilers (especially in dual boiler or heat exchanger machines) can generate dry, consistent steam for longer stretches without lag.
- Material quality: Stainless steel wands are more durable and heat-resistant than plastic-coated ones, and easier to clean.
Auto-frothers simplify the process but often sacrifice texture quality. They draw milk in, froth it to a set level, and dispense it directly into your cup or pitcher—ideal for convenience but not for precision.
Look for:
- Removable milk carafes: Allow for easy refrigeration and cleaning.
- Adjustable froth levels: Some higher-end machines let you choose between flat milk, light foam, or dense foam.
- Ease of cleaning: Auto systems can collect milk residue quickly—look for automatic rinsing or cleaning alerts.
Some machines offer panarello wands, which act like a simplified manual wand by adding air to the milk automatically. These strike a middle ground—easier to use than a full manual wand but with better texture than fully automated systems.
Use whole milk or barista oat milk for best foam quality and stability. Low-fat dairy and most almond or rice milks tend to produce weaker, unstable foam. Temperature matters too—aim for 55–65°C (130–150°F) for smooth, velvety texture without scalding.
Portafilter Size & Type
Portafilters are the component that holds your coffee grounds during brewing. Standard commercial portafilters are 58mm, while many entry-level machines use smaller or pressurized baskets.
Pressurized Portafilters (Dual-Wall):
- More forgiving for beginners
- Works with pre-ground coffee
- Less crema authenticity
- Can mask grind inconsistencies
Non-Pressurized Portafilters (Single-Wall):
- True barista-style control
- Better crema and flavor potential
- Requires precise grind and tamp
- Not ideal for low-end grinders
Start with pressurized baskets if you’re new, switch to non-pressurized as skills and grinders improve.
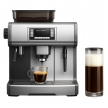
Integrated Grinder (If Applicable)
A fine, consistent grind is just as important as the machine itself. Many super-automatic machines come with built-in grinders, but if you’re buying a semi-automatic or manual machine, you’ll likely need to purchase one separately.
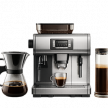
Build Quality and Design
Look for durable housing materials like stainless steel or aluminum. These not only improve the machine’s longevity but also help retain heat more efficiently. Portafilter quality matters too, like metal handles with a good weight provide better control and results.
Also, consider how the machine fits into your space. Compact models work better in small kitchens, but they often sacrifice features like a dual boiler or larger water tank.
Espresso Machine Types
Your ideal machine depends on your experience, time, and desire for control. Some offer full manual control for enthusiasts, while others prioritize speed and convenience.
Manual (Lever)
Best for: Purists and hands-on enthusiasts
Pros: Complete control over pressure and extraction
Cons: High learning curve; not beginner-friendly
Manual machines offer the ultimate in control, letting you fine-tune everything from pre-infusion to shot pressure, but they require dedication and practice.
Semi-Automatic
Best for: Home baristas who want customization
Pros: Great balance of control and automation
Cons: Requires user to grind, tamp, and time shots manually
These machines are a favorite among coffee lovers who want to grow their skills and experiment with variables like grind size, tamp pressure, and shot time.
Automatic
Best for: Users who want consistency with minimal effort
Pros: Automates shot timing; more forgiving
Cons: Limited control compared to semi-auto or manual
A good stepping stone for beginners who want to explore espresso without managing every step.
Super-Automatic
Best for: Convenience-first users
Pros: Built-in grinder, tamping, and brewing all in one
Cons: Expensive and less customizable
These machines are the espresso equivalent of a personal barista. They make the process quick and easy, but you trade away the ability to tweak and refine.
Capsule-Based (e.g., Nespresso)
Best for: Beginners or casual espresso drinkers
Pros: Fast, clean, consistent pods
Cons: Limited to pod options; higher ongoing cost
Capsules are fast and easy, but lack the depth and flexibility of true espresso making.
Advanced Features Worth Considering
- Pre-Infusion settings: A short burst of low pressure that evenly saturates grounds before full extraction.
- Shot timer or pressure gauge: Helps you monitor extraction time or pressure in real time to perfect each shot.
- Programmable profiles: Let you replicate results once you find your sweet spot.
- App connectivity (in premium models): Allows remote control, recipe adjustments, and maintenance alerts from your smartphone.
- Cup clearance & warming tray: Fits different cup sizes and keeps your espresso warm longer.
- Auto shutoff & energy saving: Saves electricity and improves safety.
- Removable water tank: Easier to refill and clean.
Budget Breakdown: What to Expect
It’s important to remember that the price you are willing to pay determines the quality, features, and performance of your espresso machine.
- For under $200, you’re going to find most capsule machines or steam-driven machines. These are the least expensive and convenient, but often have compromised quality when it comes to “real” espresso (mainly in pressure and temperature stability).
- For $200-$600, you’ll find beginner, entry-level semi-automatic and manual machines. These are ideal for a first time hands-on espresso machine. There may be some issues, but they’re a great place to start for learning about espresso.
- For $600-$1,200, you’re in the mid-range where you’ll find a happy medium between performance and price. Many of these machines have features like PID temperature control, more powerful steam, and a sturdier build – all features that can be necessary for quality, consistent espresso at home.
- $1,200+ machines offer pro-level features like dual boilers and longer-lasting parts.
Also consider the additional costs of a good grinder, accessories (tamper, milk pitcher, etc), water filtration, and regular maintenance.
Which Machine Matches Your Routine?
Your perfect espresso machine will often be the one that matches your routine best.
- If you’re short on time, a capsule or super-automatic machine delivers fast, consistent shots with minimal cleanup. They’re perfect for busy mornings or beginners who want a fuss-free experience.
- If you love the craft of making coffee, a semi-automatic or manual lever machine gives you more control and room to grow, especially when paired with a PID controller and a quality steam wand.
- Tinkerers who enjoy dialing in grind size, dose, and shot timing will appreciate the flexibility of a semi-auto or manual setup (I explain how to use a semi-auto espresso machine here).
- If you prefer a hands-off experience, consider a super-auto that grinds, tamps, and brews at the push of a button, making them great for convenience or multi-user households.
- Latte lovers should look for machines with strong milk systems. These are usually super-autos or dual boilers with programmable frothing.
- If you have a smaller kitchen, go for a compact capsule machine or a thermoblock unit.