


For many of us, the coffee maker is the unsung hero of our morning routine, consistently brewing that crucial cup of coffee that starts our day. But to function at its peak, this machine, just like any other hardworking small appliance, needs routine maintenance.
Over time, mineral deposits, coffee oils, and residue can accumulate inside your coffee maker, which can affect performance and taste. Regular cleaning addresses many of these issues and ensures both the safety and quality of your daily coffee.
For this article, I’ll be using an Instant Pot Dual Pod Plus coffee maker to show you how to properly clean and descale your machine — but rest assured, no matter the coffee maker you use, the process will look very similar.
What You’ll Need:
- White vinegar (16 oz / 2 cups)
- Filtered or distilled water (fill to max line)
- Measuring cup (or use the reservoir’s minimum line)
- Large container (to collect hot water)
- Dish soap (for cleaning the reservoir afterward)
Vinegar works well as a cleaning agent for a multitude of reasons, as it is:
- Acetic and effectively dissolves mineral deposits,
- Natural and has antibacterial properties,
- Safe for internal components,
- Readily available and economical,
- Environmentally-friendly compared to harsh chemicals.
In addition, using filtered or distilled water for cleaning is important because it:
- Prevents introducing new minerals during cleaning,
- Ensures more effective cleaning,
- Helps maintain the clarity of your next brew.
Also, remember to use cold filtered water when mixing with vinegar. Hot water can reduce vinegar’s cleaning effectiveness and create unpleasant fumes.
How to Clean a Coffee Maker: Step by Step
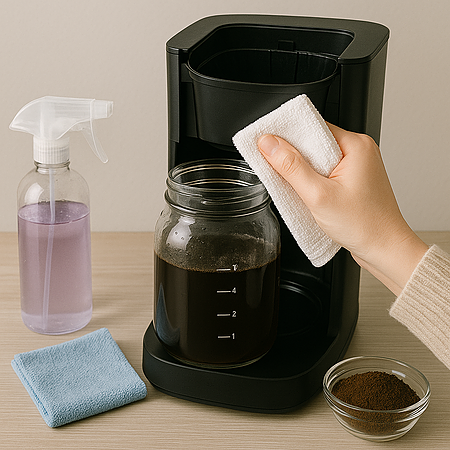
Step 1: Unplug Your Coffee Maker
- Begin by unplugging your coffee maker – safety first!
- Clean the machine to empty any old coffee or grounds.
![[MK] Draft: How to Clean a Coffee Maker, Kristi Carignan](https://www.market.com/wp-content/uploads/2025/07/-mk-draft-how-to-clean-a-coffee-maker-kristi-carignan-1.png)
Step 2: Prepare the Descaling Solution
- Empty the water reservoir completely.
- Pour 16 oz (2 cups) of vinegar into the reservoir. If you don’t have a measuring cup, just fill to the minimum line with vinegar.
- Fill the rest of the reservoir with filtered water up to the max line to dilute the vinegar properly.
![[MK] Draft: How to Clean a Coffee Maker, Kristi Carignan](https://www.market.com/wp-content/uploads/2025/07/-mk-draft-how-to-clean-a-coffee-maker-kristi-carignan-2.png)
Step 3: Start the Descaling Cycle
- Place a large container under the spout to collect hot water, or have the machine drain into your sink directly.
- Turn on the machine.
- Enter descaling mode — For example, I press and hold the 10 oz and 12 oz buttons simultaneously until the clean light turns on and water starts running. This step will depend on the model of your machine.
![[MK] Draft: How to Clean a Coffee Maker, Kristi Carignan](https://www.market.com/wp-content/uploads/2025/07/-mk-draft-how-to-clean-a-coffee-maker-kristi-carignan-3.png)
Step 4: Monitor the Process
- The machine will cycle water through, pausing and resuming intermittently.
- If your container fills up, swap it out for an empty one to prevent spills or simply let the water drain into your sink if that’s where you’ve placed it close to.
- Continue this process until the add water light turns on (indicating the cycle is complete).
Important: If the machine does not exit descale mode when the add water light turns on, manually turn it off before it runs dry. Running dry can damage the pump.
![[MK] Draft: How to Clean a Coffee Maker, Kristi Carignan](https://www.market.com/wp-content/uploads/2025/07/-mk-draft-how-to-clean-a-coffee-maker-kristi-carignan-4.png)
Step 5: Rinse with Fresh Water
- Wash out the reservoir with soap and water to remove vinegar residue.
![[MK] Draft: How to Clean a Coffee Maker, Kristi Carignan](https://www.market.com/wp-content/uploads/2025/07/-mk-draft-how-to-clean-a-coffee-maker-kristi-carignan-5.png)
- Refill the reservoir with fresh distilled water up to the max line.
- Repeat the descaling process:
-
- Press the right combination of buttons again to start a rinse cycle. This will flush out any remaining vinegar taste and smell.
- Stop the process before the machine runs dry by pressing the power button when the water level reaches the minimum line.
![[MK] Draft: How to Clean a Coffee Maker, Kristi Carignan](https://www.market.com/wp-content/uploads/2025/07/-mk-draft-how-to-clean-a-coffee-maker-kristi-carignan-6.png)
Step 6: Final Check and Ready to Brew
- The clean light should now be off, and the machine will be out of descaling mode.
- Fill the reservoir to the max line with cold, filtered water.
- The coffee maker is now ready for use!
![[MK] Draft: How to Clean a Coffee Maker, Kristi Carignan](https://www.market.com/wp-content/uploads/2025/07/-mk-draft-how-to-clean-a-coffee-maker-kristi-carignan-7.png)
How to Descale a Coffee Maker
Descaling goes beyond regular cleaning by specifically targeting mineral buildup, such as limescale, that accumulates inside your coffee maker. While the vinegar cleaning method handles basic descaling, persistent mineral deposits might require a commercial descaling solution.
Signs you need to descale include:
- Brewing takes longer than usual.
- Coffee isn’t as hot as it should be.
- Strange noises during brewing.
- White, chalky residue in the water reservoir.
- Inconsistent water flow.
- Coffee tastes bitter or metallic.
The frequency of descaling depends on:
- Water hardness in your area,
- Frequency of coffee maker use,
- Type of water used (tap vs. filtered),
- Machine maintenance history.
Follow the process as before, but fill the reservoir with a commercial descaling solution as per the directions rather than running a simple water cycle. To break down mineral accumulation, run a full brew cycle without a pod and then leave the solution for 15 to 20 minutes.
Before making coffee again, run two or three rinse cycles with cold, filtered water to get rid of any leftover residue.
How to Clean a Coffee Maker without Vinegar
While vinegar is our recommended cleaning solution, here are two other effective options:
Baking Soda Method
- Mix 1/4 cup baking soda with 4 cups of warm filtered water.
- Stir until completely dissolved.
- Pour into the reservoir and run a brewing cycle.
- Run 2-3 fresh water cycles to rinse.
Benefits of Baking Soda:
- Gentle on machine components
- No harsh smell
- Natural deodorizing properties
- Safe for all surfaces
Limitations of Baking Soda:
- Less effective against heavy mineral deposits
- May require more frequent cleaning
- Best for regular maintenance rather than deep cleaning
Citric Acid Solution
- Mix 2 tablespoons citric acid powder with 4 cups distilled water.
- Stir until completely dissolved.
- Pour into the reservoir and run a brewing cycle.
- Run 2-3 fresh water cycles to rinse.
Benefits of Citric Acid:
- No residual taste or smell
- Highly effective against mineral deposits
- Professional-grade cleaning power
- Safe for all coffee maker components
Limitations of Citric Acid:
- Not effective for oily residues
- Mild compared to other descalers, especially for heavy buildup
- May require more frequent cleaning
- Not as effective as white vinegar for killing bacteria and mold
- Can leave a tangy or sour taste in coffee if not thoroughly rinsed
- Can be corrosive over time
How to Clean a Moldy Coffee Maker
If your coffee maker hasn’t been cleaned in a long time, there’s a good chance that mold has begun to grow. If you discover mold in your coffee maker, it is dirty, and the white vinegar solution didn’t work, follow these steps:
- Mix a solution of 1 part bleach to 10 parts distilled water.
- Run one complete cycle with this solution.
- Run a minimum of 5 complete cycles with fresh water.
- Dispose of the bleach solution properly.
Note that this may not be the most environmentally-friendly option, so be sure to follow local guidelines for chemical disposal. For example, never pour the solution directly into storm drains.
In addition, be sure to follow these safety precautions:
- Ensure proper ventilation
- Never mix bleach with other cleaning agents
- Wear protective gloves
- Avoid skin contact
- Keep cleaning solutions away from children and pets
Correct Maintenance for a Clean Coffee Maker
Prevent buildup and extend the time between deep cleanings with these daily habits:
- Discard leftover coffee pods and rinse refuse containers with warm water. Use a soft sponge and dish soap if oils build up.
- Wipe the drip tray and exterior. Clean up spills and coffee splashes with a damp cloth to prevent stains and bacteria buildup.
- Run a water cycle. Brew a cup of plain water (no pod) to flush out any lingering coffee residue.
- Let components air dry. Keep the lid and water reservoir open to prevent moisture buildup and mold.
Common Mistakes to Avoid
- Using harsh scrubbers on the warming plate
- Neglecting to clean the reservoir lid
- Using tap water in areas with hard water
- Storing the machine in humid areas
- Ignoring small issues until they become major problems
Now your coffee maker is clean, descaled, and ready to brew great-tasting coffee again! ☕