
I’ve helped hundreds of buyers find HD projectors over the years, and the confusion around this category never changes. The market splits sharply between legitimate 1080p projectors and budget models advertising inflated specifications. Understanding what matters helps you avoid disappointment.
HD projectors deliver Full HD (1920×1080) resolution at price points ranging from $200 to $2,000. This guide walks through the specifications that affect your viewing experience and which features justify spending more.
What Makes an HD Projector
HD refers to native resolution, which means a projector displays images using its actual pixel count rather than what it accepts as input. Native 1080p (1920×1080) represents true HD, where the projector chip contains 2,073,600 physical pixels creating the image you see on screen.
Here’s how marketers create confusion:
When you see projectors advertising “Supported 4K” or “4K compatible,” this means the projector accepts 4K input but downscales everything to its native resolution. Therefore, a projector with native 720p that “supports 4K” still produces a 720p image regardless of what you feed into it.
I’ve worked with buyers who purchased “4K HD projectors” expecting 4K quality, then discovered the native resolution was 720p after setting everything up. The marketing claimed 4K support while delivering 720p output, which creates disappointment and wasted money.
Recommendation: Verify the native resolution specification before purchasing. Look for “native 1920×1080” or “native 1080p” in the product specifications when buying true HD projectors.
Brightness
Brightness determines where you use the projector and how large the image appears. Manufacturers measure brightness using different standards, which creates a lot of confusion when comparing models. The main standards include:
ANSI Lumens follow the ISO 21118 standard and are the legitimate measurement method, averaging brightness readings from nine points across the screen. A 2000 ANSI lumen projector produces the kind of consistent brightness you feel confident using in your actual viewing environment.
LED Lumens are an invented marketing term with zero standardization. Manufacturers inflate these numbers 5-10x over actual output, so a projector claiming “6000 LED lumens” often measures just 200-300 ANSI lumens when tested.
Peak Lumens measure only the brightest single spot rather than average screen brightness. Budget projectors listing 18,000 lumens at $100 use these inflated measurements and typically deliver 150-250 ANSI lumens in reality.
Brightness Requirements by Use
Your room and screen size determine necessary brightness:
Larger screens need more light because a projector creating a bright 100-inch image looks dim when stretched to 150 inches. The same light covers 2.25x more area, which makes the image appear dimmer across the larger surface.
I’ve tested budget projectors in living rooms with table lamps on, and the image washed out completely below 1000 ANSI lumens. You need legitimate brightness for rooms with any ambient light. Close blackout curtains and turn off lights for the best viewing regardless of brightness, since even 3000-lumen projectors look better in controlled lighting.
Recommendation: Buy projectors with ANSI lumen specifications only. Ignore LED lumen or peak lumen claims entirely. Choose 1000-1500 ANSI lumens minimum for rooms with curtains closed, or 2500+ ANSI lumens for rooms with windows and ambient light.
DLP vs LCD Technology
HD projectors use two main technologies producing different image characteristics.
DLP (Digital Light Processing)
DLP projectors use a chip covered in microscopic mirrors that tilt to reflect light on or off, creating images with strong contrast. These projectors deliver better black levels than LCD with sharper images and no visible pixel grid, while handling motion smoothly for sports and gaming. They also maintain compact size and lighter weight compared to LCD alternatives.
The main drawbacks include the rainbow effect, which appears as brief red, green, or blue flashes during eye movement and bothers 10-15% of viewers. Some people never notice while others find it unwatchable, so test before buying if possible or purchase from retailers with good return policies.
LCD (Liquid Crystal Display)
LCD projectors pass light through three separate LCD panels for red, green, and blue, creating naturally accurate colors straight from the box. They produce no rainbow effect, deliver better brightness per watt, and offer lower entry costs.
The drawbacks include lower contrast producing grayer blacks, screen door effect (visible pixel grid) on budget models, faster panel degradation in dusty environments, and larger, heavier construction than DLP.
If you’re interested in how these technologies actually work, I found a video for you.
Recommendation: Which Technology Is Better for HD?
- For movie watching in dark rooms, either technology works well. DLP offers better contrast creating deeper blacks in dark scenes, while LCD delivers more accurate colors without calibration.
- For gaming and sports, DLP handles fast motion better with less blur, and the higher contrast helps spot details in dark game environments.
- For daytime viewing, LCD projectors squeeze more brightness from the same wattage, which matters when fighting ambient light.
Light Source: Lamp vs LED vs Laser
Light source technology affects ownership costs, brightness consistency, and lifespan. Each type offers different tradeoffs between upfront cost, maintenance requirements, and performance.
Lamp-based projectors deliver the best brightness per dollar spent, with a $600 lamp projector producing 2000-2500 ANSI lumens compared to just 400-600 ANSI lumens from an LED projector at the same price. However, lamps dim gradually and need replacement after 3-4 years of regular use.
LED projectors eliminate replacement costs and turn on instantly while running cooler and lighter. The tradeoff comes in lower brightness and higher cost per lumen, limiting them to small screens in dark rooms.
Laser projectors combine high brightness with maintenance-free operation and instant-on capability. They provide improved color accuracy, especially with triple-laser RGB systems in premium models. For detailed specifications and recommendations, read our Laser Projectors buyer’s guide.
Recommendation: Choose lamp-based projectors for the best brightness per dollar if your budget stays under $800, but accept the lamp replacement costs as part of ownership. Choose laser projectors at $1000+ budgets for maintenance-free operation and consistent brightness over 10+ years.
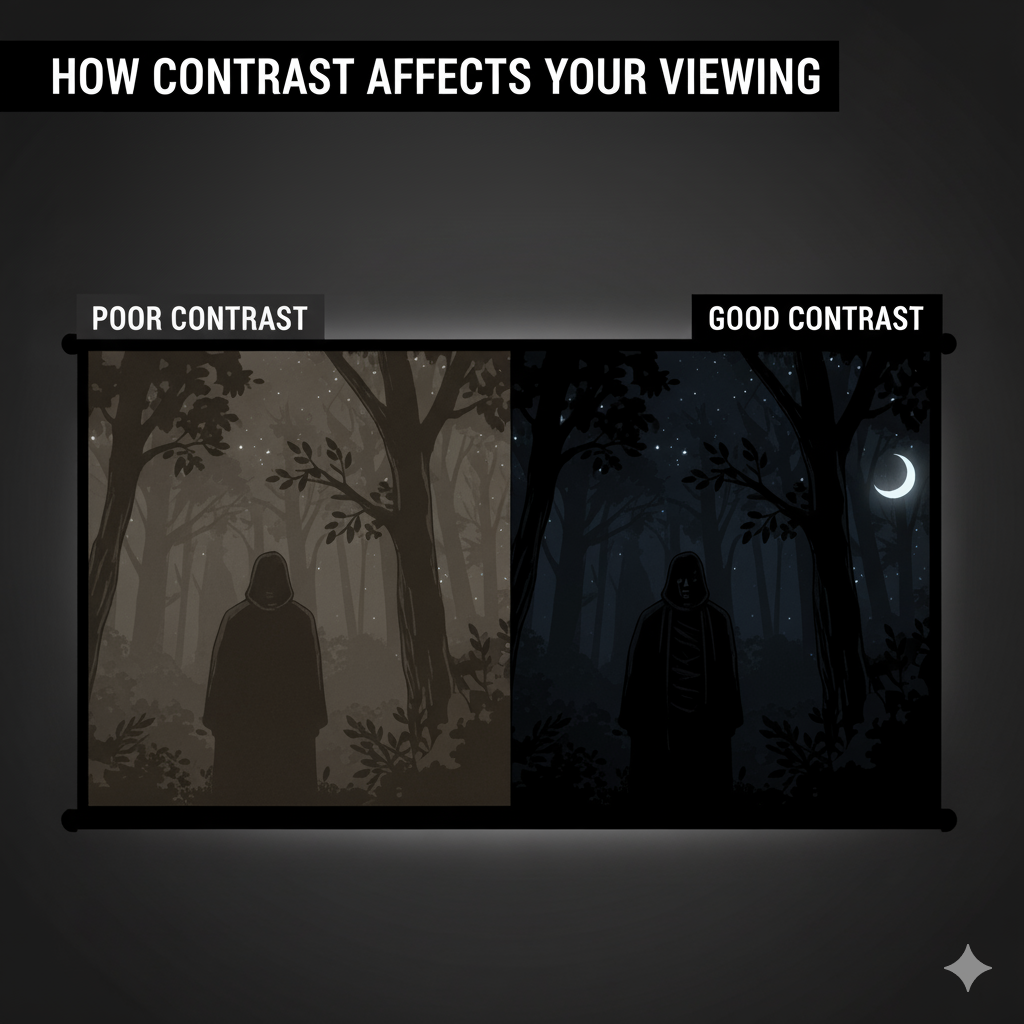
Contrast Ratio Reality
Contrast ratio measures the difference between brightest whites and darkest blacks.
Marketing specifications list numbers like 100,000:1 that mean little for actual viewing since manufacturers use “dynamic” methods, cranking brightness to maximum for white measurement then shutting the lamp down completely for black measurement.
Native contrast measures actual chip performance without tricks. Budget HD projectors achieve 1,000-3,000:1 native contrast, mid-range models reach 3,000-10,000:1, and premium home theater projectors hit 10,000-30,000:1.
Higher contrast produces images with better depth where shadow details remain visible in dark scenes. Dark movie scenes reveal contrast performance immediately since poor contrast makes everything look gray and muddy.
DLP projectors typically provide better contrast than LCD at the same price point. A $700 DLP projector might achieve 10,000:1 native contrast while a $700 LCD hits 3,000:1.
Recommendation: Focus on native contrast specifications instead of dynamic contrast claims. Look for 3,000:1 minimum native contrast for good movie viewing. Budget an extra $200-300 for models with 10,000:1+ native contrast if you watch films with dark cinematography.
What You Get Beyond 1080p
Some HD projectors use pixel-shifting to create “4K” images from 1080p chips, shifting the image slightly and firing twice per frame to create the appearance of higher resolution.
Pixel-Shift 4K
DLP pixel-shift projectors use 0.47-inch chips with physical pixel counts of 2716×1528. The chip shifts diagonally to create approximately 8.3 million pixels per frame, producing sharper images than straight 1080p. Pixel-shift 4K projectors start around $800-1200.
Native 4K
True native 4K projectors use chips with full 3840×2160 resolution and cost $2000+ for entry models. The image quality difference from pixel-shift becomes minimal at normal viewing distances.
For detailed 4K and ‘4K-marketed’ projector specifications and recommendations, read our 4K Projectors buyer’s guide.
Recommendation: Save money with native 1080p if you sit 10+ feet from your screen. Higher brightness or better contrast delivers more noticeable viewing improvements than upgrading to pixel-shift 4K.
Smart Features and Connectivity
Modern HD projectors include smart platforms like Google TV and Android TV that eliminate external streaming devices.
- Google TV provides the best interface with content recommendations across services.
- Android TV offers similar apps but many cheaper projectors lack official Netflix certification despite claiming support.
- Budget brand proprietary systems promise thousands of apps but most won’t install or run properly.
Buy projectors with at least two HDMI 2.0 ports regardless of smart features since built-in platforms age quickly and apps lose support after 2-3 years. WiFi enables screen mirroring for photos and browsing, though streaming services block mirroring due to copyright protection.
Lastly, Bluetooth audio adds 100-200ms of lag creating dialogue sync issues, so use wired connections (HDMI ARC, optical, 3.5mm) when possible.
Recommendation: Prioritize HDMI 2.0 ports over smart features since platforms become obsolete within a few years. Choose wired audio connections over Bluetooth for proper dialogue synchronization.
Audio Performance
Built-in speakers range from barely functional to surprisingly good based on wattage and speaker design:
- Budget projectors include 3-5W mono speakers adequate for small bedrooms only.
- Mid-range models feature 10-15W stereo speakers acceptable for casual viewing.
- Premium projectors partner with audio brands delivering 20-30W output with improved sound quality, though the spatial effect remains limited compared to proper surround systems.
For real home theater audio, consider external speakers:
Recommendation: Invest at least $150 in an external soundbar for noticeable audio improvement over built-in speakers. A $200 soundbar paired with a $600 1080p projector delivers better experiences than an $800 4K projector with built-in speakers.
Gaming Performance
Input lag measures the delay between controller input and screen response. Most HD projectors run 40-80ms input lag in standard mode, which might work fine for casual gaming. However, competitive gaming needs under 20ms lag, so look for projectors with dedicated game modes that reduce input lag to 15-30ms by bypassing image processing.
Recommendation: Accept 40-60ms input lag for casual and single-player gaming. For dedicated gaming recommendations including refresh rates, game mode comparisons, and competitive gaming specs, read our Gaming Projectors buyer’s guide.
Throw Distance and Placement
Throw distance determines where you place the projector relative to screen size. Standard throw projectors need 10-15 feet to create 100-inch images, while short throw models cut that to 4-6 feet.
Calculate your available distance before buying. Measure from where the projector sits (ceiling mount position or furniture) to your wall or screen location. Use the manufacturer’s throw calculator to verify the projector produces your desired screen size at that distance.
Alternatively, follow this formula: Throw Distance = Throw Ratio X Screen Width.
Ceiling vs Shelf Mounting
Ceiling mounting keeps the projector secure and prevents shadows from people walking past. You need to run HDMI cables through walls or across ceilings. Most projectors sit 12-18 inches below ceiling height when mounted.
Shelf mounting behind the seating area works when ceiling mounting proves difficult. The projector sits on furniture aimed at the screen. This setup lets you move the projector easily but increases shadow risks.
Keystone Correction
Keystone correction digitally warps the image to compensate for off-angle projection but degrades image quality by reducing effective resolution and brightness while increasing input lag. Automatic keystone correction uses cameras or sensors for convenience on portable projectors, but for permanent installations, proper placement eliminates the need entirely.
Recommendation: Choose ceiling mounting for permanent installations to avoid shadows and achieve proper alignment. Avoid keystone correction whenever possible since it degrades image quality and increases input lag. Finally, measure your throw distance before purchasing to ensure the projector fits your space. For short throw options that reduce placement complexity, read our Short Throw Projectors buyer’s guide.
Screens vs Walls
Smooth matte white walls produce acceptable images in dark rooms where you notice zero texture when touching the surface. Flat or matte paint finishes also work while glossy or semi-gloss paint creates hotspots and uneven reflection. That said, test your wall by shining a flashlight at an angle since visible texture gets magnified by the projector.
Projector screens improve image quality through better light reflection and consistent surface:
For detailed screen recommendations including materials, gains, and installation options, read our Projector Screens buyer’s guide.
Recommendation: Start by projecting on a smooth white wall to test your setup. Budget $200-400 for a dedicated screen once you commit to the projector as your primary display.
What Your Money Gets You
Warranty and Support
Warranty length indicates manufacturer confidence in reliability.
- Budget projectors typically offer 1 year coverage.
- Established brands extend to 2 years standard.
- Premium models from major manufacturers include 3 years.
Longer warranties are more important for LED and laser projectors since their light sources can last over 20,000 hours, often giving you a decade of use. A 3-year warranty, in that case, covers a good portion of the projector’s practical lifespan.
Check what the warranty actually includes. Some companies will replace defective units outright, while others make you ship the projector back for repairs at your own cost. Knowing how the process works before you buy can save you a lot of hassle later.
Customer service also varies a lot between brands. Well-known manufacturers usually have solid support systems, but budget models from lesser-known companies often offer little or no help beyond the 30-day return window.
Recommendation: Buy from established brands offering at least 2-year warranties. Verify the warranty process includes replacement or prepaid shipping for repairs. Avoid budget brands with 1-year coverage and no customer service history.
Final Thoughts
Finding the right HD projector becomes much easier once you look past inflated specs and focus on what really counts. Native 1080p resolution, true ANSI brightness, and solid warranty coverage make the biggest difference in everyday use. DLP and LCD both have their strengths, so match the technology to how and where you’ll be watching.
Whether you’re setting up a movie room, gaming space, or just want a big screen for casual viewing, a well-chosen HD projector can deliver impressive performance for years without breaking your budget.