
Like any frequently used equipment, a microphone can accumulate dirt, dust, and bacteria over time. In this guide, we’ll break down the cleaning process step by step, covering different types of microphones and situations where extra care is needed.
What You’ll Need:
- Mild soap
- Soft cloth
- Soft-bristled toothbrush
- Warm water
- 70% isopropyl alcohol
How to Clean a Microphone: Step-by-Step Guide
Step 1: Check if you can clean it
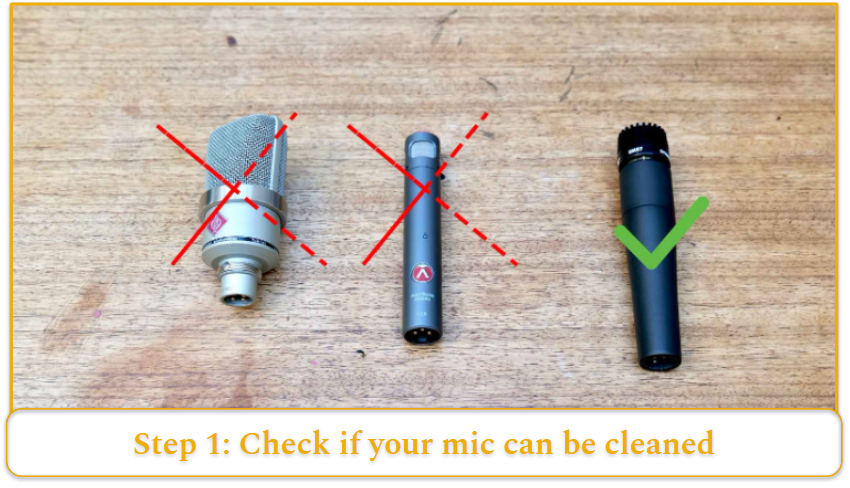
It’s important to know what kind of mic you have so that you can exercise an appropriate level of caution when cleaning it.
- Dynamic microphones like the Shure SM58 or Sennheiser e945 are rugged machines. Most dynamic mics can be cleaned quite easily.
- Condenser microphones are fragile, and ribbon mics even more so. The grilles are often not detachable, and the electronics are not built for wear and tear.
- I recommend always checking with your manufacturer if you are unsure about cleaning your condenser or ribbon mic.
- No microphone tolerates moisture well. Use caution with liquids.
Step 2: Gather Your Cleaning Supplies
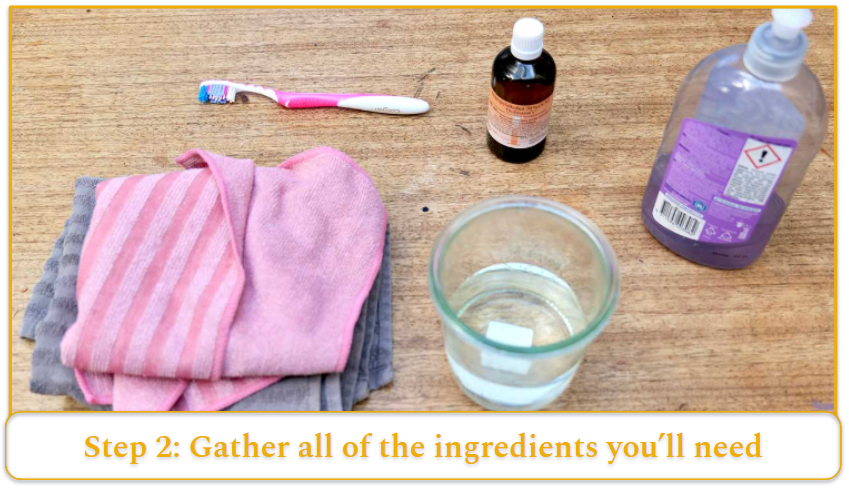
Before starting, ensure you have everything you need: mild soap, a soft cloth, a soft-bristled toothbrush, and warm water, which will suffice for most microphone cleaning jobs.
If your mic has a foam windscreen, isopropyl alcohol (preferably 70%) is more effective than water as it dries faster and disinfects thoroughly.
Step 3: Disassemble and Clean the Grille
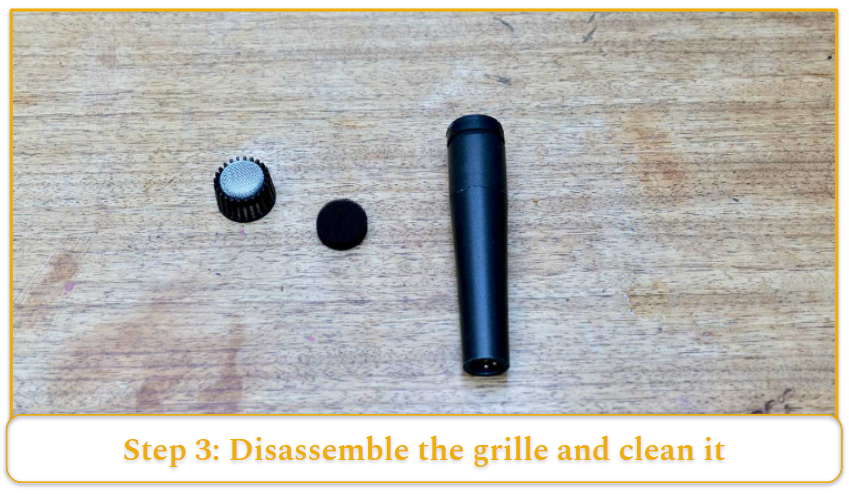
Here’s what to do if your mic’s grille is removable:
- Always unplug your microphone before cleaning.
- Unscrew the removable grille if your mic has one. Handheld microphones usually have a removable grille that protects the internal components.
- If possible, remove the foam windscreen.
- Wash the grille gently with warm, soapy water and a soft toothbrush.
- Let the grille dry completely before reattaching it to avoid any trapped moisture inside the microphone.
If the grille is not removable, the process is a bit different:
- Dip a clean cloth in soapy water.
- Wring it out so that no water drips.
- Carefully dab the outside of the grille while holding the mic upside down.
- Quickly dry it off with a dry cloth and air dry for 72 hours.
Step 4: Cleaning the Foam Windscreen
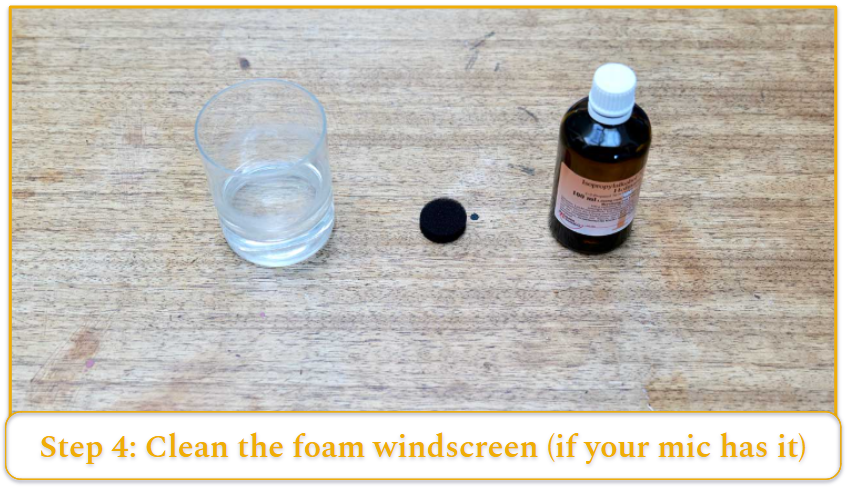
If your microphone has a foam windscreen, it absorbs moisture, dust, and bacteria over time. The best way to clean it is to rinse it with 70% isopropyl alcohol and let it air dry for at least 72 hours. Rushing this step can leave lingering moisture, which might affect audio quality or promote mold growth.
For popular mics like the Shure SM58, replacement windscreens are readily available. If the windscreen is moldy or excessively dirty, replacing it is the best option.
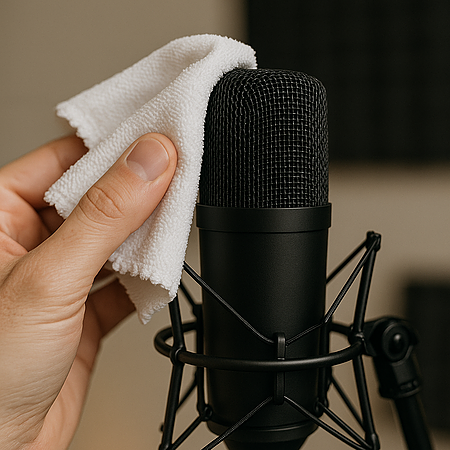
Step 5: Wipe Down the Microphone Body

The handle or body of the microphone can be wiped down with a cloth lightly dampened with soapy water. “Lightly” is the key word here—excessive moisture can seep into internal components.
Never use bleach, hydrogen peroxide, or other abrasive cleaners, as they can damage the finish and internal electronics. I do not recommend isopropyl alcohol for cleaning the microphone body, as it can dull the finish on metals and plastics.
Step 6: Inspect the Mic for Moisture
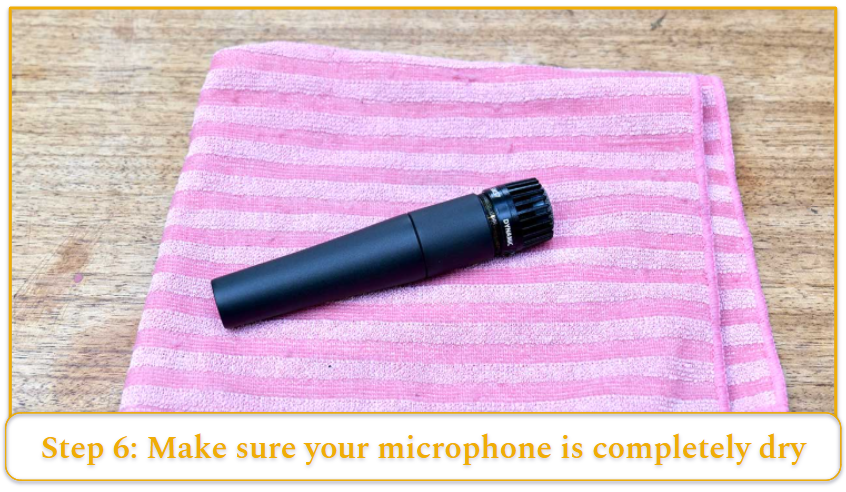
Finally, make sure your mic is completely free of moisture before reassembling it.
- With a dry, soft cloth, pat down the surface of the mic.
- Inspect the capsule area, as well as all inputs and switches, for any moisture that may have seeped in while cleaning.
- If your mic has a battery, check the battery area for any moisture.
- After air drying for 72 hours, reassemble the microphone, ensuring everything is securely in place.
How to Disinfect a Microphone
Cleaning your mic will wipe away dirt, dust, debris, and some bacteria. But if a microphone is used frequently—especially in shared environments like music venues, podcast studios, or conference rooms—it’s important to disinfect it regularly.
The grille and foam windscreen should be the primary focus when disinfecting, as they accumulate the most bacteria.
- To disinfect the grille, a clean, soft cloth lightly dampened with 70% isopropyl alcohol is generally sufficient.
- Avoid direct contact with the diaphragm or other internal components.
- The foam windscreen should be disinfected following the cleaning instructions outlined in Step 4.
It’s crucial to avoid using bleach, hydrogen peroxide, or other abrasive cleaners, as these substances can cause damage to the microphone’s surface. Some finishes, such as nickel-plated or painted surfaces, may react poorly to alcohol-based solutions.
To prevent unwanted dulling or discoloration, always test the alcohol solution on a small, inconspicuous area before applying it to the entire mic.
How to Clean a Headset Mic
Headset mics sit close to the face and quickly accumulate sweat, oils, and dust. A thorough but gentle approach is necessary to prevent damage while maintaining hygiene.
The same materials mentioned above can be used for cleaning headset mics.
- If your headset has removable ear cushions or a detachable microphone, take them off first to allow for a deeper clean.
- If the microphone is detachable, wiping it down with a cotton swab dipped in a small amount of isopropyl alcohol (70%) can remove grime and bacteria.
- For built-in microphones, a soft-bristled brush works well to clear dust from the mesh area.
Cables should also be cleaned periodically, as they accumulate dirt from handling. A cloth dampened with mild soapy water works well for this. The connectors should be checked for dust and gently wiped down to ensure a consistent audio connection.
Once all parts have been cleaned, the final step is to disinfect the headset. A quick wipe with a clean cloth lightly dampened with soapy water can help reduce bacteria without damaging materials. Allow everything to dry completely before reassembling the headset.
How to Clean a Smartphone Microphone
Over time, dust, lint, and debris can accumulate in the tiny openings of smartphones, leading to muffled sound.
- Before starting, power off the phone to avoid any risk of short-circuiting.
- A soft-bristled brush, such as a clean makeup brush or small paintbrush, can be used to sweep away loose debris around the microphone hole. Holding the phone with the screen facing downward helps any dislodged particles fall away naturally.
- For dirt trapped deeper inside, use a wooden or plastic toothpick to lift out lint without harming the delicate components.
- To sanitize the area, a soft cloth or cotton swab lightly dampened with 70% isopropyl alcohol can be used to wipe around the microphone. Isopropyl alcohol will not affect the glossy finish found on most phones. If unsure, test it on a small corner for any dulling of the finish.
- Let the phone air dry for a few minutes before turning it back on to ensure no moisture remains.
How to Clean a Moldy Microphone
Microphones exposed to high humidity or stored improperly can develop mold, especially in the foam windscreen. If mold is present, replacing the windscreen is the best option.
If replacement is not possible, clean the mic as instructed in the step-by-step guide above. Visible mold can be scrubbed away with a toothbrush. Be sure to clean the entire mic thoroughly to kill any lingering spores.
Proper Microphone Hygiene and Maintenance
The frequency of microphone cleaning depends on how often and where it’s used.
- For Daily Users: Those who use a microphone regularly—such as musicians, podcasters, or broadcasters—should clean their equipment at least once a week. In high-contact environments like live performances, a quick wipe-down after every use helps prevent buildup.
- For Occasional Users: If a microphone is used only once a month or less, cleaning it before and after each use is sufficient. Always store your mic in a case, in a clean, dry place.
- After Concerts and Events: Performers using microphones at concerts, especially outdoor festivals where dust and sweat are factors, should clean their mics thoroughly after each show. In contrast, a musician playing at an indoor bar may only need to wipe their mic down post-performance unless there was heavy exposure to smoke, humidity, or spilled liquids.
If multiple performers share the same mic, wiping down the mic basket between users is an option. Ideally, each performer should have a personalized head basket (grille and windscreen), which can be easily swapped out on most vocal handheld microphones.
Leading microphone manufacturers offer replacement parts, including grilles and windscreens, for most popular microphone models.
Environmental Considerations
Outdoor festivals with sand, dust, or humidity require more frequent cleaning than controlled indoor environments. In such cases, be sure to store microphones properly between events to reduce wear and tear.
When considering microphone hygiene, the main culprits are the grille, windscreen, or pop filter. The internal components should be left alone.
Cables and attachments should be wiped occasionally with a damp cloth. Avoid alcohol-based cleaners, as they can weaken the cable’s protective coating.