


Getting a projector for movie nights at home should feel exciting, not overwhelming. But I’ve worked with hundreds of buyers trying to recreate that cinema experience in their living rooms and basements, and I’ve noticed that people don’t really know what to look for when buying a multi-purpose home projector.
Fortunately, home theater projectors have become more accessible and easier to set up than ever before. And I’m here to help you cut through the marketing claims to find what really works for your space.
Why Get a Home Theater Projector
A home theater projector (movie/ multi-purpose projector) turns your wall or screen into a display that ranges from 80 inches to well over 200 inches. However, unlike TVs, projectors require careful consideration of your room layout, lighting conditions, and viewing distance.
In addition, people looking for home projectors usually prioritize features like color accuracy, contrast, and HDR performance. For movie watching specifically, buyers concentrate on accurate color reproduction, deep blacks, and enough brightness to maintain image quality.
These priorities differ from other projector use cases, e.g., presentation projectors, which emphasize brightness over everything, outdoor projectors, which need to fight ambient light, or gaming projectors that focus more on input lag and refresh rate.
Start With Room Layout
Before getting into specs, you need to measure your space. I’ve encountered buyers who purchased expensive projectors only to discover their room won’t accommodate the throw distance. Grab a tape measure and note three things:
- The distance from where the projector will sit to your screen or wall
- Your ceiling height
- Your seating position relative to the screen
Seating Distance and Screen Size
Use this simple formula: multiply your viewing distance in feet by 10 to get your ideal screen size in inches.
At 12 feet away, you want a 120-inch screen. At 15 feet, aim for 150 inches. At 20 feet, you need 180 to 200 inches for the screen to fill your vision properly.
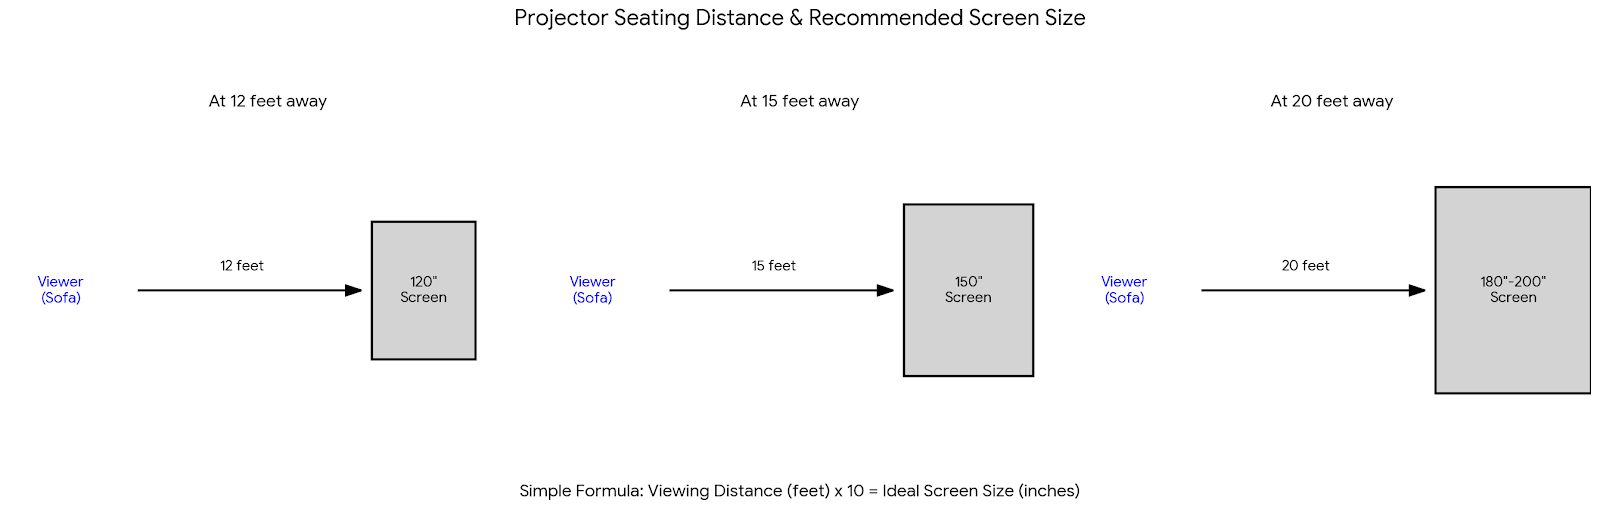
Example: Your seating sits 20 feet from the wall. A 120-inch screen will look small and disappointing at that distance. You need to either move seating closer, install a much larger screen (180+ inches), or stick with a large TV instead.
That said, most people sit 10 to 15 feet from their screen, which means 100 to 150-inch screens work well for typical home theaters.
Ceiling Height Considerations
Standard ceiling mounting requires at least 8 feet of height, and you’ll need 12 to 18 inches of drop from the ceiling to position the projector correctly. Lower ceilings work better with shelf-mounted or UST projectors that sit closer to viewer level.
Recommendation: Measure your viewing distance first, then multiply by 10 to get your ideal screen size in inches. If your room can’t accommodate this size comfortably, consider whether a projector makes sense for your space.
Throw Distance | Finding the Right Position
Standard throw projectors need about 10 to 15 feet to create a 100-inch image, while short throw projectors cut that to about 4 to 6 feet. Ultra short throw (UST) projectors sit just inches from the screen or wall, typically on a TV cabinet or low shelf.
Standard Throw Projectors
These offer the best image quality per dollar and work well ceiling-mounted in dedicated spaces. Ceiling mounting means running HDMI cables through walls or across the ceiling, and you’ll need to deal with fan noise (though most modern projectors stay reasonably quiet at 25 to 35 decibels).
Short Throw Options
Short throw projectors give you flexibility in smaller rooms since the shorter throw distance means less chance of shadows from people walking in front of the projector. These work well mounted on a rear shelf or ceiling-mounted in rooms where you can’t get enough distance for a standard throw.
We have an extensive guide on short throw projectors if this sounds like the right fit for you.
Ultra Short Throw
UST projectors solve specific problems by sitting on furniture near your screen, eliminating ceiling mounts and long cable runs. Kids and pets can’t walk through the beam and cast shadows. The downsides include limited screen size options (most top out around 120 to 150 inches), higher costs, and the almost mandatory need for a specialized ALR screen to deal with the upward projection angle.
Keystone vs. Lens Shift
Keystone correction and lens prove necessary when setting up your projector. Keystone digitally warps the image to compensate for angle issues, but this degrades image quality and often increases input lag. Lens shift physically moves the lens to adjust image position without quality loss. But proper placement beats digital fixes every time for a permanent installation.
Recommendation: Choose standard throw for dedicated home theaters with proper mounting, short throw for rooms under 12 feet deep, and UST only if you absolutely can’t ceiling mount or need the projector on furniture. Avoid relying on keystone correction for permanent setups.
The Ideal Resolution for Home Projectors
The “4K versus 1080p” debate dominates buyer questions, and I have answers.
First, understand the terms. Native resolution refers to the actual pixel count of the projector’s chip, while marketing resolution refers to what the projector accepts as input. Therefore, a projector advertised as “4K supported” often has a native 720p or 1080p chip that accepts 4K input but downscales it.
When 1080p is Enough
For home theater use at typical viewing distances (10 to 15 feet), native 1080p looks excellent. I’ve encountered buyers convinced they need native 4K, then discovered that at their viewing distance, they can’t distinguish between 1080p and 4K anyway.
To add on to that, true native 4K projectors start around $1,500 to $2,000 for entry-level models and quickly climb to $3,000 and beyond, making them quite an expensive affair.
The viewing distance calculation works like this: at 10 feet from a 100-inch screen, most people can’t reliably tell 1080p from 4K. You’d need to sit closer (6 to 8 feet) for 4K detail to become clearly visible. If you’re sitting 15 to 20 feet away, 4K resolution provides no visible benefit over good 1080p.
But in reality, contrast ratio, color accuracy, and brightness trump resolution. A 1080p projector with excellent blacks, accurate colors, and sufficient brightness will look better than a cheap “4K supported” projector with poor contrast and washed-out colors.
For detailed information about 4K specifications and what to look for, read our 4K projectors buyers guide.
Recommendation: Save money with native 1080p if you sit 10+ feet away or have a budget under $1,500. Only invest in true native 4K if you sit closer than 8 feet or your budget exceeds $2,000.
Brightness
Projector brightness is measured in ANSI lumens or ISO lumens, though some manufacturers list “LED lumens” or other invented metrics that mean nothing. Look for ANSI or ISO specifications.
Brightness Requirements by Room Type:
Larger screens need more light since the same projector creating a bright 100-inch image will look dim stretched to 200 inches. The light spreads over four times the area, making the image appear dimmer. If you want a truly massive screen (150+ inches), budget for a brighter projector.
Recommendation: Buy 1,500-2,000 lumens for dark rooms with screens under 120 inches, or 2,500+ lumens for any room with ambient light or screens over 120 inches. At the same time, I strongly advise that you ignore any projector claiming 8,000+ lumens under $1,000.
Contrast and Black Levels
Contrast ratio describes the difference between the brightest whites and the darkest blacks a projector can produce. Marketing specs list absurd numbers like 100,000:1 or 1,000,000:1 that don’t reflect real-world performance, so native contrast (the actual light on/off ratio of the projector chip) is what you should focus on.
Good native contrast for a home theater projector starts around 2,000:1 and goes up from there. Projectors with dynamic iris mechanisms can improve contrast by closing down during dark scenes, creating dynamic contrast ratios that look impressive on paper but don’t reflect actual viewing performance.
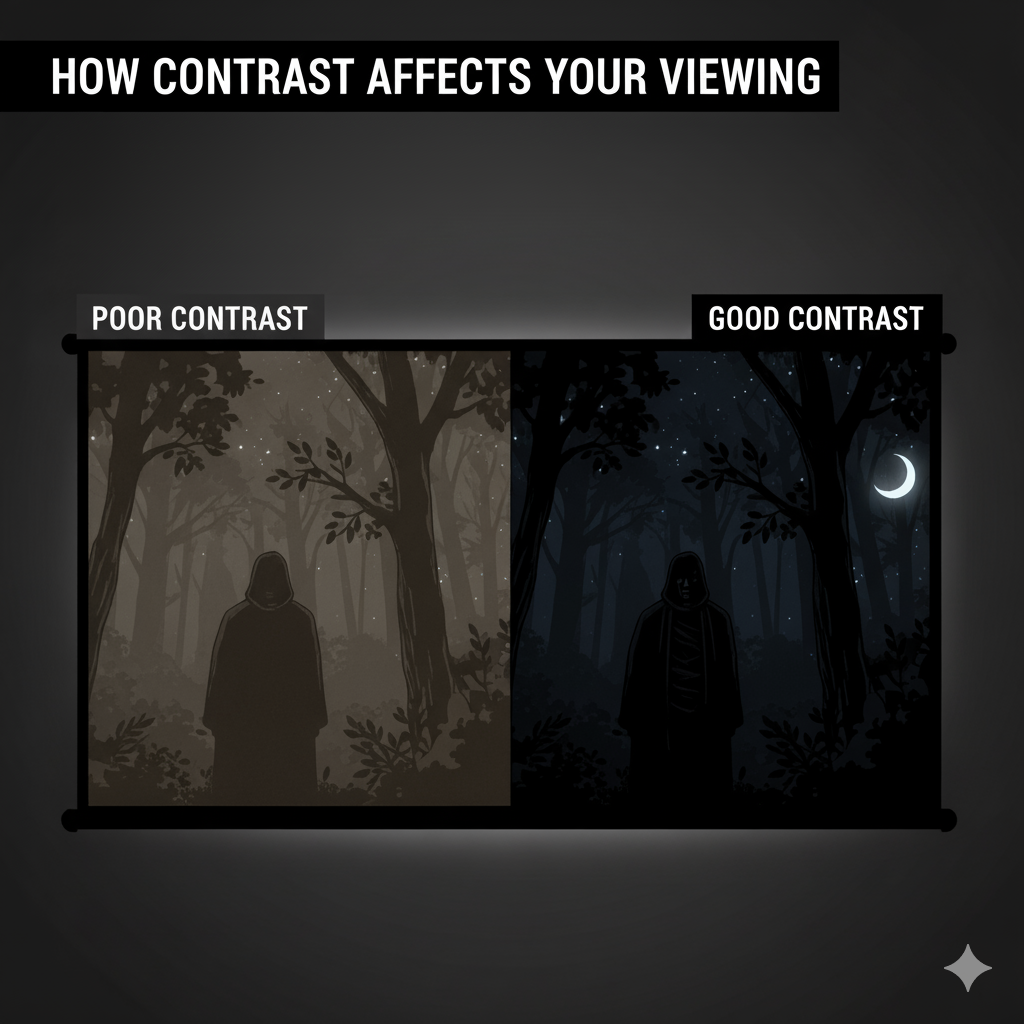
How Contrast Affects Your Viewing
Dark scenes reveal contrast performance, and if you watch a lot of movies with dark cinematography (which is most modern films), contrast is enormous. Poor contrast makes dark scenes look gray and muddy instead of deep and detailed.
DLP projectors (which use a chip with micro-mirrors) typically offer higher contrast than LCD projectors (which use liquid crystal panels) but may show “rainbow effect” (brief flashes of color) that bothers some viewers. LCoS projectors (like those from certain premium manufacturers) offer the best contrast but cost significantly more.
Recommendation: Prioritize native contrast over dynamic contrast specifications. Look for 2,000:1 minimum native contrast, and test DLP projectors for rainbow effect sensitivity before committing to a purchase.
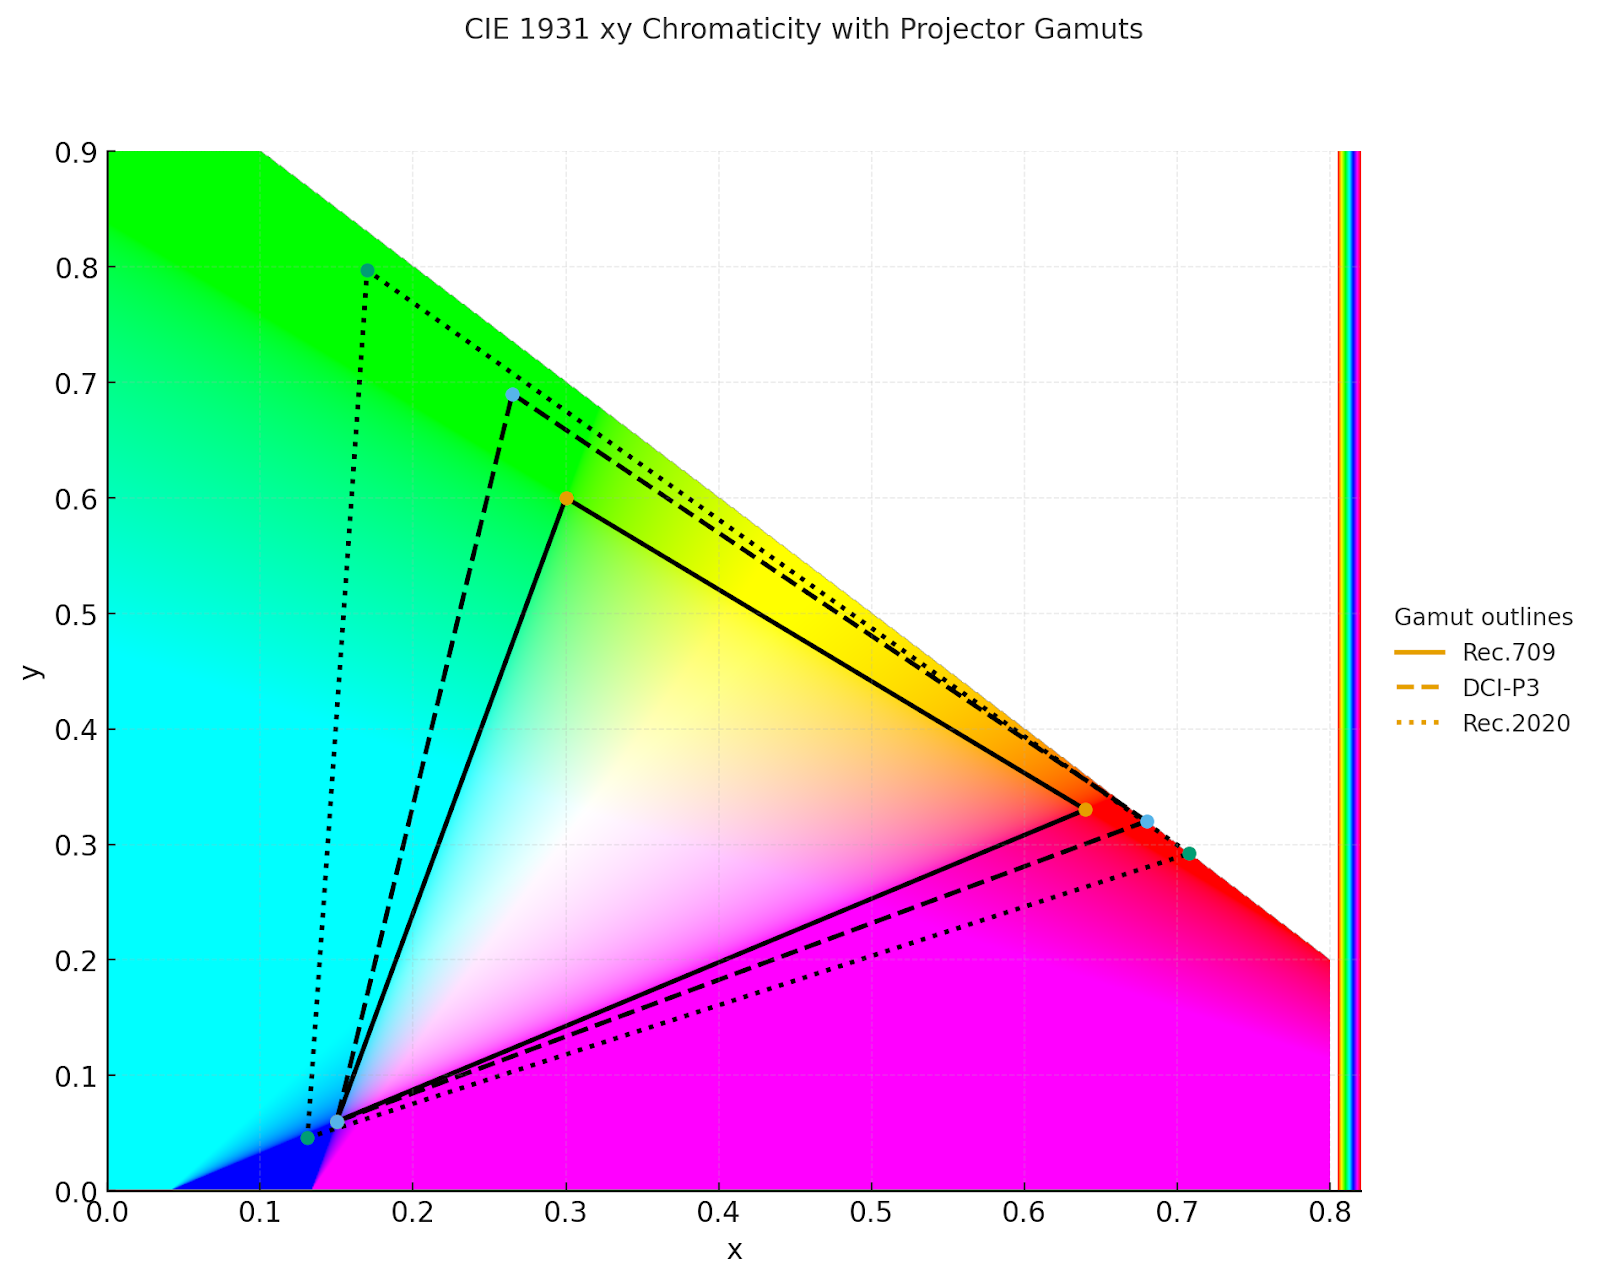
Color Accuracy and HDR
Color gamut describes the range of colors a projector can produce. The Rec.709 standard covers standard HD content, while DCI-P3 covers theatrical digital cinema. For home theater, you want 90%+ Rec.709 coverage at minimum, and many newer projectors claim 100%+ DCI-P3, though these numbers often come from marketing departments rather than calibrated measurements.
HDR Support
HDR (High Dynamic Range) support has become standard even on mid-range projectors. HDR10 is the basic standard that most content uses, while Dolby Vision provides more advanced HDR with dynamic metadata but requires licensing (so fewer projectors support it).
HDR requires significant brightness to look good, so a projector with 1,000 lumens claiming HDR support won’t have enough light output to properly display HDR content. For effective HDR on a 100-inch screen, you need 2,500+ lumens, which is one reason HDR works better on TVs than projectors.
Recommendation: Verify at least 90% Rec.709 coverage for accurate colors. Only consider HDR features if your projector outputs 2,500+ lumens, otherwise HDR will look dim and disappointing.
Light Source: Lamp vs. LED vs. Laser
Traditional Lamp Projectors
Traditional lamp projectors use high-pressure bulbs that last 3,000 to 6,000 hours and need replacement. Replacement bulbs cost $100 to $400, and lamps dim over time, losing brightness gradually. The upside is that lamp projectors often provide the best picture quality per dollar.
LED Projectors
LED projectors use LED arrays that last 20,000+ hours with no replacement needed. LEDs maintain consistent brightness over their life and turn on instantly, though the downside is lower brightness. LED projectors typically max out around 500 to 1,500 lumens, making them suitable only for small screens in dark rooms.
Laser Projectors
Laser projectors offer 20,000 to 30,000-hour lifespans with high brightness (2,000 to 4,000+ lumens for home models). They turn on instantly, maintain consistent brightness, and produce excellent color, though cost is the downside since laser projectors start around $1,500 and go up significantly.
Recommendation: Choose lamp-based projectors under $1,000 for best value despite replacement costs. Upgrade to laser at $1,500+ for maintenance-free operation and consistent brightness over decades of use.
Smart Features and Connectivity
Many projectors now include Android TV, Google TV, or proprietary smart systems with Netflix, Prime Video, YouTube, and other apps built in. This eliminates the need for external streaming devices, though I generally recommend keeping options open since smart systems age quickly, and apps may lose support. Having HDMI ports for external devices (streaming sticks or media players) provides flexibility.
Wireless Connectivity
WiFi and Bluetooth have become standard even on budget models. WiFi allows screen mirroring from phones and tablets, though be aware that many streaming apps block mirroring due to copyright protection. You’ll still need an external device for those services. Bluetooth audio lets you connect external speakers or use the projector as a Bluetooth speaker when not projecting.
Physical Connections
Look for at least two HDMI 2.0 ports. If you game at 4K/120Hz, HDMI 2.1 support is worth considering, though few projectors under $2,000 include it. USB ports allow direct playback from flash drives, useful for photo slideshows or downloaded movies.
Recommendation: Buy a projector with at least two HDMI 2.0 ports regardless of built-in smart features. Keep an external streaming device handy since built-in apps often lose support after 2-3 years.
Audio Setup
Built-in projector speakers range from barely acceptable to surprisingly good, and most projectors include 5 to 10-watt speakers that work for casual viewing but don’t create immersive experiences.
Some newer models partner with audio brands to deliver 20 to 30 watts with better sound quality. However, for real home theater audio, you need external speakers. Consider:
- Entry Level: Soundbar ($200-500) – Simple, effective upgrade
- Mid Level: 3.1 system ($500-1,000) – Soundbar with subwoofer or LCR speakers
- Full Theater: 5.1 or 7.1 system ($1,000-3,000+) – Complete surround sound
Recommendation: Budget at least $200 for a soundbar since built-in speakers ruin the experience. For dedicated theaters, invest $1,000+ in a proper 5.1 surround system with a subwoofer.
Gaming Performance
Input lag measures the delay between controller input and screen response. For movie watching, 50ms lag is invisible, but for gaming, especially competitive gaming, you want under 30ms and ideally under 20ms.
Most home theater projectors have 40 to 60ms input lag in standard mode. Many include dedicated game modes that reduce processing to lower lag, often to 15 to 30ms. This involves trade-offs in image quality (less processing means less smooth motion and possibly poorer color), but the reduced lag makes games more responsive.
Refresh rate is important for gaming too since standard 60Hz projectors work fine for most gaming. If you play fast-paced competitive games on PC or next-gen consoles, 120Hz or even 240Hz support makes a difference, though you’ll need to look at gaming-specific projectors or high-end home theater models.
For comprehensive gaming-specific recommendations, read our gaming projectors buyers guide.
Recommendation: Accept 40-60ms lag for movie-focused use. If gaming regularly, find a projector with dedicated game mode offering under 30ms lag.
Light Control and Screens
You don’t need a black cave, but you do need control. West-facing windows with afternoon sun will ruin prime-time viewing. Blackout curtains or shades solve this. For daytime viewing, you need a high-brightness projector (3,000+ lumens) paired with an ALR (ambient light rejecting) screen, or you should reconsider whether a projector makes sense.
Other light control solutions include:
- Motorized blackout shades (drop for movies, retract for daily use)
- Dark paint on viewing wall at minimum
- Complete room darkening for best performance
- Strategic lighting that doesn’t point at screen
Do You Need a Screen?
Dedicated screens improve image quality noticeably. Matte white screens ($200 to $400) work well in dark rooms, while gray or ALR screens ($500 to $800) help with ambient light.
For detailed guidance on choosing the right screen type, size, and material for your setup, read our projector screens buyers guide.
Recommendation: Install blackout shades and paint your viewing wall dark gray or blue at minimum. Budget $200 to $400 for a basic screen in dark rooms, or $500+ for ALR screens if you have ambient light issues.
What Your Money Gets You
Should You Keep the TV or Buy a Projector?
This question comes up constantly, and the answer depends entirely on your priorities and space. TVs offer better image quality per dollar spent, especially in the 65 to 85-inch range. They work in any lighting, need no installation beyond setting on a stand, and include smart features, speakers, and simple connectivity.
When to Pick a Projector
Projectors offer larger screen sizes (100+ inches) at reasonable cost. An 85-inch TV costs $1,500 to $3,000, while a projector setup with a 120-inch screen costs $1,000 to $2,500 total. Meaning, for the same money, you get a significantly larger image.
Projector Trade-offs
The downsides of projectors include:
- Room requirements
- Light control needs
- Speaker requirements (those built-in speakers don’t cut it for real movie watching)
- Installation complexity
- Ongoing lamp costs for lamp-based models
Recommendation: Choose a TV if your room has windows you can’t cover or family members who resist light control. Pick a projector only if you control the space and commit to proper setup.
Getting Started With Your Home Projector
If you’ve made it this far, you’re ready to start planning your setup. Take your room measurements, figure out your viewing distance, and decide whether you’ll mount your projector or place it on furniture. From there, choose the right brightness and screen size for your space, and set aside a little extra for audio and light control.
The main goal is to create an experience that feels comfortable and cinematic without overcomplicating things. Start simple, make small adjustments, and enjoy watching your favorite movies on a screen that finally feels like a theater.