


A short throw projector works for you if your room isn’t deep enough for standard projectors, furniture blocks your ideal mounting spot, or the beam sits in a common walkway where people cast shadows when moving about. Short throw projectors sit closer to the screen and still deliver large images, so they fit in spaces where traditional projectors won’t work.
This guide covers throw ratios and what they mean for your room, mounting options, screen selection, specs and pricing, and also addresses how to avoid common mistakes newbies often make. But if you’re interested in general projector topics like brightness, contrast, and resolution, check our Main Projector Buyer’s Guide.
What Is Throw Ratio?
Throw ratio defines how far a projector needs to sit from the screen to create a specific image size.
The ratio is written as two numbers separated by a colon (like 1.5:1), where the first number represents the distance (1.5) and the second number (always 1) represents the screen width, both measured in the same unit. A ratio of 1.5:1 means the projector needs to sit 1.5 times the screen width away from the screen.
Standard projectors use ratios between 1.3:1 and 2.0:1, meaning they need 1.3 to 2.0 feet of distance (throw distance) for every 1 foot of screen width. For a 10-foot-wide screen, that means 13 to 20 feet of distance. Short throw projectors operate at ratios between 0.4:1 and 1.0:1, placing them much closer to the screen.
The math works like this: Throw Distance = Throw Ratio X Screen Width.
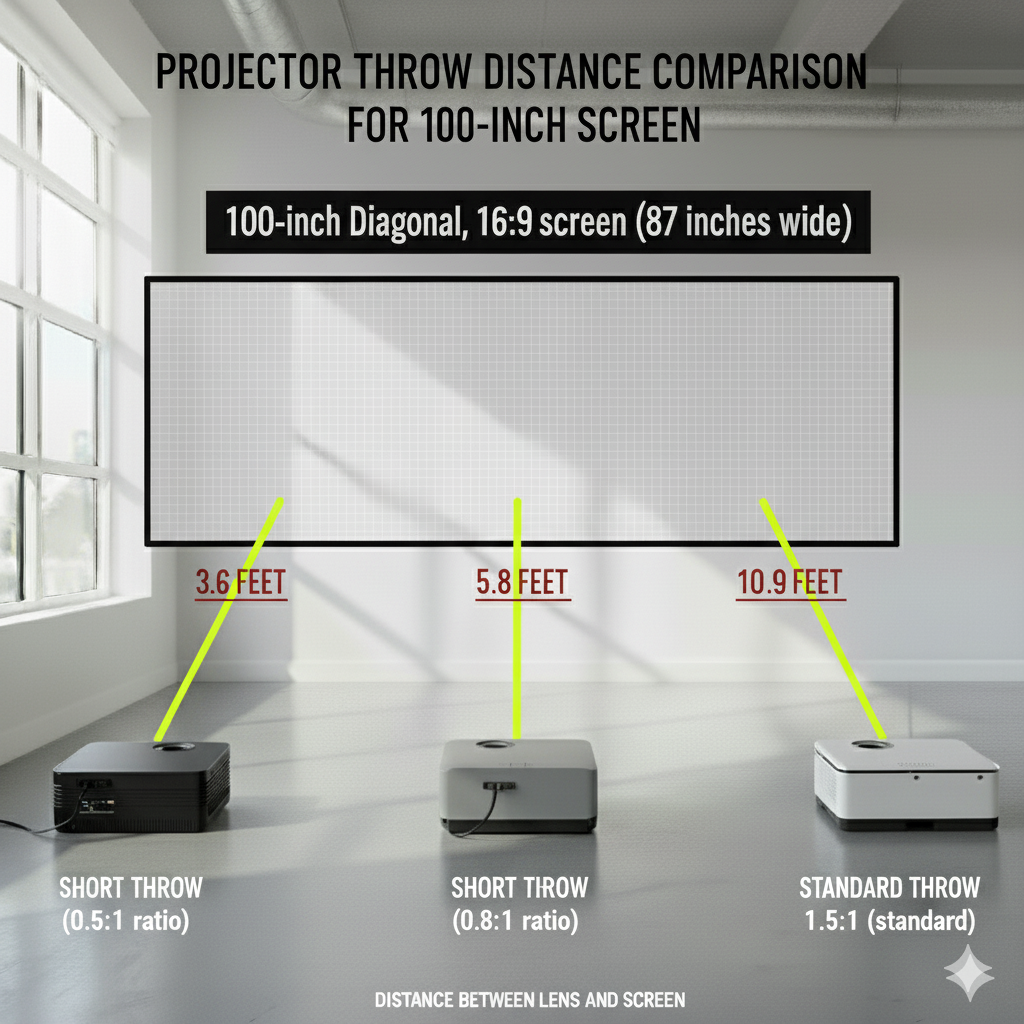
So, a 100-inch diagonal 16:9 screen measures roughly 87 inches wide (7.25 feet). With a 0.5:1 throw ratio, you need only 3.6 feet between projector lens and screen. With a 0.8:1 ratio, you need 5.8 feet. A standard 1.5:1 throw ratio requires 10.9 feet for that same screen.
Projector Throw Categories
Short throw projectors fall into distinct categories based on throw ratio, each affecting where you can place them.
Short Throw (0.4:1 to 1.0:1)
Short throw projectors need roughly 3 to 7 feet for a 100-inch image. These work well in small to mid-size rooms measuring 12 to 16 feet deep and can ceiling mount a few feet from the screen or sit on furniture. Models with ratios between 0.8:1 and 1.0:1 need about 6 to 7 feet, while those between 0.4:1 and 0.6:1 need only 3 to 4 feet.
Ultra Short Throw (under 0.4:1)
USTs (ultra short throws) sit just inches from the screen, typically 12 to 30 inches depending on the model. These units look like soundbars or small AV components and rest on TV stands or dedicated cabinets directly below the viewing surface.
Standard Throw (1.0:1 to 2.0:1)
Standard throw projectors are basically what we call traditional projectors, and usually need 7 to 15 feet for a 100-inch image. These usually mount mid-room to the back wall, outside the short throw range.
Long Throw (above 2.0:1)
Long throw projectors require 15 feet or more for a 100-inch image. They are designed for large venues like auditoriums and concert halls where massive projection distances are necessary.
Calculating Your Room Requirements
Start by measuring your available space from where you plan to mount the projector to your screen location. If ceiling mounting, measure from the mount point to the wall. Remember that throw distance measures from the projector lens to the screen, not from the back panel.
Most projectors measure 10 to 15 inches from lens to rear panel, so subtract that from your measurement.
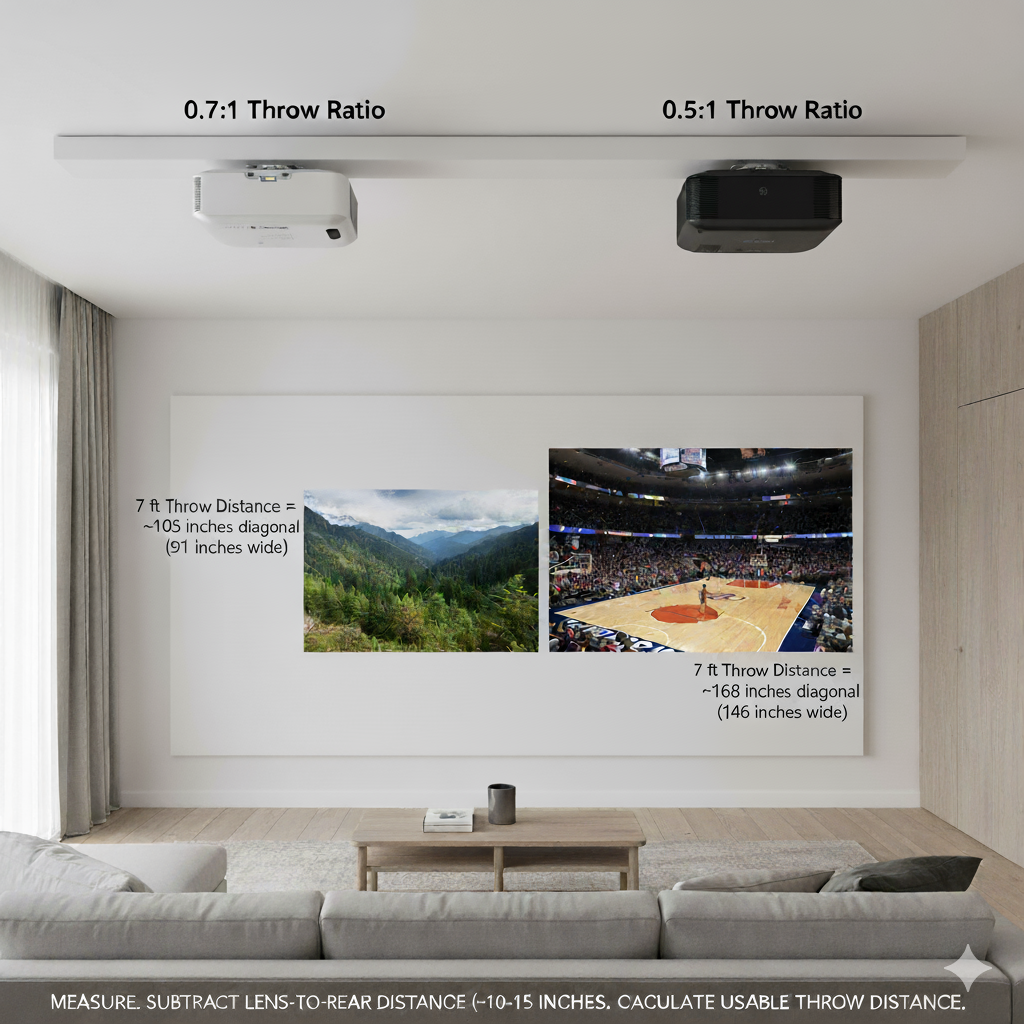
A room with 8 feet wall-to-wall gives you about 7 feet of usable throw distance. With a 0.8:1 ratio, you can project approximately 105 inches diagonal (91 inches wide). With a 0.5:1 ratio, that same space accommodates roughly 168 inches diagonal (146 inches wide).
Ceiling height is another important consideration for short throw projectors because closer placement creates steeper projection angles. A projector mounted 8 feet high projecting down at a screen 4 feet away creates a sharper angle than one projecting from 12 feet away.
Subsequently, this affects two things.
First, the image might distort without adequate vertical lens shift or keystone correction.
Second, people walking between projector and screen are more likely to block the image when the projector sits closer.
Placement Options and Trade-offs
Where you put your short throw projector is more important than most people might think. You see, the closer distance changes how shadows fall, how complicated installation gets, and how the setup works in daily use.
Ceiling Mount
Ceiling mounting short throw projectors gives you the cleanest installation and maximizes floor space. The projector stays out of sight, while your cables run through walls or along the ceiling, and nobody bumps into it accidentally.
You’ll need mounting hardware that can handle your projector’s weight, which is usually between 10 and 20 pounds depending on the model. Power and HDMI cables need to reach the mounting spot, so you’re either running conduit through the walls if you’re building or renovating, or you’re using surface-mounted cable channels if the room is already finished.
The overhead placement eliminates shadows when people walk in front of the screen. This setup works great for active gaming, fitness content, or families with kids who move around a lot.
Lens shift lets you adjust the image position up or down without physically moving the projector or using keystone correction, that degrades quality. Without lens shift, you’re stuck trying to get perfect placement on the first try (good luck with that) or accepting the quality hit from keystone correction.
Recommendation: The hardest part, however, is figuring out exact placement before you drill holes. Throw ratio calculations are helpful, but individual projectors vary a little. So, if you can, mount it with some wiggle room, test the alignment with the projector sitting temporarily, then lock everything down once you’ve confirmed it works.
Furniture Placement
Ultra short throw projectors and some shorter short throw models can sit on furniture like TV stands, cabinets, or dedicated shelving. This method skips the whole installation hassle and lets you move things and rearrange your room later.
This works best when you mount your screen at typical TV height and position a table or cabinet a few feet in front of it. The projector sits on top of that cabinet and angles upward toward the screen. Most ultra short throw models come with adjustable feet or legs that let you tweak the height and tilt until everything lines up perfectly.
The benefits of this setup include:
- Easy access for adjusting focus or connecting devices
- No cable runs through walls or ceilings
- Flexibility to reposition or move the projector between rooms
- The ability to use the projector in multiple spaces, e.g., setting them up in the living room for movie nights and moving them to bedrooms or outdoor areas for other occasions
Furniture placement handles shadows differently than ceiling mounting. When people walk between the projector and screen, they block the image briefly since the short distance means they pass through the beam quickly.
However, the real problem is that furniture-mounted projectors sit in high-traffic areas. When your projector sits on a coffee table or low cabinet, people standing up from the couch, reaching for things, or just moving around the room end up blocking the projection path more often and for longer stretches.
Also, mind vibration from footsteps near the cabinet, pets jumping up on the furniture, or people accidentally bumping into the projector as it will all shake the image on screen. Get heavier, sturdier furniture to reduce this problem.
Floor Stands and Portable Setups
Some short throw projectors work with floor stands or tripods, especially models built for business presentations or portable entertainment. These setups give you maximum flexibility since you can position the projector anywhere in the room without drilling holes or running cables through walls.
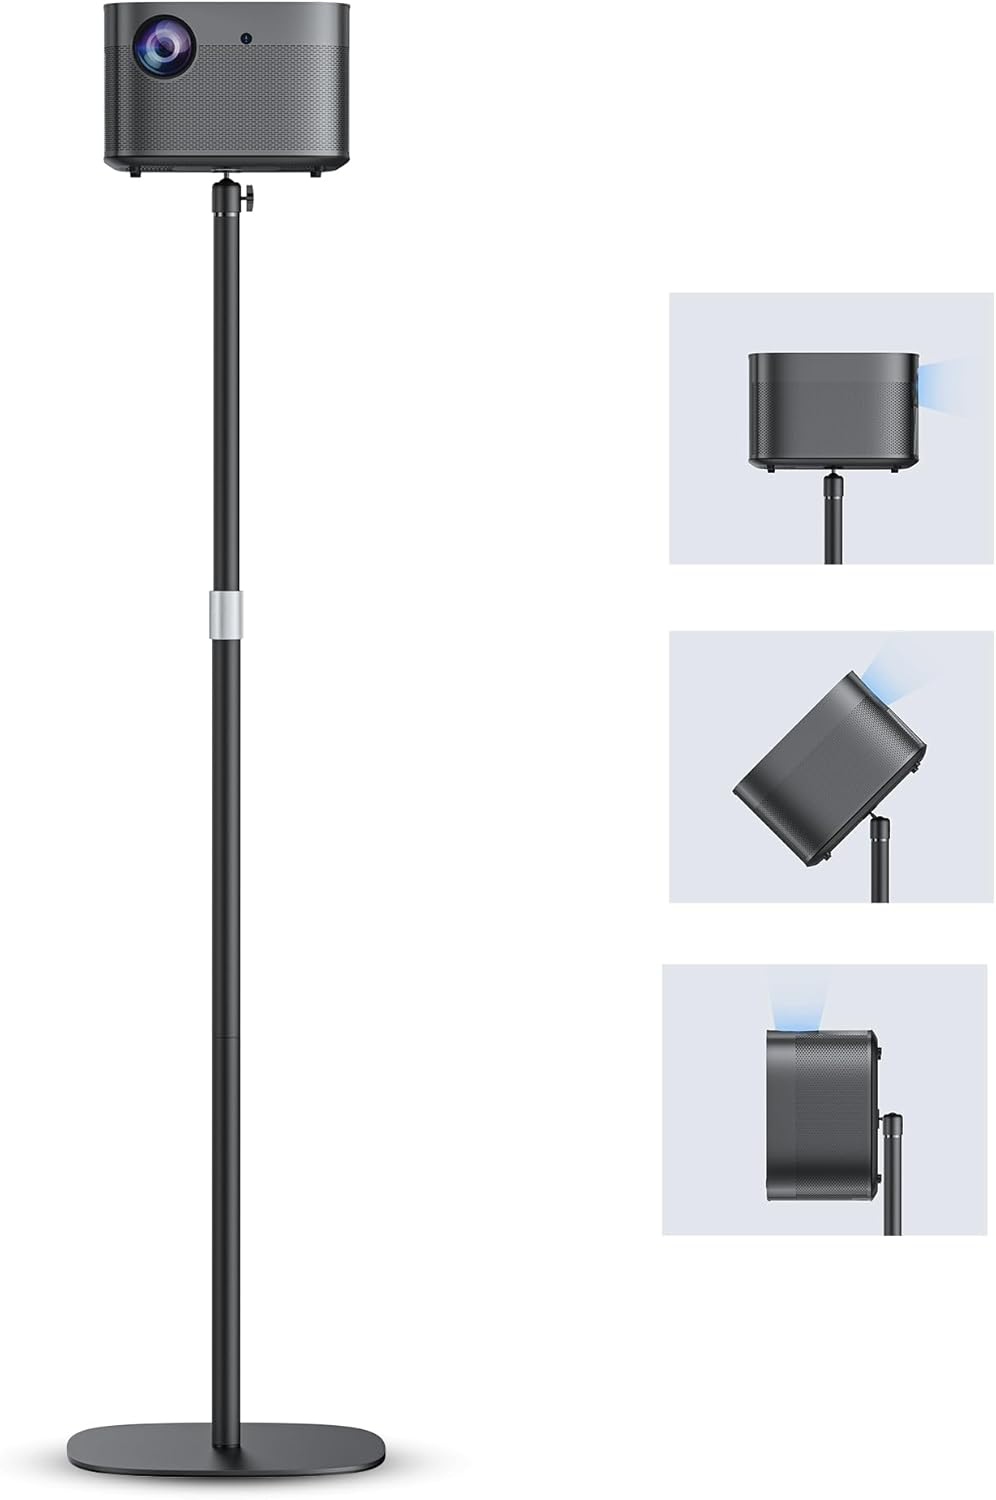
Source: Amazon
Floor stands usually adjust from 3 to 6 feet high and come with leveling mechanisms so you can get the alignment right. You mount the projector on the stand platform, then tweak the height and tilt until the image frames your screen properly. Admittedly, cable management isn’t the easiest to handle with floor stands since all your wires remain in plain sight, but you can opt for wireless connectivity to minimize the clutter.
Portable setups work well for temporary setups, rental properties where mounting isn’t allowed, or when you want to move the projector between different rooms. The downside is that stands aren’t as stable as permanent mounts (they can tip or shift if bumped), your equipment stays visible in the space, and you have to set everything up and take it down each time you use it.
Shadow Avoidance and Placement Benefits
Shadow blocking is one of the biggest practical wins with short throw projection. With standard throw projectors, anyone walking between the projector and screen casts huge shadows that block the whole image, which happens all the time in living rooms and bedrooms.
In certain situations, the shadow avoidance benefit makes all the difference. For instance:
- Fitness and yoga content means you’re standing and moving around in front of the screen constantly.
- Gaming with motion controls has you on your feet and shifting positions.
- Families with young kids deal with nonstop movement around the room.
- Home offices benefit since presenters can stand near the screen during presentations without casting shadows over their slides.
But remember, the shadow advantage depends heavily on where you mount the projector.
Recommendation: A short throw projector ceiling mounted a couple feet from the wall eliminates shadows for most activities, while that same projector sitting on a coffee table will cast shadows every time someone stands up. Therefore, plan your placement based on how people actually move around in your space.
Screen Selection and Geometry
Short throw projectors work with any projection surface, but sitting closer to the screen creates steeper angles that change how screens perform. The main thing you need to think about is matching your screen’s design to your projector’s throw ratio and the lighting in your room.
For general screen guidance on gain, materials, types, and sizing, see our guide to projector screens. This section focuses specifically on how the throw ratio affects which screen you should pick.
Standard Short Throw Compatibility (0.6:1 to 1.0:1)
Most fixed frame screens built for standard front projection work fine with short throw projectors in this range. Stick with gain ratings between 1.0 and 1.3 because higher gain screens create hot spots with short throw setups. The light coming from closer placement doesn’t spread as evenly, so the center of the screen ends up looking brighter than the edges.
Recommendation: Opt for tensioned screens since any wrinkles or waves in the material show up more when light hits at steeper angles, and budget $200 to $800 for quality options in the 100 to 120-inch range.
ALR Screens and Geometry Matching
The optical structures in ALR screens work like venetian blinds, angled to catch light coming from one direction (your projector) while blocking light from other directions (room lights overhead).
Standard throw ALR screens are angled for projectors sitting far away at shallow angles, so they catch light coming in almost horizontally. Short throw projectors sit much closer and shoot light upward at steeper angles, which means the screen’s “blinds” are tilted the wrong way and can’t catch the light properly.
Overall, remember, mismatched screens will either dim your image or fail to block ambient light effectively.
Recommendation: Look for ALR screens specifically designed for short throw geometry, usually labeled for 0.4:1 to 0.8:1 ratios. These cost $400 to $1,200 for 100 to 120-inch sizes and handle ambient light well when properly matched.
Ultra Short Throw Requirements (Under 0.4:1)
Ultra short throw projectors require specialized UST screens, and this is a practical requirement (not an optional upgrade).
UST projectors sit inches from the screen and project nearly straight up, creating extreme angles that standard screens can’t handle properly. UST ALR screens use Fresnel or lenticular optical structures that direct light toward viewers while blocking overhead lighting.
Recommendation: Without the right screens, ultra short throw projectors only work in completely dark rooms because standard materials can’t block ambient light at these extreme angles. So, budget $600 to $2,000 for 100 to 150-inch sizes, and upwards of $3000 if you’re going for premium models.
Brightness Requirements for Short Throw
Short throw projectors don’t produce different brightness levels than standard throw models, but sitting closer to the screen makes the light feel more concentrated and intense at the same lumen output.
Ultra short throw projectors marketed for living room use often claim 3,000 to 5,000 lumens because manufacturers assume you’ll use them with ambient light present.
However, keep in mind that manufacturers inflate brightness specs by 30 to 50 percent. A projector claiming 4,000 lumens will probably deliver 2,400 to 2,800 actual lumens once you calibrate the colors properly. Therefore, look for independent reviews that measure ANSI lumens with color accuracy verified at dE < 10.
Additionally, the brightness numbers above assume you’re matching your screen correctly. A 1.0 gain white screen reflects all the light your projector puts out, while a 0.6 gain ALR screen absorbs about 40 percent of it to block room light. So, you’ll need a brighter projector with ALR screens to compensate for that loss.
Gaming Performance Considerations
Short throw projectors appeal to gamers for two reasons:
- You don’t cast shadows on the screen when you move around
- The setup takes less space.
Standing or shifting during active gaming sessions doesn’t block the image when the projector sits close and overhead.
We have a guide to gaming projectors, if you want a deep dive on the topic. In the meantime, here’s an overview of what you need to know about the specs that affect gaming performance.
Recommendation:
For general gaming across various genres, prioritize:
- 1080p or 4K resolution
- 120Hz support
- 2,000+ lumens brightness
- Under 25 milliseconds input lag . For competitive gaming tighten to 15 milliseconds
- DLP (digital light processing) technology
Competitive gaming setups work well with short throws because you can position the projector near the screen and keep all your equipment in one area.
Smart Platform and Streaming Features
Short throw projectors are increasingly replacing TVs in living rooms, so built-in smart features have become necessities. You want plug-and-play streaming without needing external boxes cluttering your setup.
- Google TV delivers the best overall experience with personalized recommendations, wide app selection, and regular updates
- Android TV has similar functionality to Google TV with slightly less polish
- Fire TV and Roku have simpler interfaces and good performance, though content discovery isn’t as advanced
Netflix certification is essential since Netflix only allows its app on certified devices. Budget projectors under $250 often lack certification, forcing you to add a Fire Stick or Roku just to watch Netflix. However, this defeats the whole purpose of built-in streaming and adds visible cables.
Recommendation: Proprietary systems from projector manufacturers usually offer limited apps and get abandoned after release. So, stick with the major platforms for long-term support, even if it will cost you about an extra $200 – $400.
Light Source and Lifespan
Light source technology determines your maintenance costs and hassle over time, which is especially important since short throw projectors often serve as permanent TV replacements.
Recommendation: For TV replacement setups where you expect maintenance-free operation, opt for LED or laser sources. The $200 to $500 upfront cost difference disappears once you factor in $600 to $1,200 in bulb replacements over ten years.
Practical Considerations
A few things to think about for installation and daily use:
Audio System Quality and Setup
Short throw projectors usually include better built-in speakers than standard throw models. This is because they sit closer to viewers and frequently replace TVs where integrated audio adds convenience.
Here’s what built-in audio can handle to help you set realistic expectations:
Built-in Speaker Quality by Model Tier
For casual viewing of TV shows, YouTube, and streaming content, 20-watt+ built-in audio works fine. But movies and gaming benefit from external audio systems that deliver deeper bass and surround immersion, and serious home theater users will add external soundbars or surround systems regardless of how good the built-in speakers are.
For proper surround sound, you face the same challenges as any projector setup. The projector sits away from your soundbar or AV receiver, so you need HDMI ARC/eARC cable runs, wireless HDMI for audio, or source devices connected directly to audio equipment with video sent separately to the projector.
Bluetooth audio introduces sync issues and limits you to stereo output. Some people find the delay tolerable for movies and shows but frustrating for gaming where audio-visual timing is critical. If your projector supports Bluetooth 5.0 or newer with low latency codecs (aptX LL), the experience improves but never matches wired connections.
Lens Shift vs Keystone Correction
Optical lens shift physically moves the lens assembly to reposition the image without any digital processing, so every pixel stays sharp and at full resolution. Vertical lens shift lets you raise or lower the image by 10 to 50 percent of image height, while horizontal lens shift adjusts left or right positioning. Premium short throw projectors include lens shift specifically because getting precise ceiling mount placement is tough with shorter throw distances.
Digital keystone correction warps the image through processing, which creates geometric distortions and resolution loss. Heavy keystone makes 1080p content look closer to 720p quality, reduces brightness through pixel remapping, and creates uneven pixel density. Short throw projectors without lens shift force you into perfect mounting placement (which rarely happens in real installations) or accepting keystone’s quality hit.
Recommendation: Budget an extra $200 to $500 for models with optical lens shift if you’re ceiling mounting.
Focus and Auto-Focus Technology
Short throw projectors need more precise focus than standard models because the compressed projection path reduces depth of field, so small position changes affect focus quality noticeably.
Manual focus works through adjustment rings or digital controls. Some projectors include split-screen focus tools that show multiple image zones at once so you can verify uniform focus across the entire screen.
Auto-focus technology eliminates manual adjustment using different detection methods with varying speed and accuracy.
Auto-Focus Technology Comparison
Recommendation: For furniture-mounted setups where projectors might get bumped or repositioned, go for auto-focus. Permanently ceiling-mounted units only need focus adjustment during initial installation, so manual focus works fine.
Ventilation and Heat
Short throw projectors generate the same heat as any projector, but placement changes how you handle it. Ceiling-mounted units need 8 to 12 inches of clearance on all sides for air intake and exhaust, though some compact models need less.
Furniture-mounted projectors in enclosed cabinets need ventilation or heat will build up, trigger thermal shutdowns, or shorten the light source lifespan. Make sure cabinets have ventilation holes, fans, or enough open space around the projector.
Fans cool down your projector but fan noise affects your experience more with short throw because the projector sits closer to you. Standard throw projectors mounted far behind your seating make minimal noise, but short throw units positioned overhead or nearby become audible.
Recommendation: Check fan noise specs before buying and plan your placement to minimize how much the noise bothers you during quiet scenes. Target fan noise below 30 decibels for ceiling mounts and below 28 decibels for furniture-mounted units in quiet rooms.
Price and Value Expectations
Short throw projectors cost a bit more than standard throw models with similar specs, usually $100 to $300 extra. Ultra short throw projectors carry an even bigger premium and sometimes cost double what you’d pay for a standard throw equivalent.
Value varies a lot within each tier. Some $1,200 projectors outperform $2,000 competitors because they implement similar components better. Read independent reviews that measure actual performance instead of just trusting specification sheets.