Cleaning a blender might seem straightforward, but doing it properly makes a big difference – not just for hygiene, but also to keep your appliance running smoothly. Whether you use your blender daily or just occasionally, proper cleaning helps prevent lingering odors, stains, and dull blades.
In this guide you’ll find clear and easy step-by-step instructions for both daily and deep cleaning, as well as maintenance – including tips on what to avoid and what to focus on to keep your blender smelling and working like new.
What You’ll Need:
- Dish soap
- Warm water
- Soft sponge or bottle brush
- Cloth or towel
- Baking soda (optional)
- White vinegar or lemon juice (optional)
- Small brush or toothbrush
- Oven mitt or towel (for handling blades)
How to Clean a Blender: Step-by-Step
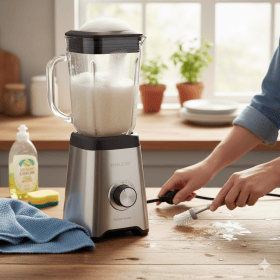
Step 1: Rinse immediately after use
![[MK] Draft: How to Clean a Blender](https://www.market.com/wp-content/uploads/2025/10/-mk-draft-how-to-clean-a-blender-1.png)
If you’re not going to wash your blender right away, give it a quick rinse with warm water right after using it to remove most of the residue. This prevents food from drying and getting stuck, and makes it much easier to clean later.
Step 2: Use the self-cleaning method
![[MK] Draft: How to Clean a Blender](https://www.market.com/wp-content/uploads/2025/10/-mk-draft-how-to-clean-a-blender-2.png)
- Fill the blender halfway with warm water and add a few drops of dish soap.
- Secure the lid and blend on high speed for about 30 seconds.
This helps loosen any residue stuck to the blender jar or blades. Some blenders may even have a self-cleaning cycle, so you can use that if available.
Step 3: Rinse and inspect
![[MK] Draft: How to Clean a Blender](https://www.market.com/wp-content/uploads/2025/10/-mk-draft-how-to-clean-a-blender-3.png)
- Pour out the soapy water and rinse the blender out thoroughly.
- Check for any remaining residue, and follow up with manual cleaning if needed.
Step 4: Manual cleaning
![[MK] Draft: How to Clean a Blender](https://www.market.com/wp-content/uploads/2025/10/-mk-draft-how-to-clean-a-blender-4.png)
- Disassemble the blender and clean each part with warm, soapy water using a sponge or a brush.
- Be extra careful when handling the blades — covering sharp parts with a towel can help prevent injuries.
- Using a toothbrush or a smaller brush can be helpful to clean tighter spots.
- When you’re done, rinse each part thoroughly with warm water.
Step 5: Dry completely
![[MK] Draft: How to Clean a Blender](https://www.market.com/wp-content/uploads/2025/10/-mk-draft-how-to-clean-a-blender-5.png)
Let each part air dry on a dish rack. Make sure the jar and any other parts that can collect water are placed upside down, to avoid trapping moisture and bad smells. You can also use a towel to dry it, but make sure everything is completely dry before you reassemble it. This will help prevent unpleasant odors and mold.
How to Deep Clean a Blender
Even if you take good care of your blender, an occasional deep clean is a good idea — especially if it starts to smell, looks cloudy or has stubborn residue because it wasn’t cleaned right after use. Here’s how to do it right:
Step 1: Disassemble the blender
![[MK] Draft: How to Clean a Blender](https://www.market.com/wp-content/uploads/2025/10/-mk-draft-how-to-clean-a-blender-6.png)
Take apart all components: lid, jar, blades (if not attached to the lid) and gasket, if your blender has one.
Step 2: Soak the parts
![[MK] Draft: How to Clean a Blender](https://www.market.com/wp-content/uploads/2025/10/-mk-draft-how-to-clean-a-blender-7.png)
- Fill a sink or basin with warm water and add a splash of vinegar or a spoonful of baking soda (optional).
- Let the parts soak for about 15-30 minutes, to loosen stains and get rid of any smells.
- Adding a few lemon slices can add extra freshness.
Step 3: Scrub each component
![[MK] Draft: How to Clean a Blender](https://www.market.com/wp-content/uploads/2025/10/-mk-draft-how-to-clean-a-blender-8.png)
- Gently scrub each part with a sponge or a brush.
- Pay extra attention to tight spots around the blades and on the gasket, as these areas can often trap food residues and smell.
Step 4: Clean the base
![[MK] Draft: How to Clean a Blender](https://www.market.com/wp-content/uploads/2025/10/-mk-draft-how-to-clean-a-blender-9.png)
Never submerge the blender base in water, as that can damage the motorized part. Instead, wipe it down with a damp kitchen cloth and a few drops of dish soap if necessary. Dry it thoroughly afterwards.
Step 5: Let all components air dry
![[MK] Draft: How to Clean a Blender](https://www.market.com/wp-content/uploads/2025/10/-mk-draft-how-to-clean-a-blender-10.png)
Rinse all parts with warm water and place them on a clean dish rack to air dry. Make sure everything is completely dry before reassembling.
How to Clean the Blender Base
The base of your blender is where its motor is, so it should never be submerged in water as that can cause permanent damage. But it still needs an occasional clean to keep it looking fresh! Here’s how to do it.
You’ll need:
- a damp kitchen cloth or a sponge
- a dry cloth or paper towel
- a toothbrush or cotton bud (for tighter spots, if needed)
- dish soap (for sticky or greasy areas)
Step 1: Unplug the blender
Always unplug the base before cleaning to avoid any electrical hazard due to water contact.
Step 2: Wipe with a damp cloth
Carefully wipe the base down with a damp cloth to remove any dirt and stains.
Step 3: Use soap for sticky spots
If water alone is not enough to remove the most stubborn stains, add a few drops of dish soap to remove grease and clean sticky areas.
Step 4: Clean hard-to-reach areas
Use a toothbrush or a cotton swap to reach tight spots where dirt can build up, like the socket where the jar clicks into place, as that can easily collect dust and food residue.
Step 5: Dry thoroughly
Wipe the base with a dry towel or cloth to dry it, reaching into all hard-to-reach spots to avoid any water damage. Make sure it’s completely dry before plugging it back in.
Tips for Keeping Your Blender Clean
Rinse immediately after use
A quick rinse with warm water prevents food from drying and sticking to the jar, making proper cleaning much quicker and easier.
Do a weekly deep clean
Even if your blender looks clean, regular deep cleans can help keep it in great condition and remove any hidden dirt that goes unnoticed during daily cleaning. This keeps your blender jar shiny and prevents unpleasant odors.
Use vinegar to remove persistent smells
Add a splash of vinegar to the water when soaking the blender parts to remove or prevent lingering odors. Lemon juice also works well as an alternative.
Keep the base dry
Always make sure the base is fully dry after cleaning. This will prevent water damage and any potential electrical hazards when plugged in.
Store with the lid off
Keep the lid off the jar between uses to let it air out. This prevents trapped moisture, which can cause unpleasant smells.
Common Mistakes to Avoid
Putting the base in the dishwasher or sink
The base contains the motor and can be damaged by excessive water. Instead, wipe it down with a damp cloth and dry it thoroughly right after.
Forgetting to clean under the blades
Food residue can go unnoticed in hidden spots like under the blades. Use a toothbrush or a cotton swab to reach these areas too and prevent dirt build-up.
Using harsh scrubbers or abrasive sponges
Using harsh or abrasive sponges can scratch the jar, especially if it’s plastic. Instead, choose a soft sponge or kitchen cloth for a more delicate touch.
Assuming all parts are dishwasher safe
Not every part of the blender is dishwasher safe, especially rubber seals and more obvious ones, like the base. If you’re not sure, check the user manual for precise instructions, or just do it manually to be on the safe side.
Reassembling before everything is dry
Putting the components back together before everything is fully dry can trap moisture and lead to unpleasant smells or mold. Always let all parts dry completely and store with the lid off to air the jar out.
How Often Should You Clean a Blender?
Daily
- Rinse after every use: Always clean the jar, blades and lid after using the blender, either manually or using the self-cleaning method (fill the jar half-way with soapy water and blend for 30 seconds).
- Wipe the base if needed: This might not be necessary after every use, but a quick wipe can help prevent food from drying and sticking to the base, making deep cleaning much easier.
Weekly
- Deep cleaning: Once a week, disassemble the blender and soak each component in warm water (optional: add vinegar or lemon to help get rid of odors) to loosen any stubborn buildup.
- Focus on tight spots: Use a toothbrush or a cotton swab to clean hard-to-reach areas like under the blades.
Monthly
- Check for damage: Check the jar for any cracks and make sure the blades are not going dull. Replace any damaged part to avoid malfunctions.
- Disassemble fully: Take apart as many components as possible, to make sure there is no build up hiding anywhere and all parts function properly.