

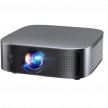


Projectors aren’t just for classrooms and conference rooms anymore; they’ve become a popular alternative to TVs for home entertainment, gaming, outdoor movie nights, and even professional presentations. With prices more accessible than ever, it’s easy to get a massive screen experience without paying TV-level costs.
The problem? Choosing the right projector isn’t simple. Brightness, resolution, throw distance, room size, and usage type all matter — and spec sheets don’t always tell you how a projector will actually perform in your space.
This guide is designed to help you choose the right projector for your needs. We break down the features that truly matter, explain how they affect real-world performance, and show you how to match a projector to your room, budget, and intended use.
By the end of this article, you’ll know exactly what to look for, what to ignore, and how to avoid overpaying for features you don’t need.
TLDR
- For brightness, look for ANSI or ISO lumens, not lux or “LED lumens.” Target 1,500+ for 100–120 inches in a dark room, 2,500+ for some ambient light, 3,500+ for bright rooms or outdoor after dark.
- For contrast, prioritize native (on/off) and ANSI contrast, ignore “dynamic.” Aim 3,000:1+ casual, 10,000:1+ for dark-room theater with good light control.
- For resolution, 1080p is fine under 120 inches or if you sit far. Pixel-shifting 4K for 120–150 inches or closer seating. Native 4K only if you’re building a dedicated setup and sitting close.
- For color, look for 95%+ Rec.709 with good accuracy. If budget allows, 90%+ DCI-P3.
- For placement, measure first. Throw distance = throw ratio × screen width. Pick UST for tight spaces, short throw for 3–8 ft, standard throw if you have 9–15 ft and want the widest choices.
- For lens/zoom/keystone, prefer optical lens shift and at least 1.3x optical zoom. Accept tiny edge misalignment. Use minimal keystone only as a last resort.
- For light source, lamps are cheap up front but dim and need replacements. LED is long-life and efficient but dimmer at the price. Single laser is the best balance for most homes. Triple laser offers top color and HDR if budget allows.
- For the screen, a smooth matte wall is OK for small, dark-room setups. For most rooms, get a proper screen; UST requires UST-ALR.
- For audio, built-ins are backup. For surround, plan ARC/eARC (Bluetooth is stereo only).
- For smart features, Google TV/Android TV = widest apps; confirm Netflix certification or use a streamer.
- For connectivity, 2× HDMI 2.0 min; HDMI 2.1 only if you need 4K/120; eARC for lossless Atmos; USB-C needs DP Alt Mode/PD to be useful.
- For fan noise, aim for 30 dB or lower for home theater. Eco modes cut noise and brightness. Avoid 35 dB+ for long viewing.
- For warranty, 2+ years minimum; 3–5 years ideal. Check light-source coverage.
What Should You Look For When Buying a Projector?
As with most purchases, your budget sets the boundaries.
- With $300-500, you’re looking at decent portable projectors or entry-level models for dark rooms.
- Spending $800-1,200 steps it up to solid home theater options with good brightness and resolution that can handle some ambient light.
- Above $2,000, you enter premium territory with laser light sources and native 4K.
But price alone doesn’t tell you if a projector fits your needs. Even within those constraints, certain features deserve priority depending on how and where you plan to use it. The best projector is the one that works for you.
Performance
Brightness
Brightness measures how much light the projector outputs in lumens. The standardized measurements are ANSI lumens or ISO lumens, and many reputable brands do publish those numbers, though some budget models don’t and instead use terms like “LED lumens” or lux, which aren’t comparable.
You’ll see projectors advertised at 5,700 lumens, but they actually put out only 3,000 lumens when tested with proper color calibration. That’s almost a 50% overstatement, and even reputable brands do this.
The gap between advertised and actual brightness isn’t consistent either. Budget projectors might inflate by 60-80%, mid-range models typically overstate by 30-40%, and premium brands usually stay within 15-20% of their claims.
But here’s why you need to get it right. Brightness determines three important things:
- Maximum usable screen size
- Ambient light tolerance
- HDR content display capability
A practical look at the impact of brightness:
In a fully dark room on a 1.0-gain screen, 1,000 lumens can light up a 150-inch image, but it won’t look punchy, and any room light will wash it out quickly. Each time you double the screen diagonal, you need roughly 4x the brightness to maintain the same image quality.
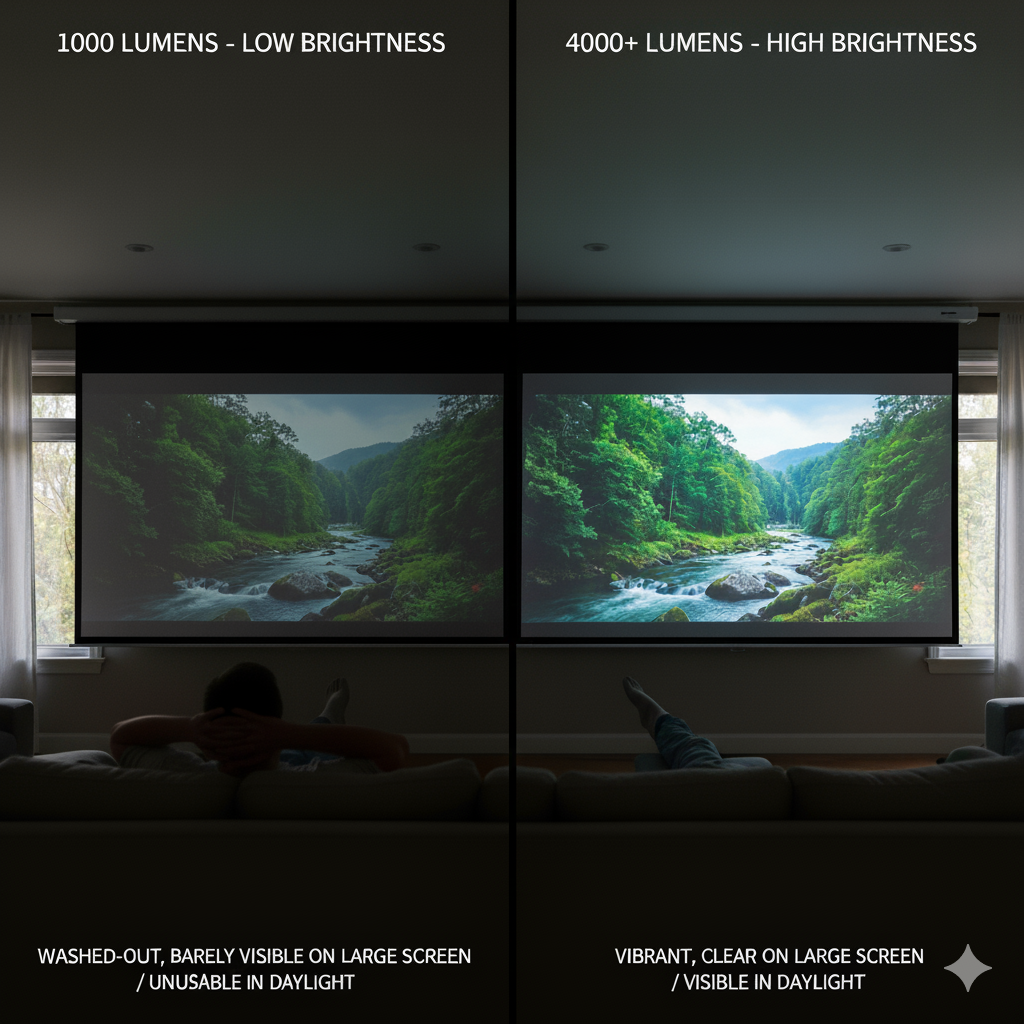
That same 1,000-lumen projector in a room with windows becomes nearly unusable during the day. You literally have to squint to see anything. And even at night, with a few lights on, the image looks like someone stretched a bedsheet over your screen. But higher brightness means you can actually use the projector without living in a cave.
For HDR content, brightness headroom is essential to display highlights properly. If your projector barely musters 1,500 lumens, HDR content will look dim and lifeless because there’s not enough light output for those bright peaks that make HDR impressive.
For context, movie theaters run 40,000-60,000 lumens for those massive screens. Your living room doesn’t need that kind of power, but understanding the scale helps you set realistic expectations.
If you’re planning outdoor movies, even projectors claiming 6,000 lumens struggle with 30-foot walls at sunset because ambient sunlight overwhelms the image. Outdoor projection after dark becomes manageable with consumer equipment, but outdoor projection before sunset requires commercial-grade projectors in the 10,000+ lumen range to compete with daylight.
Verdict: Don’t trust manufacturers’ lumens claims (lux or “LED lumens) and look for independent reviews that measure actual output. As starting points, aim for:
- 1,500+ measured lumens for a 100–120 inch screen in a dark room
- 2,500+ for a living room with some ambientlight
- 3,500+ for outdoor or business use after dark.
Contrast Ratio
A lot of people assume that brightness is what primarily determines your image quality. However, contrast ratio is what determines how good your image looks. Contrast ratio measures the difference between the darkest blacks and the brightest whites the projector can produce.
A projector with 2,000:1 contrast shows blacks that look dark gray, while one with 20,000:1 produces blacks that look black with detail visible in shadow areas. The difference is immediately obvious when you watch something like a space scene or a dark interior.
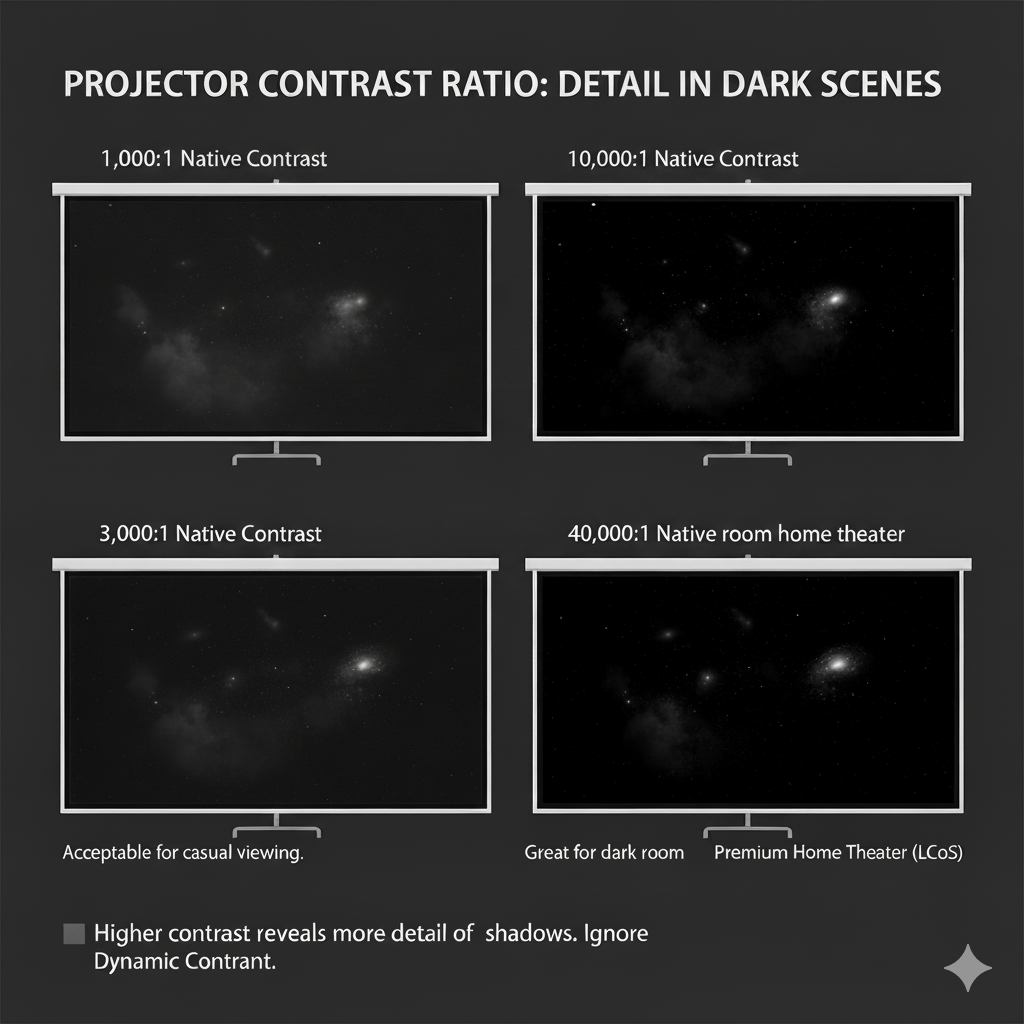
Native (on/off) contrast and ANSI contrast are the measurements that actually matter. These figures use static settings, meaning the numbers reflect how the projector performs when dark and bright content appear on screen at the same time — not inflated marketing specs.
What contrast ratios typically look like by price tier:
- Budget projectors: ~1,000–3,000:1
- Mid-range projectors: ~3,000–10,000:1
- Premium home theater models: ~15,000–40,000:1
Display technology also plays a major role in contrast performance:
- DLP (Digital Light Processing): Typically ~2,000–5,000:1
- 3LCD (Liquid Crystal Display): Also around ~2,000–5,000:1
- LCoS (Liquid Crystal on Silicon): ~15,000–40,000:1, found in high-end Sony and JVC projectors, usually priced $3,000+
For most buyers, around 3,000:1 native contrast is acceptable for casual viewing. If you’re serious about home theater and watch a lot of movies in a dark room, aim higher, about 10,000:1+ native on/off, and pair it with good black-level handling and room light control. Below 2,000:1, the image looks flat and washed out regardless of brightness.
Verdict: Target 3,000:1 minimum for casual viewing, 10,000:1+ for serious home theater. Ignore dynamic contrast numbers and look for native or ANSI contrast specifications.
Resolution
Resolution is how many tiny dots (called pixels) make up the image. More dots mean a sharper, more detailed picture, kind of like how a high-quality photo looks clearer than a blurry one. This matters most when you’re sitting close to the screen or projecting a really large image.
Projector manufacturers love to confuse buyers with resolution claims. You’ll see “Supports 4K,” “4K Compatible,” “4K Enhanced,” and “Native 4K,” which are not the same thing at all.
Supports 4K or 4K Compatible
The projector can receive a 4K signal from your device, but then it shrinks that signal down to display it at a lower resolution, usually 1080p. You’re not actually seeing 4K. You’re seeing 1080p that started as 4K. This is the most common type of misleading marketing. Some listings also say “4K input,” which means the same thing.
4K Enhanced or 4K UHD with XPR
These projectors have a 1080p chip inside, but they use a trick called pixel-shifting, where the image moves diagonally really fast to make it look like there are more pixels than there are. This produces sharper images than straight 1080p and gets pretty close to real 4K. Most “4K” projectors under $2,000 use this technology.
Native 4K or True 4K
The projector has a 4K chip with 8.3 million pixels. These start around $3,000 and go up from there. Premium home theater projectors use native 4K.
8K (7680×4320)
This is the absolute top tier with four times the pixels of 4K. These projectors are rare and expensive (typically $10,000+), and they’re honestly overkill for almost everyone. You’d need screens over 200 inches and viewing distances under 6 feet to truly appreciate the difference over native 4K, plus there’s barely any 8K content available to watch. This is mostly for professional setups rather than practical home theater.
For most buyers, the practical difference between good pixel-shifting and native 4K is minimal unless you’re sitting very close to a very large screen. From 10-12 feet away, watching a 120-inch screen, pixel-shifting 4K looks excellent.
Realistically, a person upgrading from a pixel-shifting 4K projector to a native 4K would note an improvement, but it would be incremental rather than transformative. The contrast improvement would matter more than the resolution bump.
However, resolution means nothing if the lens is poor quality. A cheap 4K projector with a bad lens will look worse than a quality 1080p projector with excellent optics, so focus on overall image quality, not just pixel count.
Verdict: For most buyers, 1080p is sufficient for screens up to 120 inches. Pixel-shifting 4K makes sense for 120-150 inch screens if your budget allows, while native 4K is overkill unless you’re building a dedicated theater with a 150+ inch screen.
Color Accuracy and Gamut
Color gamut is the range of colors a projector can display. Think of it like a painter’s palette: a small palette has basic colors, while a larger palette has every shade imaginable. Your projector might be bright and sharp, but if colors look washed out or oversaturated, the viewing experience suffers.
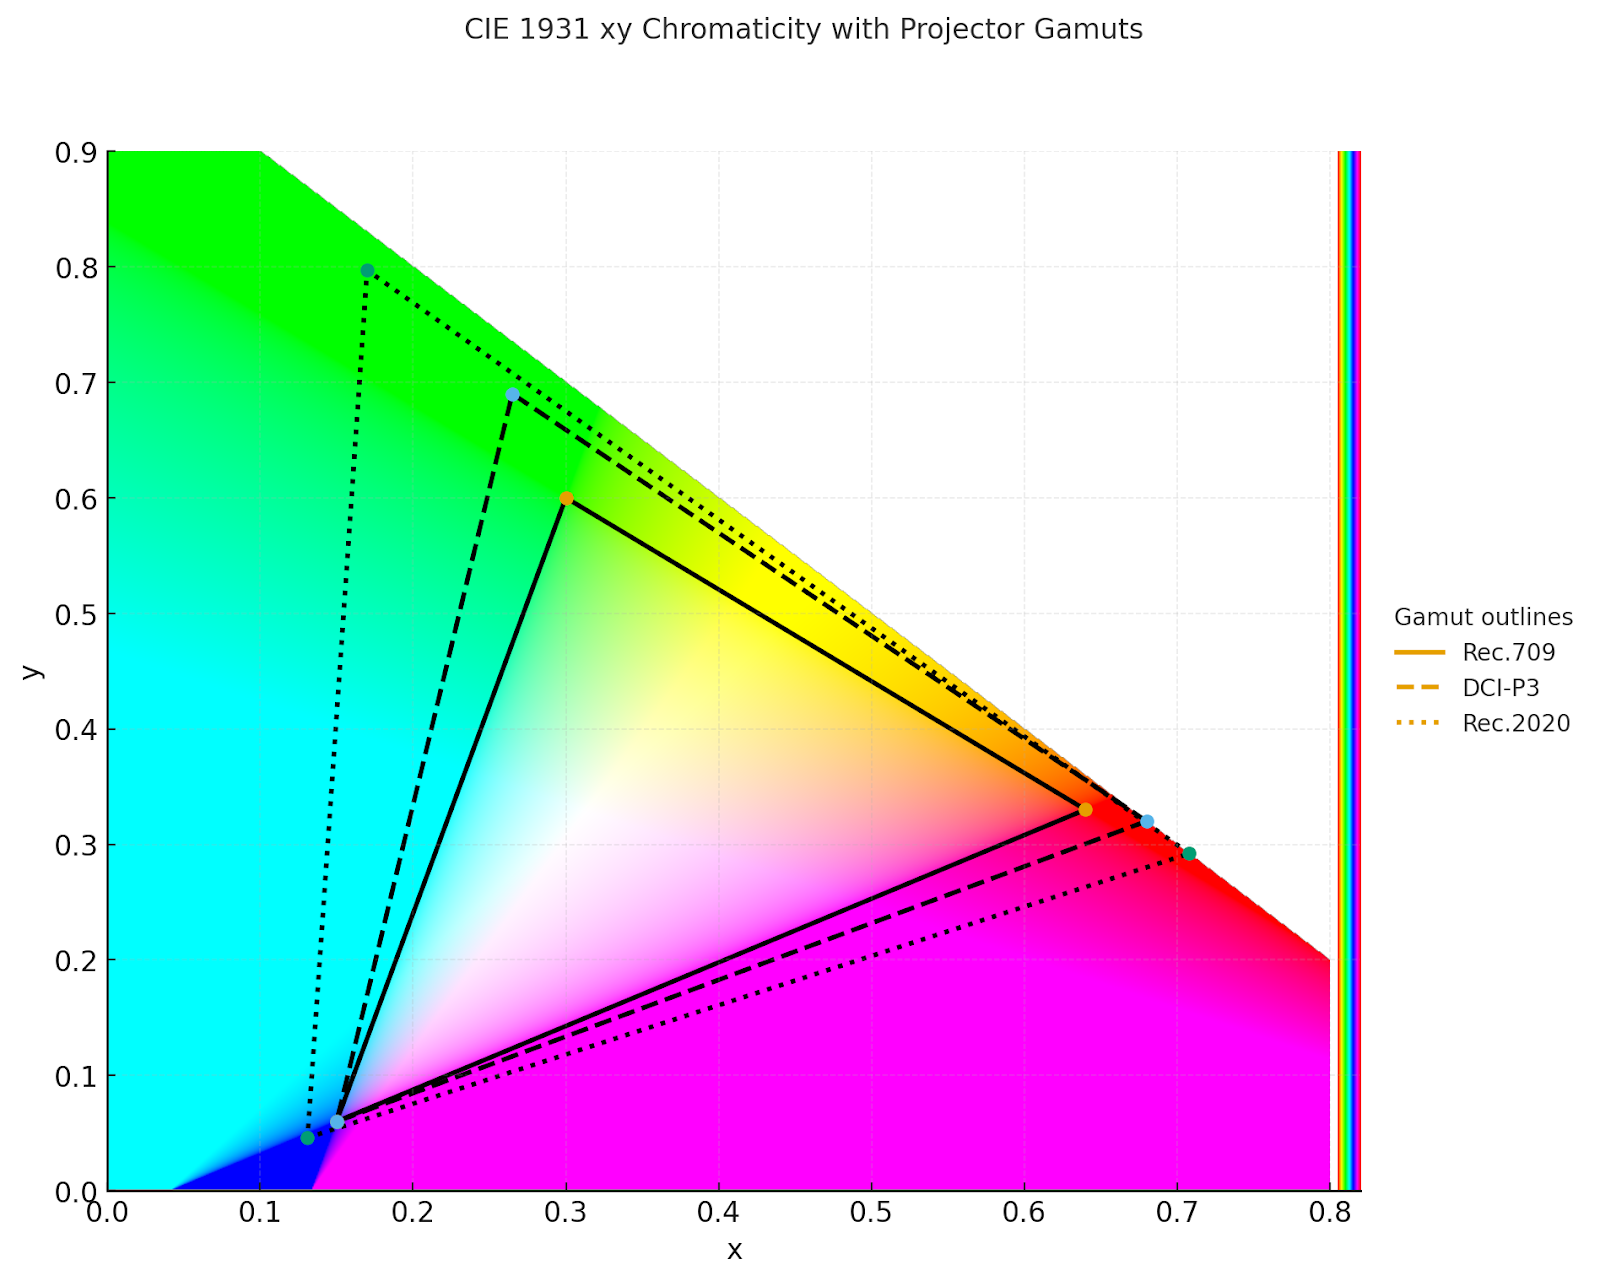
The standards you’ll see mentioned are essentially different-sized palettes:
Rec.709 is the broadcast television standard and covers about 35% of all the colors humans can see. Any decent projector should hit 90-100% of Rec.709, which means it can display most of the colors in regular TV shows and streaming content.
DCI-P3 is the digital cinema standard and covers about 45% of visible colors, with stronger reds and greens than Rec.709. This is what movie theaters use. Premium projectors achieve 90-100% DCI-P3, so colors look richer and more lifelike.
Rec.2020 (BT.2020) is the HDR and future content standard covering about 75% of visible colors. Almost no consumer projectors can fully cover this yet, though premium models might hit 70-80%.
Practically, this is how to envision color gamut:
For the actual projectors, expect the following in the different price categories:
Additional concerns
The light source technology matters here as well. Traditional lamp projectors struggle with color gamut, while single laser (laser phosphor) improves on lamps. Triple laser (RGB) delivers the widest gamut but only appears in projectors starting around $1,200.
Wider gamut doesn’t always mean better though. A projector hitting 100% Rec.709 with proper calibration looks better than one claiming 110% DCI-P3 but displaying oversaturated, inaccurate colors. It’s like having a huge palette but using the wrong shades.
Verdict: Target 95%+ Rec.709 coverage minimum. If you’re serious about color accuracy and your budget allows, look for 90%+ DCI-P3 coverage with good reviews mentioning color accuracy, not just gamut width.
Placement and Setup
You can have the brightest, sharpest projector in the world, but if it doesn’t physically fit your space, it’s useless. Many buyers mess up by focusing on specs and forgetting to measure their rooms.
Throw Distance and Throw Ratio, AKA Stop, and Measure Your Room First
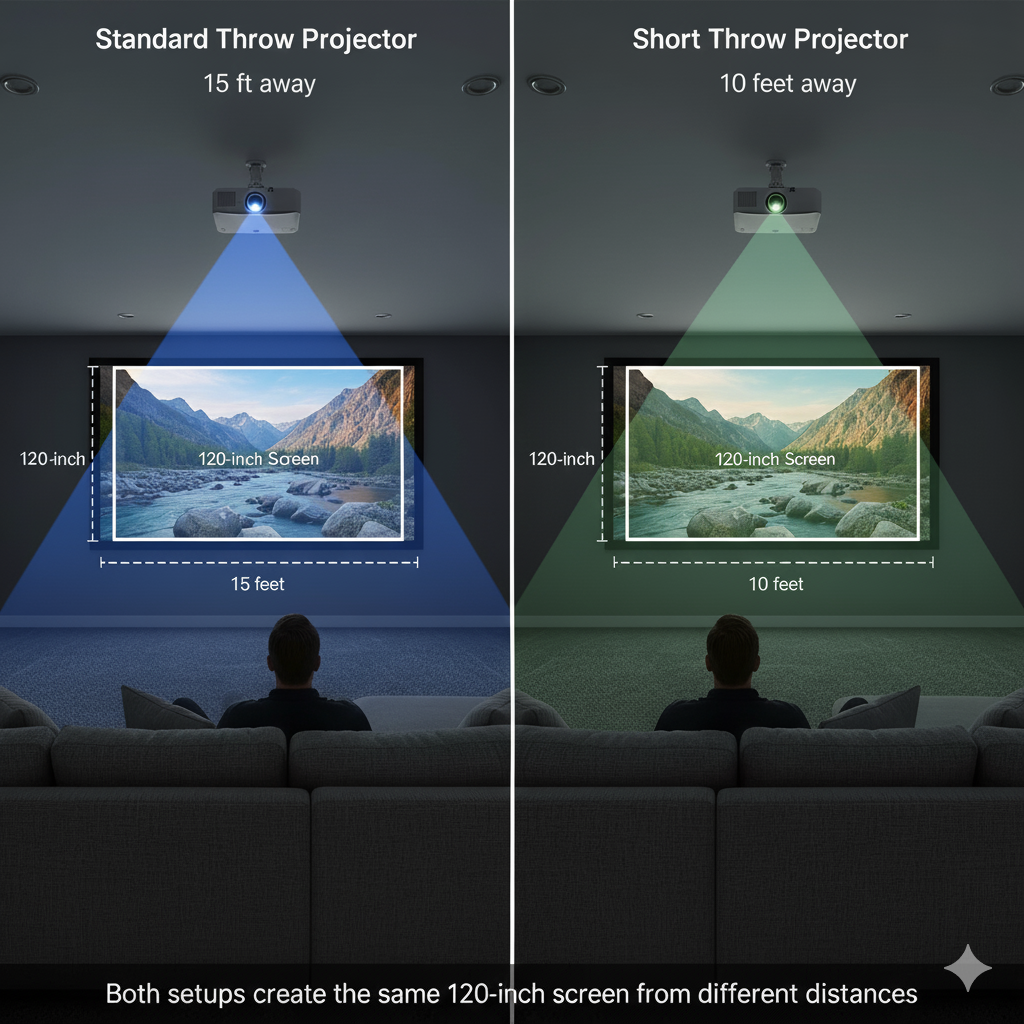
Throw distance is how far the projector needs to be from the screen to create your desired image size, while throw ratio is the mathematical relationship between that distance and image width.
Throw Distance = Throw Ratio × Screen Width
A projector with a 1.5:1 throw ratio creates a 100-inch image from about 11 feet away (100-inch diagonal equals approximately 87 inches wide in 16:9 format, × 1.5 = 130.5 inches). Note that many projectors list a throw ratio range because of zoom, so check the full range, not a single number.
Projectors fall into these categories based on throw ratio:
Ultra Short Throw (UST) – 0.25:1 or less
These projectors sit inches from the screen, creating a 100-inch image from about 1-2 feet away. Perfect for small rooms or rooms where you can’t mount a projector on the ceiling, though they start around $1,500 and require special ALR (ambient light rejecting) screens for best performance. Any bump or movement requires realignment as well.
Short Throw – 0.4:1 to 1.0:1
These create a 100-inch image from roughly 3-9 feet away and represent the “goldilocks zone” many buyers want but struggle to find. Ceiling-mounted short throw projectors solve the shadow problem (you walk in front without blocking the image) and the cable problem (short run to screen), though the market offers limited options here compared to standard throw.
hort throw lenses are more expensive to manufacture and typically show brightness or sharpness degradation at the edges compared to standard throw lenses. For many room configurations though, the convenience outweighs the slight quality loss.
Standard Throw – 1.2:1 to 2.0:1
The most common category creates a 100-inch image from roughly 10-17 feet. These offer the best image quality for the price because the optics are simpler and more mature, so if your room accommodates this throw distance, you’ll find the most options here.
Long Throw – 2.0:1+
They are meant for large venues or very large screens, and might need 20+ feet for a 100-inch image. They’re also used to create 200+ inch images in auditoriums.
Disclaimer: The biggest mistake buyers make involves falling in love with a projector before measuring their room. You can’t change your room dimensions, so the throw ratio becomes a filtering requirement, not a preference. Think of the real life situation below:
If your couch is 10 feet from your wall and you want a ceiling-mounted projector behind the seating area, check the throw ratio carefully. With a 1.5:1 projector at 10 feet, the image width is 120 ÷ 1.5 = 80 inches, which is about a 92-inch diagonal in 16:9. If you want that 120-inch screen, you’d need either a short throw projector or to move the mounting point further back to around 13 feet with a 1.5:1 ratio.
So, use a throw distance calculator (can be found online as a free tool) before buying anything.
Verdict: Measure your room first and determine where you can mount the projector and how far that is from your screen. Then filter projectors by the throw ratio that fits your space. Don’t compromise on this since the best projector in the world is useless if it can’t physically work in your room.
Lens Shift, Zoom, and Keystone
Once the projector is mounted, you need to align the image with your screen, and there are three ways to do this, listed from best to worst:
Optical Lens Shift
The projector’s lens physically slides up, down, left, or right inside the housing without touching the image quality at all. This is how you fix alignment issues properly, though it mainly shows up in projectors over $1,000.
Let’s say your ceiling mount ends up slightly off-center or you need to position the projector higher than ideal because of a ceiling fan. With lens shift, you just move the lens mechanically to adjust where the image lands on the screen, and you still get a perfect rectangle with full sharpness and brightness. Lens shift ranges are usually quoted as a percent of image height or width, for example, ±50% vertical and ±10% horizontal, so check the spec to be sure it covers your placement.
Optical Zoom
This lets you make the image bigger or smaller without physically moving the projector closer or farther from the screen. Zoom gives you a throw-ratio range, for example, 1.2–1.8:1 on a “1.5x” zoom. That range provides placement flexibility so you can hit the same screen size from several positions within that window. The exact distances that work depend on the projector’s specified throw-ratio range, not the zoom number alone.
Budget projectors often skip this feature and use fixed lenses instead, which means you have to position them at one exact distance to get your desired screen size. Avoid “digital zoom,” which just scales pixels and reduces effective resolution.
Digital Keystone Correction
When your projector sits at an angle to the screen instead of straight on, the image comes out shaped like a trapezoid (think of a rectangle that’s wider at the top than the bottom). Keystone correction digitally squashes the image back into a rectangle so it looks normal.
The problem is that this digital fix throws away pixels and dims the picture to make everything line up. It’s like taking a photo, cropping out the edges, then stretching what’s left to fill the frame again. You lose sharpness. Heavy keystone correction can make your 1080p projector look more like 720p.
Digital keystone correction is the “fix it in post” solution. It works, but you’re much better off just positioning the projector correctly in the first place.
Now, say you pull up a test grid and notice the edges are off by an inch or two. Don’t touch keystone because that tiny misalignment you see on the grid disappears completely when you’re actually watching a movie. I insist: using Keystone to fix it would make your picture quality noticeably worse.
Auto keystone detects the angle and fixes it for you without any button pressing, which sounds great. Except. It still degrades your image the same way manual keystone does. It’s more convenient than manually adjusting settings for ten minutes, but not as good as just putting the projector in the right spot to begin with.
Verdict: This is the hierarchy of solutions:
- Position the projector properly using optical lens shift and zoom
- Accept minor misalignment (1-2 inches at the edges is invisible during viewing)
- Use minimal keystone only as a last resort
- If you need heavy keystone, you bought the wrong projector for your space
Therefore, prioritize projectors with optical lens shift and 1.3x+ optical zoom if you can afford them. Remember that fixed lens projectors require exact positioning, which is often impossible in real rooms. And avoid relying on keystone correction except for minor tweaks.
Focus Technology (Manual vs Auto)
Manual focus requires you to adjust a physical ring or remote control to sharpen the image, which works fine, but takes time and trial-and-error, especially if you move the projector frequently. You’re essentially twisting a dial back and forth until the test pattern looks crisp, and if you’re off by even a little bit, the image stays blurry.
Auto focus uses sensors to detect screen distance and adjust automatically without you touching anything. Basic versions rely on infrared sensors or camera-based contrast detection and take 5-10 seconds to lock in focus.
Advanced Time-of-Flight (ToF) systems work faster by measuring distance with infrared light pulses, achieving sharp focus in 1-2 seconds with high precision. Premium implementations can even refocus in under 3 seconds (Real Time Auto Focus) if the projector gets bumped or moved.
Verdict: For permanently mounted ceiling projectors, manual focus is perfectly adequate since you only need to set it once during installation. For portable projectors that you move between rooms or take outdoors though, auto focus becomes essential because fiddling with focus adjustments every single time you set up gets old fast.
Light Source Technology and Lifespan
The light source is the projector’s heart, and it dramatically affects your total cost of ownership.
Traditional Lamp (UHP/Mercury Bulbs)
These are the old standard technology that dominated projectors for decades and still appear in many budget and mid-range models today. They use high-pressure mercury or metal halide bulbs that get extremely hot and produce intense white light, which then gets filtered into colors.
They work well, they’re bright, and they keep upfront costs lower than newer technologies, but they come with some significant limitations:
- Limited lifespan: 2,000-5,000 hours, depending on mode. At 4 hours of daily use, that’s 1.4 to 3.4 years before replacement.
- Declining brightness: Bulbs lose 20-30% brightness before they die, so a 3,000-lumen projector might deliver only 2,000 lumens in its final year.
- Replacement cost: $100-300 per bulb, depending on the model, though some projectors use rare bulbs that cost $400+.
- Availability concerns: When projector models get discontinued, bulbs often disappear from the market too. If you can’t find a replacement bulb, your projector becomes a paperweight.
In Europe, there’s an additional concern since bulb regulations taking effect in 2026 may restrict availability of replacement bulbs.
10-Year Cost Calculation
Let’s do the math. A $600 lamp projector with 3,000-hour bulb life and $150 replacement bulbs means:
- 6,000 hours of use = 2 bulbs = $300 in replacements
- 12,000 hours of use = 4 bulbs = $600 in replacements
- Total 10-year cost (assuming 4 hours daily): $600 projector + $1,200 in bulbs = $1,800
Compare to a $1,000 LED projector with 20,000+ hour lifespan:
- 10-year cost: $1,000 (no replacements needed)
The LED projector costs more upfront but less long-term, plus you avoid brightness degradation and the hassle of finding and replacing bulbs.
Note: Solid-state sources still dim over time (much more slowly than lamps), and some models use “constant brightness” modes to compensate.
LED (Light Emitting Diodes)
LED projectors use arrays of tiny semiconductor light sources instead of traditional bulbs, similar to how modern LED light bulbs work in your home. These solid-state light sources don’t burn out the way traditional bulbs do, and they generate less heat while using less power. This technology delivers several benefits:
- 20,000-30,000-hour lifespan: At 4 hours daily, that’s 13-20 years. Realistically, you’ll upgrade before the LED dies.
- Consistent brightness: Slower brightness decay than lamps, but not zero.
- Instant on/off: No warm-up or cool-down period required.
- Lower power consumption: Typically 60-150W vs 200-300W for lamps.
The trade-offs include:
- Lower peak brightness: Budget LED projectors top out around 500-1,000 lumens. High-end LED models might reach 2,000-2,500 lumens, but lamp projectors at the same price achieve 3,000-4,000 lumens.
- Color accuracy limitations: Basic LED projectors sometimes struggle with accurate colors, though this has improved significantly in recent years.
LED works best for portable projectors, bedroom setups, and smaller screens (under 100 inches) in dark rooms. For large screens or ambient light situations, LED brightness limitations become problematic.
Single Laser (Laser Phosphor)
These projectors use a blue laser that hits a spinning phosphor wheel to generate the full range of colors. They deliver several benefits:
- 20,000-30,000-hour lifespan to 50% brightness is a common spec
- Higher brightness, reaching 3,000-5,000+ lumens while maintaining efficiency.
- Better color than basic LED, though not as good as triple laser.
- Instant on/off like LED.
Single laser appears in projectors starting around $800-1,500 and represents the middle ground between LED portability/longevity and lamp brightness.
Triple Laser (RGB Laser)
Instead of using one laser and a color wheel, these projectors have three separate lasers (red, green, and blue) that combine to create the image directly. This is the premium light source technology in consumer projectors and delivers the best overall performance:
- Widest color gamut: 90-110% DCI-P3 or partial Rec.2020 coverage. Colors look noticeably richer and more accurate than other technologies.
- High brightness: 3,000-6,000+ lumens in consumer models.
- 20,000-30,000 hour lifespan: Same durability as LED and single laser.
- Best HDR performance: The brightness and color gamut combination makes HDR content look proper.
Triple laser starts around $1,200 and goes up from there. Modern implementations have largely solved the laser speckle (a grainy texture in the image) and rainbow effect (quick color separation flashes) that plagued earlier models, though some people remain sensitive to these artifacts even in newer projectors. If you’re seriously considering a laser projector, try to see one in person first to make sure you don’t fall into that sensitive category.
Verdict: For long-term ownership, avoid traditional lamps unless your budget absolutely demands it. LED works for portable and smaller home setups. Single laser is the sweet spot for most home theater buyers, while triple laser is worth the premium if you’re serious about image quality and have the budget.
Screen Considerations
The question of whether you need a dedicated screen comes up constantly, and the honest answer depends on your projector and expectations.
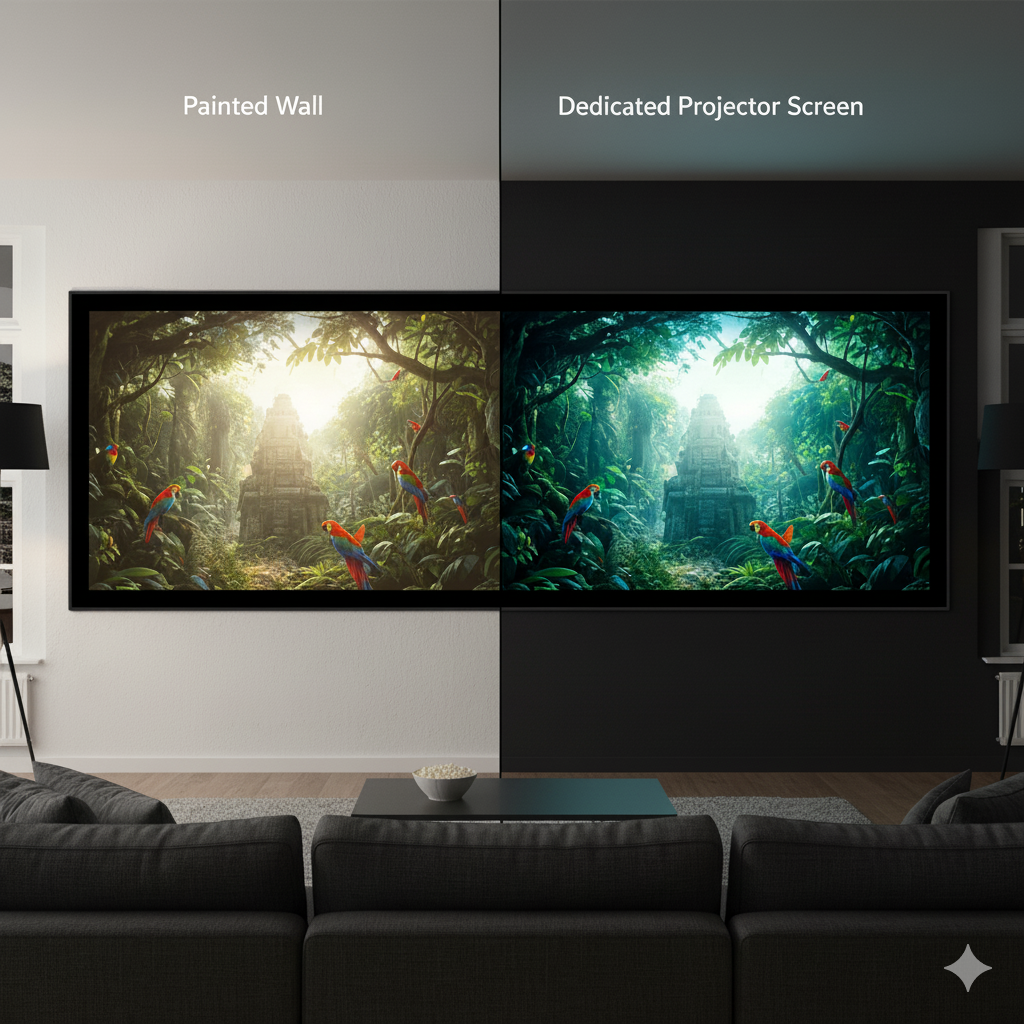
Painted Wall vs Screen
A properly prepared white wall can work, and some people report 5+ years of satisfaction projecting onto eggshell white painted walls with black frames. The image quality won’t match a dedicated screen, but it’s acceptable for casual viewing.
People upgrading to high-end projectors sometimes reconsider their screen situation after years on a painted wall. Shop advice claiming screens “aren’t necessary” turns out to be questionable when you’re dealing with premium equipment.
Walls work for some setups because:
- Flat paint in the right color (matte white or light gray) doesn’t create hotspots
- Perfectly flat walls eliminate ripples that plague cheap screens
- Free (you already have walls)
But walls have limitations:
- No ambient light rejection. All light in the room bounces off the wall equally, washing out the image.
- Color shift, because even “white” paint has a color cast that affects image accuracy.
- Wall texture creates grain in the image visible from closer viewing distances.
- Walls scatter light in all directions while screens direct it back toward your seating area, making images appear brighter from where you sit.
When You Need a Proper Screen
Dedicated screens make a measurable difference, especially with:
UST (Ultra Short Throw) Projectors
These absolutely require specialized ALR (Ambient Light Rejecting) screens designed for UST geometry. ALR screens use special coatings or angular structures that reject light coming from above (room lighting, windows) while reflecting projector light from below directly toward viewers. Without an ALR screen, UST projectors look washed out in any ambient light because standard screens don’t discriminate between room light and projector light.
UST projectors paired with quality ALR screens produce considerably superior images compared to any other projector in rooms with ambient light. The screen actively deflects ambient light while directing projector light toward viewers, maintaining contrast that would be impossible on a white wall or standard screen.
High-end Projectors
If you’re spending $2,000+ on a projector, spending another $300-1,500 on a proper screen makes sense. You’re leaving performance on the table otherwise since even the best projector can’t overcome the limitations of a mediocre projection surface.
Ambient Light Situations
Even mild ambient light benefits from ALR screens, whether you’re using UST or standard throw projectors. They increase purchase cost, but transform usability in non-dedicated theater rooms where complete darkness isn’t practical.
Large Screens (120+ inches)
Wall texture becomes increasingly visible as screen size grows. A 100-inch image might hide subtle texture, but at 150+ inches, every bump and imperfection shows up. A proper screen eliminates this issue entirely.
Screen Types and Features
Once you’ve decided to get a dedicated screen, you’ll encounter several specifications that affect image quality, viewing angles, and how well the screen handles ambient light.
Gain
This measures how a screen reflects light compared to a standard reference surface. In simple terms, it’s the screen’s brightness multiplier. A 1.0 gain screen reflects light equally in all directions, acting as a neutral baseline.
Higher gain screens (1.3-1.5) use reflective coatings or materials that concentrate more light straight back toward viewers, making the image appear brighter from your seating position. The trade-off is a narrower optimal viewing angle since the brightness boost only works when you’re sitting directly in front of the screen.
For UST projectors, ALR screens use directional gain that works differently depending on where light comes from. They might have 0.6 gain from above (actively rejecting room light from ceiling fixtures and windows) but 1.3+ gain from below (reflecting projector light efficiently toward viewers).
Tensioning
A screen works the same way as a bedsheet stretched across a frame. You pull it tight, and the surface stays smooth, but if you let it hang loose, you get wrinkles and waves.
Tab-tensioned screens use springs or mechanical systems to pull the material taut from all sides, keeping the surface perfectly flat. Manual pull-down screens don’t have this system and rely on gravity and their own weight to hang straight, which means they develop waves and ripples over time that show up during viewing.
For standard throw projectors, small ripples barely register because the projection angle is forgiving. UST projectors are different since they sit below the screen and project upward at an extreme angle, turning even tiny waves into visible distortions in the image.
Basic roll-down screens struggle with UST setups because the screen needs to be flat within millimeters for proper image geometry. Tab-tensioned screens maintain that flatness while manual screens rarely do, making a tensioned screen almost mandatory if you’re using a UST projector. Standard throw setups give you more flexibility here.
Material
Matte white is the standard choice because it offers neutral color reproduction and wide viewing angles that work well for most setups. Gray screens sacrifice some brightness to improve black levels, which helps in rooms with mild ambient light since dark scenes look deeper and more detailed.
ALR materials go further by using special angular coatings or lenticular structures to actively reject ambient light, but you need to match them to your projector type. UST ALR screens are engineered differently than standard throw ALR screens because the light hits them at completely different angles, so an ALR screen designed for standard throw won’t work properly with a UST projector and vice versa.
Verdict: For budget projectors under $500 in dark rooms with screens under 100 inches, a properly painted wall works fine. For anything else, budget $200-500 for a decent screen. For UST projectors, budget $400-1,500 for a proper ALR screen. Bottom line: don’t cheap out on the screen if you bought an expensive projector.
Audio Integration
Built-in projector speakers exist, and most are terrible. Even “good” ones with 20-30W output and Dolby Audio branding are adequate at best for casual viewing in small rooms.
Even if you have decent speakers though, getting audio routed properly is a nightmare.
The Audio Routing Problem
Let’s work with this scenario:
Your projector is ceiling-mounted in the back of the room while your soundbar or speaker system is in the front near the screen (where it should be for proper audio staging). How do you get audio from the projector to the speakers?
- Option 1 involves running an HDMI cable with eARC/ARC from the projector to the soundbar. This works, but now you have a cable running across your ceiling or down the wall and across the floor. Many people find this absolutely annoying and not visually appealing, whether in a cable duct or loose. Some resort to temporarily placing the cable when watching, then removing it afterwards.
- Option 2 uses Bluetooth audio. This option is simple, wireless, and needs no cables. The challenge is that Bluetooth is effectively stereo and not a transport for discrete 5.1 or lossless Atmos. Some bars simulate surround, but it isn’t true multichannel over Bluetooth.
- Option 3 tries wireless HDMI adapters. These exist but have terrible reviews since quality is questionable, latency is an issue, and 4K transmission is unreliable.
- Option 4 connects external streaming devices directly to the soundbar, with video sent to the projector. This works if you’re only using external devices (Fire Stick, Apple TV, etc.), but negates the convenience of the projector’s built-in smart features.
The market needs a reliable wireless eARC solution, but one doesn’t exist yet. Even the expensive options feel like overkill just to avoid running a cable.
Newer projectors with Google TV built-in should theoretically need only power cables since apps run internally, but you still end up running cables anyway if you want surround sound..
Budget Audio Solutions
For those who don’t want to deal with external speaker systems, here are your options:
Built-in Audio
This is adequate for bedrooms, portable setups, or casual viewing. Look for 20W+ with Dolby Audio minimum, since anything under 15W will sound tinny and struggle to fill even small rooms.
Bluetooth Transmitters
USB-powered 3.5mm Bluetooth transmitters send audio from the projector to Bluetooth speakers, but most require manual button presses to activate. If your projector is ceiling-mounted, reaching the button becomes annoying fast. Auto-on transmitters exist but can be finicky; expect stereo only and some latency.
Soundbars With Optical or 3.5mm Input
Budget projectors often include 3.5mm audio output, so a $100 soundbar with aux input gives you dramatically better audio than built-in speakers without the complexity of HDMI routing.
For serious home theater, you’ll eventually need to solve the audio routing problem properly by running conduit during installation if possible, or you’ll have to accept the visible cable. For portable and casual setups, you’ll need to work within the built-in audio limitations or use Bluetooth despite its stereo-only output.
Verdict: Don’t buy a projector based on audio quality unless it’s portable and you genuinely can’t add external speakers. Plan your audio routing before buying the projector, and if you need surround sound, budget for an ARC/eARC path (or a wireless ecosystem like WiSA) and any necessary cable runs or mounting.
Smart Features and Connectivity
Modern projectors increasingly include built-in smart platforms, eliminating the need for external streaming devices.
Smart Platforms
The major platforms you’ll encounter include:
Google TV / Android TV
This offers the widest app selection and best content discovery with personalized recommendations. Regular updates from Google ensure continued support, and the interface is intuitive for anyone familiar with Android.
Roku TV
Roku TV has a simple, user-friendly interface with good app selection. It is less customizable than Android/Google TV but more streamlined.
Proprietary Systems
Some manufacturers build their own platforms, though these often have limited app selections and may be abandoned after a few years of updates.
Other Considerations
Modern projectors increasingly include built-in smart platforms, which let you stream Netflix, YouTube, Prime Video, etc, directly without external devices. This used to require a separate Fire TV Stick or Apple TV, but now only budget projectors skip smart features entirely.
Note that official Netflix licensing is a critical distinction. Netflix doesn’t allow its app on just any device, so projectors need certification that typically appears starting around $250+. Without Netflix certification, you can’t install the Netflix app directly, and you’ll need an external device to watch it.
Connectivity Ports
Your projector needs to connect to other devices, and the ports determine what you can plug in and how well things work together.
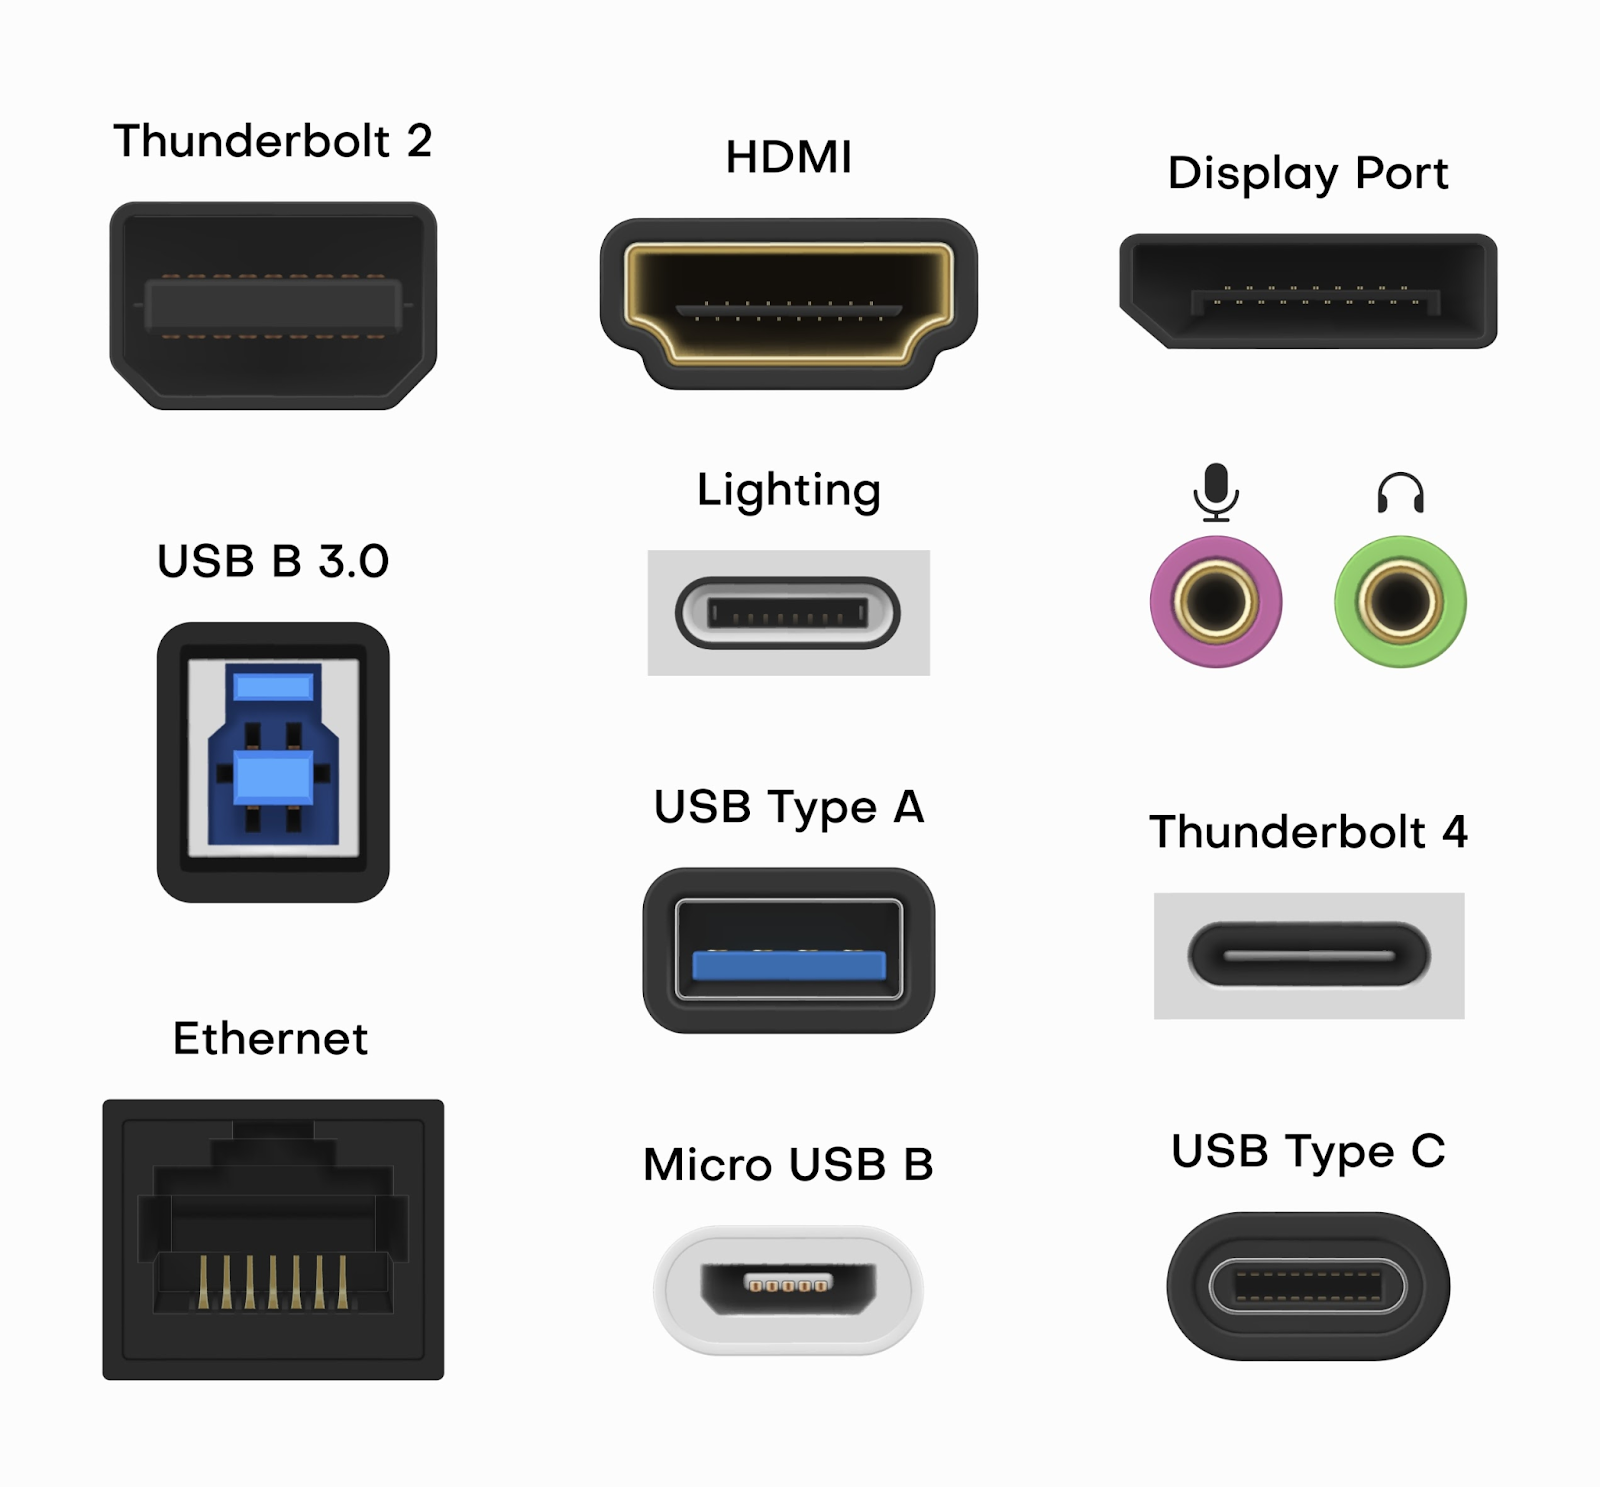
HDMI
This carries both video and audio from game consoles, streaming devices, and Blu-ray players. The baseline is two HDMI 2.0 ports, which handle 4K at 60Hz and work fine for movies and TV. If you want 4K at 120Hz from a PS5 or Xbox Series X, you need HDMI 2.1 in the chain, but note most projectors top out at 4K/60.
HDMI ARC/eARC sends audio to soundbars without running extra cables. ARC stands for Audio Return Channel, which supports compressed 5.1 and many DD+ Atmos streams, while eARC adds the bandwidth for lossless Dolby TrueHD/Atmos.
Multiple HDMI ports matter if you connect gaming consoles, streaming devices, and Blu-ray players at the same time. Single HDMI port projectors force constant cable swapping, which gets annoying.
USB
These ports let you play media directly from flash drives, power streaming sticks, or connect peripherals like keyboards. USB-A is the standard rectangular port you’re familiar with. USB-C only carries video if the projector supports DisplayPort Alt Mode, and laptop charging over the same cable also requires adequate USB-C Power Delivery.
WiFi/Bluetooth
WiFi connects your projector to the internet for streaming apps and wireless screen mirroring from phones or laptops. WiFi 5 (802.11ac) handles most streaming fine while WiFi 6 provides more stable 4K streaming in congested wireless environments like apartments with many networks. Bluetooth enables wireless audio output and lets you connect game controllers or keyboards.
VGA
This is a legacy analog video connection that’s only relevant for business or education environments with older equipment. Home theater projectors skip this entirely.
3.5mm Audio Jack
This is your standard headphone connection for sending audio to external speakers without HDMI. It’s useful on budget projectors that lack HDMI ARC.
Verdict: For home theater, prioritize two HDMI 2.0 ports minimum (one HDMI 2.1 port if gaming), HDMI eARC, and official Netflix certification. WiFi 6 and USB-C are nice additions but not essential.
Build Quality and Durability
Projector build quality is straightforward to assess once you know what to look for.
Materials and Construction
Build quality affects how long your projector lasts and how well it holds up to regular use. Most consumer projectors use plastic housings; metal trim or internal frames appear on some higher-end models. Budget models incorporate more plastic, which isn’t necessarily bad if it’s thick and well-molded. Thin, flexible plastic housing suggests cost-cutting that affects longevity.
You can assess build quality by checking these visible construction details:
- Seams and panel gaps should be consistent. Rough edges or flex indicate weaker construction and can worsen with heat cycles.
- Folding mechanisms on portable projectors need solid stems and handles with tight tolerances. Wobble in folding joints develops into worse wobble over time.
- Ventilation design matters because projectors generate heat and need adequate airflow. Look for visible grilles on the sides or back. Blocked or insufficient vents lead to thermal shutdowns and shortened component life.
Note that portable projectors sometimes face overheating issues during summer in rooms without air conditioning. However, even quality projectors can struggle in hot environments, potentially lasting years with occasional heat-related issues before finally failing.
Fan Noise
Projectors have bright light sources that generate significant heat, similar to how a light bulb gets hot when turned on. Without cooling, the internal components would overheat and fail or shut down to protect themselves. Fans pull cool air in and push hot air out to maintain safe operating temperatures, but this creates noise you’ll hear during viewing.
The question is how much noise can you tolerate? Fan noise is measured in decibels (dB). For reference, normal conversation measures about 60 dB, a whisper is 30 dB, and a library is 40 dB. Every 10 dB increase represents a perceived doubling of loudness, so a 35 dB projector sounds twice as loud as a 25 dB model.
Here’s what buyers can expect:
Eco modes reduce fan speed to lower noise, but they also reduce brightness by 20-30%. This is a common trade-off you’ll need to consider based on your room’s lighting conditions.
Verdict: For home theater, target 30 dB or lower in normal mode. For business or education use where audio quality matters less, 35 dB is acceptable. Avoid anything above 35 dB for extended viewing.
Warranty
Warranty length signals manufacturer confidence and protects you from early failures, which happen more often than they should. Budget projectors usually offer 1-2 year warranties covering basic manufacturing defects, mid-range models extend to 2-3 years, and premium brands sometimes offer 3-5 years.
What’s covered matters as much as the length. Some warranties exclude the light source (lamp, LED, or laser), which is the most expensive component to replace. This is less concerning for LED and laser projectors since their light sources last 20,000+ hours, but lamp projectors with 3,000-hour bulbs and warranties that don’t cover the bulb leave you exposed after just one year of daily use.
Verdict: Target a 2+ year warranty minimum covering major components (motor, light source, electronics, frame). 3-5 years is ideal. Avoid anything without a warranty or with coverage limited only to obvious manufacturing defects.
What Projector Should You Buy?
Based on the details above, different setups demand different priorities:
The Living Room Home Theater Projector
You want movie nights and occasional gaming in a room with some ambient light control, a screen size around 100-120 inches, and mounted or table placement.
Target specs:
- 1,500-2,500 actual lumens (enough for dim room viewing)
- 3,000:1+ native contrast
- 1080p minimum (pixel-shifting 4K if budget allows)
- Single laser or LED light source
- Standard throw (1.2-1.5:1) or short throw if space-limited
- Built-in smart platform with Netflix
- HDMI 2.0 with eARC minimum
- 30 dB or lower fan noise
- Decent built-in audio (20W+ Dolby Audio) or plan for external speakers
- Price range: $800-1,500
This setup handles movies, TV, and casual gaming in a family space where you can have lamps on during setup and dim them for viewing.
The Dedicated Home Theater Projector
Complete darkness control, large screen (120-150+ inches), seating distance 10-15 feet. This is for serious movie watching, not casual TV.
Target specs:
- 2,000-3,500 actual lumens (brightness matters less in complete darkness, but more is still better for HDR and large screens)
- 10,000:1+ native contrast (critical for dark room viewing)
- Pixel-shifting 4K or native 4K
- Single or triple laser light source
- Standard throw (1.3-1.8:1)
- Optical lens shift and 1.3x+ zoom
- HDMI 2.1 for gaming
- 27 dB or lower fan noise
- Plan for external audio system (don’t rely on built-in)
- Dedicated screen (matte white, 1.0-1.3 gain)
- Price range: $1,500-3,500+
You’ll want to ceiling mount this and run cables properly, taking time to set it up correctly once.
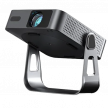
The Portable/Outdoor Projector
For camping, backyard movies, or moving between rooms, this needs battery power or at least easy setup without permanent mounting.
Target specs:
- 500-1,000 lumens (adequate for dark outdoor settings)
- LED light source (durability, instant on/off)
- Battery power with 2.5+ hours runtime
- Auto focus and auto keystone
- Built-in speakers (20W+ Dolby Audio)
- Smart platform with Netflix
- Compact size and under 5 lbs
- 1080p resolution
- Price range: $300-800
Accept compromises on brightness and contrast since portability and convenience are the priorities here.
The Budget Home Theater (Under $500)
You want a big screen experience but can’t spend much. Dark room only, moderate screen size (80-100 inches).
Target specs:
- 800-1,500 lumens (look for honest reviews measuring actual output)
- 1,500:1+ contrast
- 1080p minimum (avoid “supports 4K” marketing for 720p projectors)
- LED light source preferred (avoid lamp replacement costs)
- Standard throw
- Basic smart features or plan for Fire Stick
- Accept higher fan noise (32-35 dB)
- Accept manual focus and limited keystone
- Price range: $300-500
Buy from brands with actual support and warranty while avoiding no-name options claiming impossible specs. Used projectors from quality brands often provide better value than new budget models.
The Gaming Projector
For gaming consoles (PS5, Xbox Series X) or PC gaming with low input lag and fast refresh rates.
Target specs:
- 2,000+ lumens
- 1080p or 4K (native or pixel-shifting)
- HDMI 2.1 (required for 4K at 120Hz)
- Under 20ms input lag
- 120Hz refresh rate
- DLP technology preferred (no ghosting)
- Short throw if playing active games (prevents shadow casting)
- Game mode with minimal processing
- Price range: $700-2,000
Don’t buy a “gaming projector” without verified input lag measurements since marketing claims mean nothing. Look for independent reviews measuring actual lag.
The Business/Education Projector
For presentations in lit rooms, conference rooms, or classrooms with brightness, reliability, and easy setup.
Target specs:
- 3,000+ lumens (critical for lit rooms)
- 1080p or WXGA (1280×800, matches business laptops)
- Standard throw (1.5-2.0:1)
- Lamp is acceptable (easy bulb replacement and lower cost)
- Multiple HDMI ports
- VGA port for legacy compatibility
- Quick auto focus and keystone
- Loud, clear built-in audio (15W+ minimum)
- Durable construction for frequent transport
- Price range: $500-1,500
Warranty and support matter more than image quality since businesses need reliability and quick replacement if something fails.
The Bottom Line
How you plan to use the projector determines what you need, so don’t buy a UST projector for $2,500 when a $600 standard throw projector does what you need. Don’t buy a 500-lumen portable projector expecting to fill a 150-inch screen.
Measure your room, calculate throw distance, and set a realistic budget that includes the screen and audio if needed. Filter by specs that actually fit your space and use case, then read independent reviews that measure real performance.