

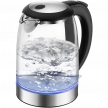


I’ve watched plenty of people buy a gooseneck kettle, thinking any curved spout will do the job. They’re wrong. Pour-over coffee and precision tea brewing rely on controlling where your water lands and how fast it flows. That narrow spout design is functional, not decorative. It lets you adjust your stream width, target specific areas of the coffee bed, and maintain a consistent flow rate from start to finish.
Standard electric kettles dump water too quickly and with almost no control. You can’t execute a proper bloom phase or maintain a steady spiral pour with a conventional spout. If you want to brew a good pour-over, you need equipment built for it. Nothing else delivers the same level of control.
The Spout: Your Most Important Decision
Here’s what separates a $40 gooseneck from a $120 one: spout engineering. The taper, interior diameter, and angle relative to the handle all affect how the water behaves. You’ll see three basic designs on the market, and they perform very differently.
Precision-tapered spouts with flow control give you the tightest stream and the most responsive adjustments when you change your pour angle. The spout narrows gradually from base to tip, and many include an internal restrictor that lets you fine-tune flow rate. These models cost more because tighter manufacturing tolerances require better construction.
Standard gooseneck spouts maintain a uniform diameter throughout. They work fine for basic pour-overs, but don’t give you as much control when you’re trying to hit a specific flow rate.
Wide gooseneck designs look the part but miss the point entirely. If the opening is too large, you essentially have a regular kettle with a curved neck.
I’d put my money on the precision-tapered option every time. The extra $30–$50 translates to better extraction consistency, and if you’re buying specialty coffee at $18–$20 per bag, you’ll taste the difference immediately. Pour-over isn’t forgiving when your flow rate bounces around.
Temperature Control: Dialing In Your Brew
Why Single-Degree Precision Matters
Coffee and tea chemistry shifts fast across small temperature ranges. A 5–10°F change alters which compounds extract first and how quickly. I brew Ethiopian light roasts at 200–202°F, while delicate Japanese green teas do best around 160–170°F. Kettles with only a “boil” button or a few presets lock you into someone else’s idea of ideal temperature.
Digital controls offering 1°F or 1°C adjustments let you test different temperatures and find what actually works for your specific beans or leaves. My ideal pour-over temperature has changed as I’ve bought from different roasters. With preset-only kettles, I’d still be stuck at the generic “205°F” advice that gets repeated everywhere.
Temperature Range and Hold Function
Coffee brewing mostly happens in the 195–205°F range, but tea often requires lower temperatures. Your kettle should reach down to 140–150°F minimum.
The hold function matters just as much. A 60-minute hold is genuinely useful because it lets you brew multiple cups or serve guests without reheating water between rounds. Anything shorter forces you to stop and wait, which defeats the purpose of having precision equipment.
Core Technical Features That Impact Performance
The specs matter because they determine how the kettle performs day to day.
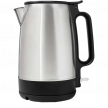
Heating Element Type
Concealed stainless steel heating elements are the clear winner here. They’re sealed off from direct water contact, which means less mineral buildup and longer lifespan. I’ve seen exposed elements develop calcium deposits within months in areas with hard water, and once that happens, heating efficiency drops, and you’ll taste the difference in your water.
Lower-end models use exposed elements to cut costs, but this is the wrong place to save money. A concealed element typically adds $15–$25 to the price, but it pays for itself in lifespan and easier cleaning.
Capacity: The 1.2–1.5L Sweet Spot
You want enough water to brew several cups without refilling, but not so much that the kettle becomes unwieldy. I keep coming back to kettles within the 1.2–1.5L range. It holds three to four cups comfortably, while still giving you good control during the pour.
Anything above 1.5L works against you. The added weight makes precision harder to maintain, especially halfway through a 3–4 minute pour, and your wrist will feel it. Go too small (under 0.8L) and you’ll be refilling constantly if you’re brewing for two.
Choose a capacity that matches your usual batch size and avoid upsizing just because it’s available. Extra volume only makes controlled pouring more difficult.
Power Output and Heat-Up Time
I stick with 1000W minimum. Those minutes add up over weeks and months of daily brewing. Energy cost differences are negligible, so if you’re deciding between similar kettles, higher wattage wins.
Real-Time Temperature Display
Seeing your current water temperature is more useful than simply knowing the target. You need real-time feedback during heat-up and when you’re adjusting on the fly. Large backlit displays that switch between Fahrenheit and Celsius work best. Cheap models often rely on a single indicator light, which offers no precision.
Check if you can read the display from your normal brewing position without lifting or angling the kettle. Cheaper models sometimes mount the readout on the base, which is useless while pouring.
Handle Design and Pour Control
Counterbalanced handles make a bigger difference than most people expect. When you’re holding a kettle at a 45-degree angle for several minutes during a pour-over, poor balance translates directly to wrist fatigue. I’ve used both types extensively, and I can tell you the counterbalanced design reduces strain noticeably.
The handle should position your wrist in a neutral alignment when the spout is at the correct pouring angle. Standard ergonomic handles work, but they often require you to adjust your grip partway through a longer brew, which is exactly when your pour rate starts to get inconsistent.
Built-in flow restrictors give you another way to adjust pour rate beyond just changing your tilt angle. I wouldn’t call them essential, but they do expand your control when you’re switching between brew methods. Fixed-flow kettles do fine if the spout design is engineered properly.
Safety and Build Quality
Auto shut-off and boil-dry protection are baseline features at this point. I wouldn’t buy a gooseneck kettle without them, but they’re not meaningful differentiators either. Every decent model includes both.
Material choice matters far more. Look for 304-grade stainless steel minimum. Lower-grade metals can leach metallic notes to your water, and that gets worse as the kettle ages and the interior picks up patina. Food-safe coatings work in the short term, but stainless steel holds up better. I skip BPA-free plastic models for brewing, where water quality translates directly to taste.
Cordless designs with a 360-degree base are standard now, and for good reason. You need full range of motion for controlled pouring, and fighting a power cord ruins consistency. Make sure the base has enough weight that you can set the kettle down quickly mid-brew without it wobbling.
Warranty length tells you what the manufacturer thinks about their own product. Two years or more signals that they expect the kettle to hold up. Anything under twelve months makes me question the heating element and electronic controls.
Which Gooseneck Kettle Is Right for You?
Match your priorities to the feature set. If you’re brewing pour-over daily and experimenting with different beans, invest in precision temperature control (1-degree increments), a tapered spout with flow control, and a counterbalanced handle. This usually puts you in the $100–$150 range, but you’ll taste the difference in extraction consistency.
Casual users can get good results with variable temperature presets and a standard gooseneck spout. You’re looking at $60–$90, which is reasonable if you’re brewing a few times per week and aren’t chasing the perfect cup every time. Just make sure you’ve got the safety features and at least 1000W of power.
Here’s where I’d save money versus where I wouldn’t. Don’t compromise on spout design or temperature precision – these two features determine your actual brew quality. You can live with a shorter hold time, a basic digital display, or a standard handle if you’re working within a budget. Aesthetics and finish options don’t affect brewing performance at all.
For general brand comparisons and maintenance tips, see our main kettle buyer’s guide. The specs I’ve outlined here determine whether a gooseneck kettle actually delivers on precision brewing or just looks like it should.